You may want to route business calls to different destinations at different times, like working hours, holidays or even lunchtime. The Time Conditions feature on Yeastar PBX system is the feature to achieve that.
What are the Time Conditions used for?
Time Conditions are used to control call flow based on date and time, which can be set up with time groups on Yeastar PBX web interface. A time group is a list of time rules against which incoming or outgoing calls are checked. The rules specify a time range by the: time, day of the week, day of the month, and month of the year.
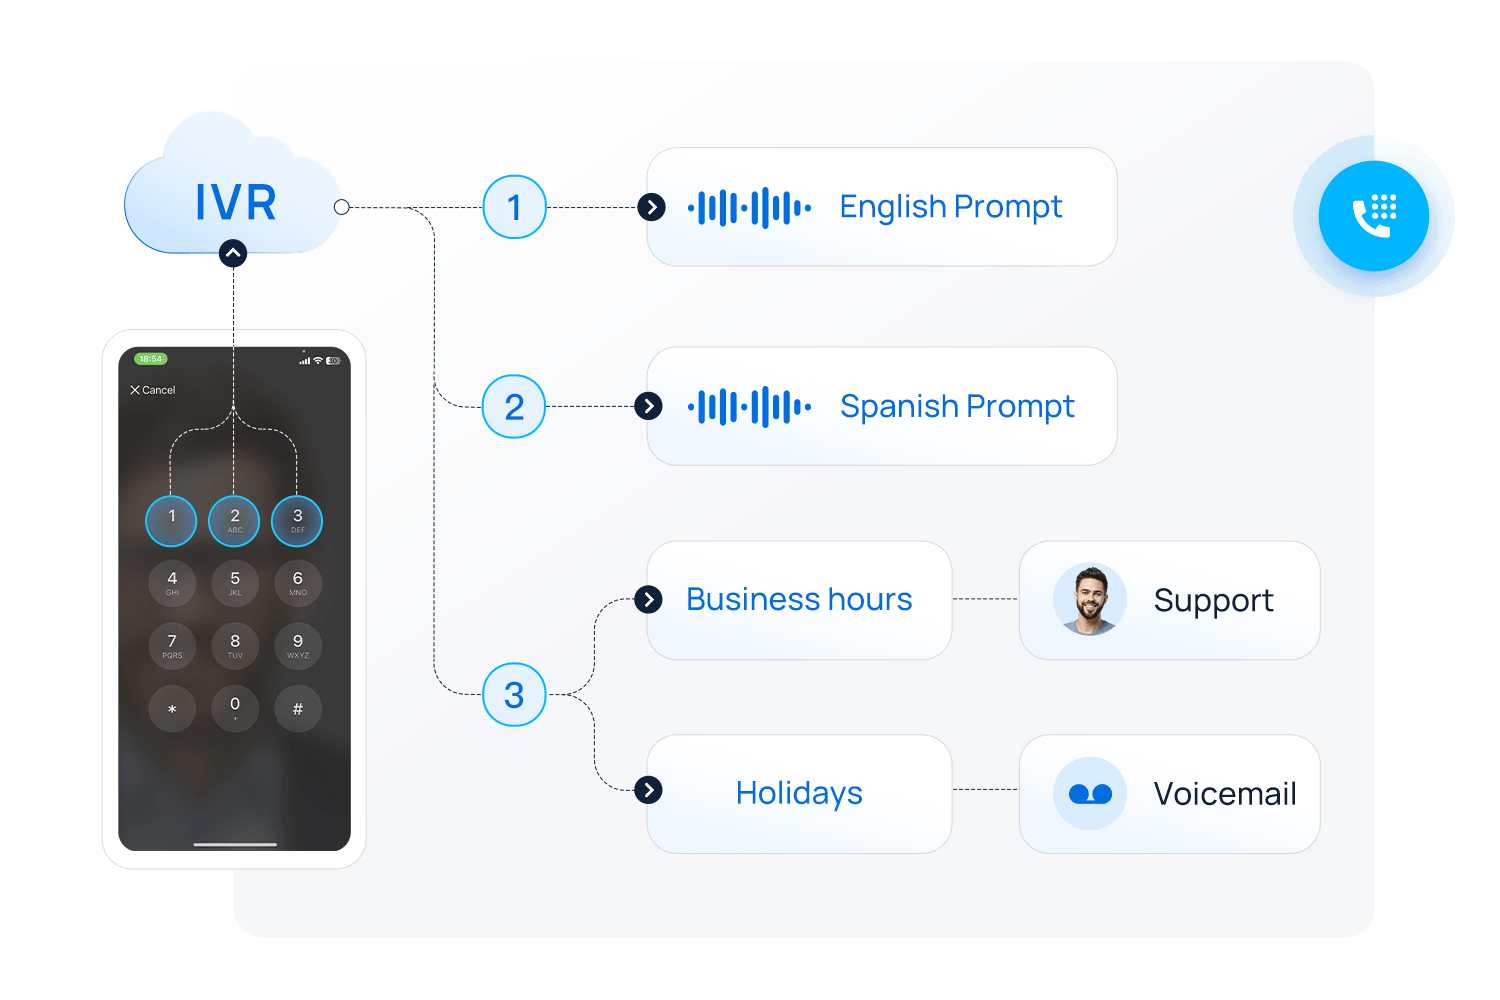
Time Conditions can be assigned to an inbound route and IVR, which controls the destination of a call based on the time. The destination could be Voicemail, Queues, IVR, Inbound Routes, etc. Time Conditions can also be assigned to an outbound route in order to limit the use of that route.
For example, you might create a Time Condition called “Lunch.” You would then select a Time Group that defines what time periods are “lunch,” and then indicate that incoming calls during lunchtime should go directly to voicemail, while calls that do not come in at lunchtime should ring the Front Desk.
Appropriate Time Conditions can not only make your business arrangement more effective but avoid the situation of missing an important call or customer ringing the Front Desk but nobody answers, which might cause a loss to your business.
How do I set up Time Conditions?
Setting up Time Conditions on the P-Series Phone System
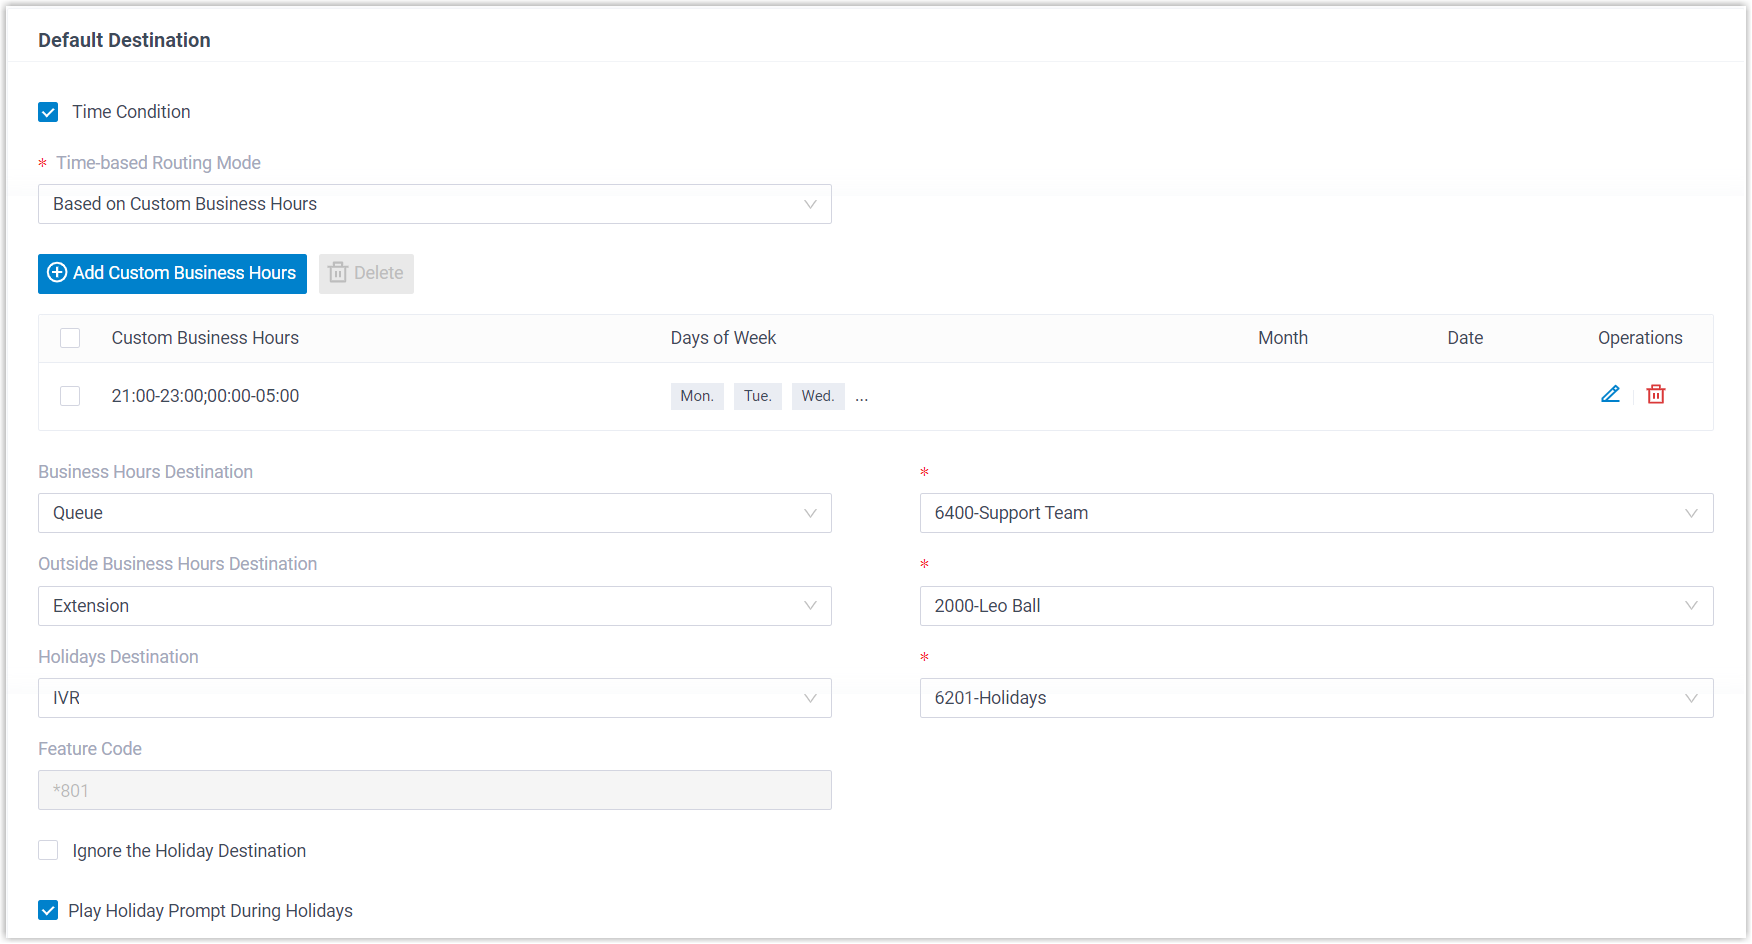
P-Series Phone System supports 3 types of business hours settings and two types of holidays to cater to different business scenarios. After these time conditions are configured, the system administrator can apply them to inbound routes, outbound routes, IVRs, Call Flow Designer and even extensions (to automatically switch extension’s presence status based on the time conditions).
3 Types of Business Hour Settings
- Global Business Hour. The main business hours for your company. Global Business Hours may apply to most of the employees who have fixed work schedules.
-
Custom Business Hours. Typically for scenarios when you have departments with different hours from your main business hours, and when you need to create custom schedules that accommodate each department’s unique hours and call-handling needs.
- Custom Time Periods. Typically used to accommodate the scenarios when you have shift workers with different working hours, and need to route calls to different extensions based on their work schedules.
2 Types of Holiday Settings
- Fixed-date Holidays. Suitable for situations when the holiday date varies every year and doesn’t have a fixed rule like the “First Friday of May” every year.
- Calendar-based Holidays. Suitable for situations when the holiday date has a fixed rule based on the calendar year. For example, every Dec. 25th for Christmas. This way, you don’t have to set up holidays every year.
Configuration Guides
Learn how to configure the time rules and apply them to different call flow settings with the step-by-step guide:
Time Condition Settings on Call Control > Inbound Route
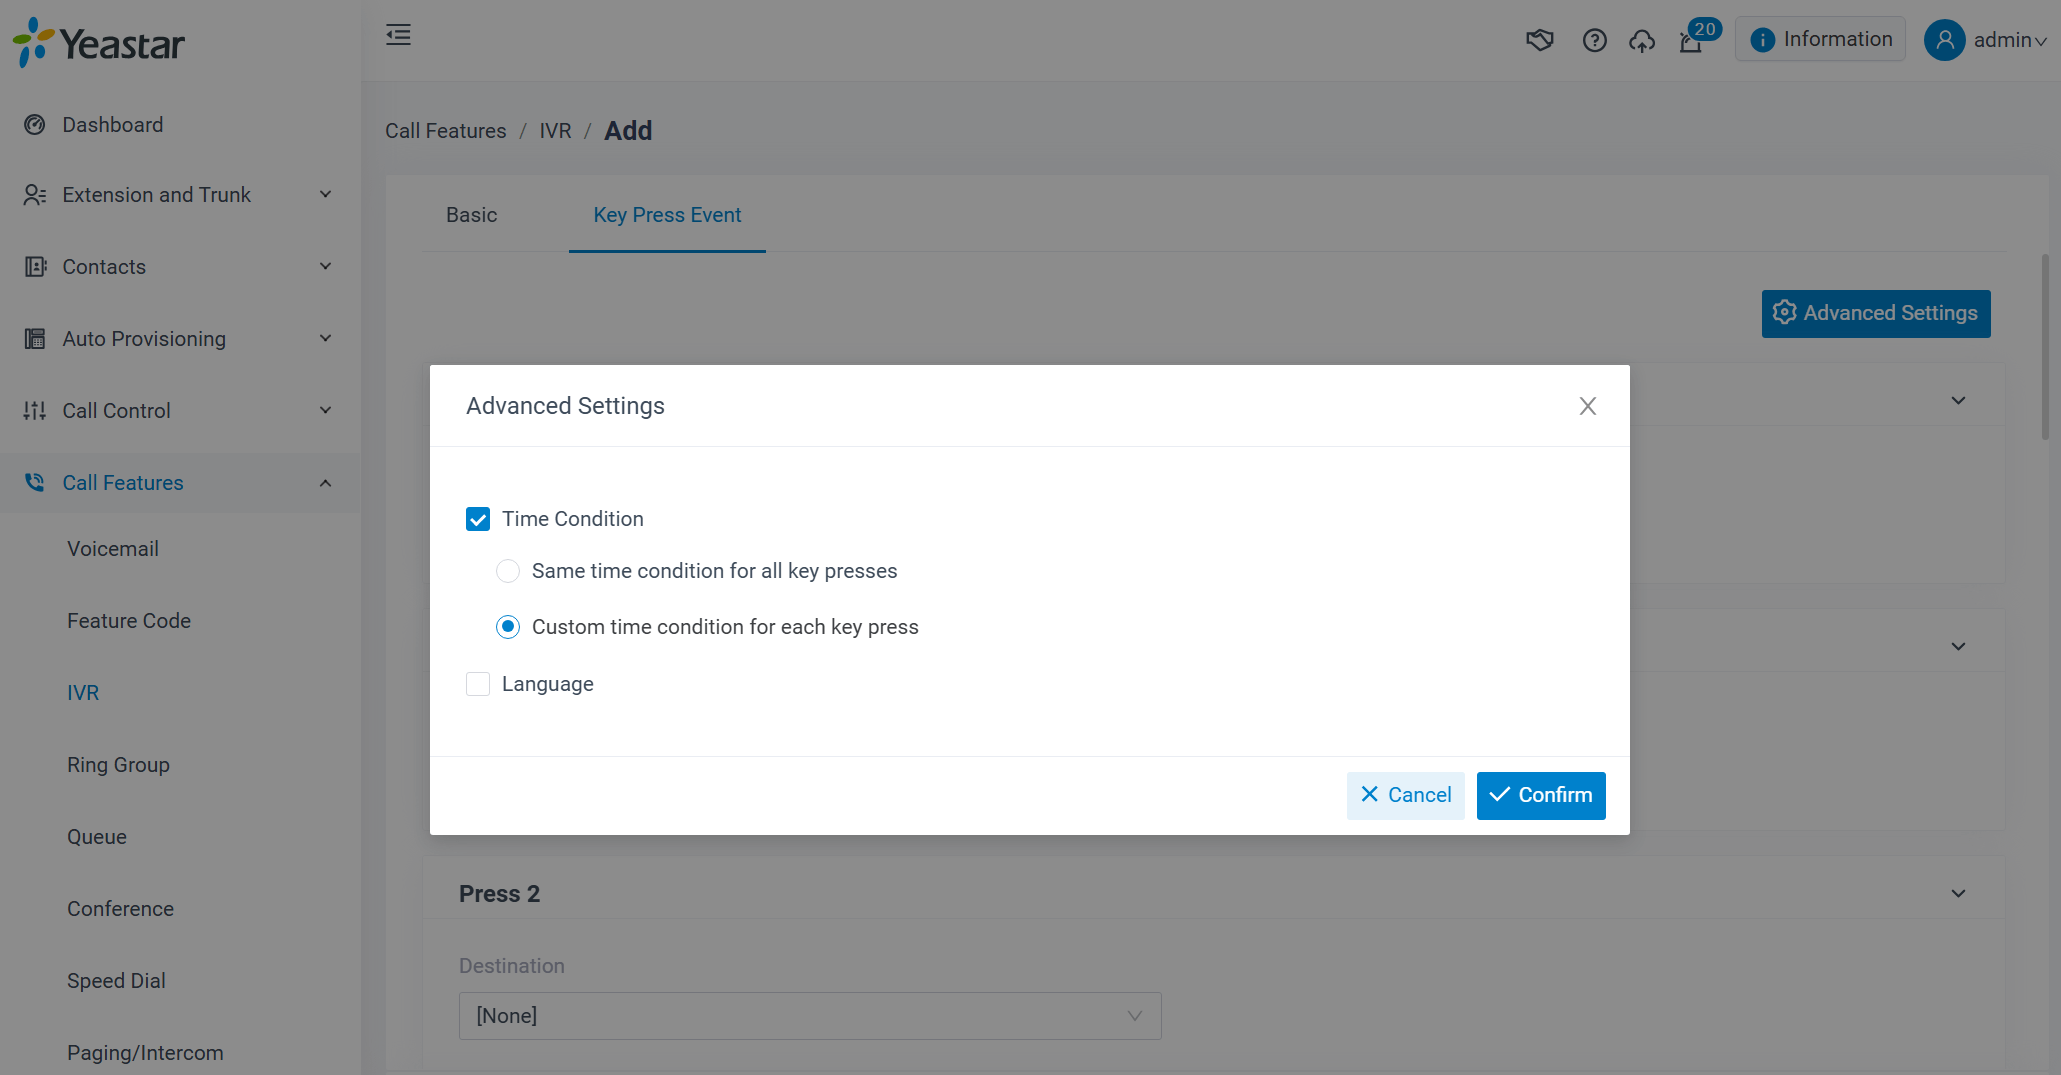
Time Condition Settings on Call Features > IVR > Key Press Event

Setting up Time Conditions on S-Series VoIP PBX
Login to your Yeastar PBX web interface and follow the below instructions to set up time conditions for your business phone system.
1. Add Time Condition
Go to Settings>PBX>Call Control>Time Conditions, click ![]() to add time condition.
to add time condition.

- Name: give this Time Condition a brief name to help you identify it.
- Time: this is where you will define a time range. You can define multiple ranges in the same time group by clicking
 .
. - Days of Week: select a weekday, month day, and/or month range in which you want this time range to apply.
- Advanced Options: this option is disabled by default. If it is enabled, you need to set the month and the day you want the Time Condition to take effect. If it is disabled, it means that the time range defined above will apply to every day of the month, every month of the year.
2. Add a Holiday
After you have defined your office business hours, you may need to create a holiday time groups. For example, you want to create a Holiday for New Year’s Day, from January 1st to January 3rd.
Click ![]() to add a holiday. You can set by specific dates, or a specific day of the week in a specific month through the different type.
to add a holiday. You can set by specific dates, or a specific day of the week in a specific month through the different type.

3. Assigning Time Conditions to Inbound Routes
Path: Settings>PBX> Call Control>Inbound Routes, add a new route or edit the existing route.
The created Time Conditions will become available for selection in the Inbound Routes settings.
- If you disable the Time Conditions in inbound routes, all calls will be routed to the “Destination”.

- If enabled Time Condition, you can route calls to different destinations at different times based on your settings. Calls that do not match the time periods will be routed to “Other Time” destination.

The system will assign each Time Condition with a “Feature Code”, so you can use this code to force a change of destination of a Time Condition and restore to its original destination.
Tips: you can use the feature code to forced switch the Time Condition, in the case like that you need to use Holiday condition in workday. So you don’t need to add a new time condition. After that, you can also use the feature code to restore it to your original setting.
4. Assigning Time Conditions to Outbound Routes
You can also assign Time Conditions to outbound routes, which may help you to control the route that can be used. For example, you can limit the users to make outbound calls when your office is closed.
Path: Settings>PBX> Call Control>Outbound Routes.
5. Time Conditions Override
The Time Condition Override function is used to switch the incoming call routing against the Time Condition. An authorized user can dial the Time Condition feature code to override the time condition.
For example, during office hours, incoming calls go to ring group; after office hours, incoming calls go to voicemail. Users can override the time condition to ring group if they are in the office after office hours.
For more extended Time condition knowledge, please refer to here.
Hi,
I want to enter a holiday, which always have the same date, like 24th December here in Europe, and I want to route all calls to the voice mail boxes, each year (and I don’t want to reenter this type of holiday each year).
Is there a chance?
With best regards
Gerhard
Hi Gerhard,
Yes, this is workable. By setting Time Conditions, you can route your calls to Voicemail, Queues, IVR, Inbound Routes, etc.
We need to run IVR on Working and non-working hours base. Like from 9 to 5 Normal IVR with extension transfer option and from 5pm to 9am message ivr with hang-up option.
How it’s possible?
Hi
Yes, this can be done. Please kindly refer to this document.
Hello,
I’d like to implement an exception to this time conditions for certain numbers. E.g. I want these numbers to be able to call even though its the Lunch break. How do I do this?
Hi, Patrick.
Unfortunately, this feature is currently unavailable.
We recommend that you could submit the requirement on our Feature Request section first: https://support.yeastar.com/hc/en-us/community/topics/200540058-Feature-Requests
As we would like to know if the feature is common for other clients as well.
If we get positive feedback, we would consider adding the feature to the feature version.
I have created 1 time condition for all days of the week from 0800 to 1700 hrs to ring on extension 1000 and other time on extension 1043 and applied to the inbound route.
However calls are always ringing on extension 1043. What is causing this?
Hi Spec,
Please submit a ticket here, and our technical expert will reach you soon.
Hi Spec,
Sorry to hear that. Please submit a ticket here, and our technical expert will reach you.
This doesn’t really explain enough. I can set a new Holiday, but then what happens? I create a holiday for a certain date, and on that date when I test call the main line, I get a particular message that says basically “today is a holiday and we’re closed” where is this coming from and how do I change that message?
The official documentation says “Inbound calls will be routed to the pre-configured destination if the date and time of the calls match the time condition” . . . . WHAT preconfigured destination? There is no such setting.
Hi, Danie B,
I’d like to know this word that you mentioned “message” means voice or text?