

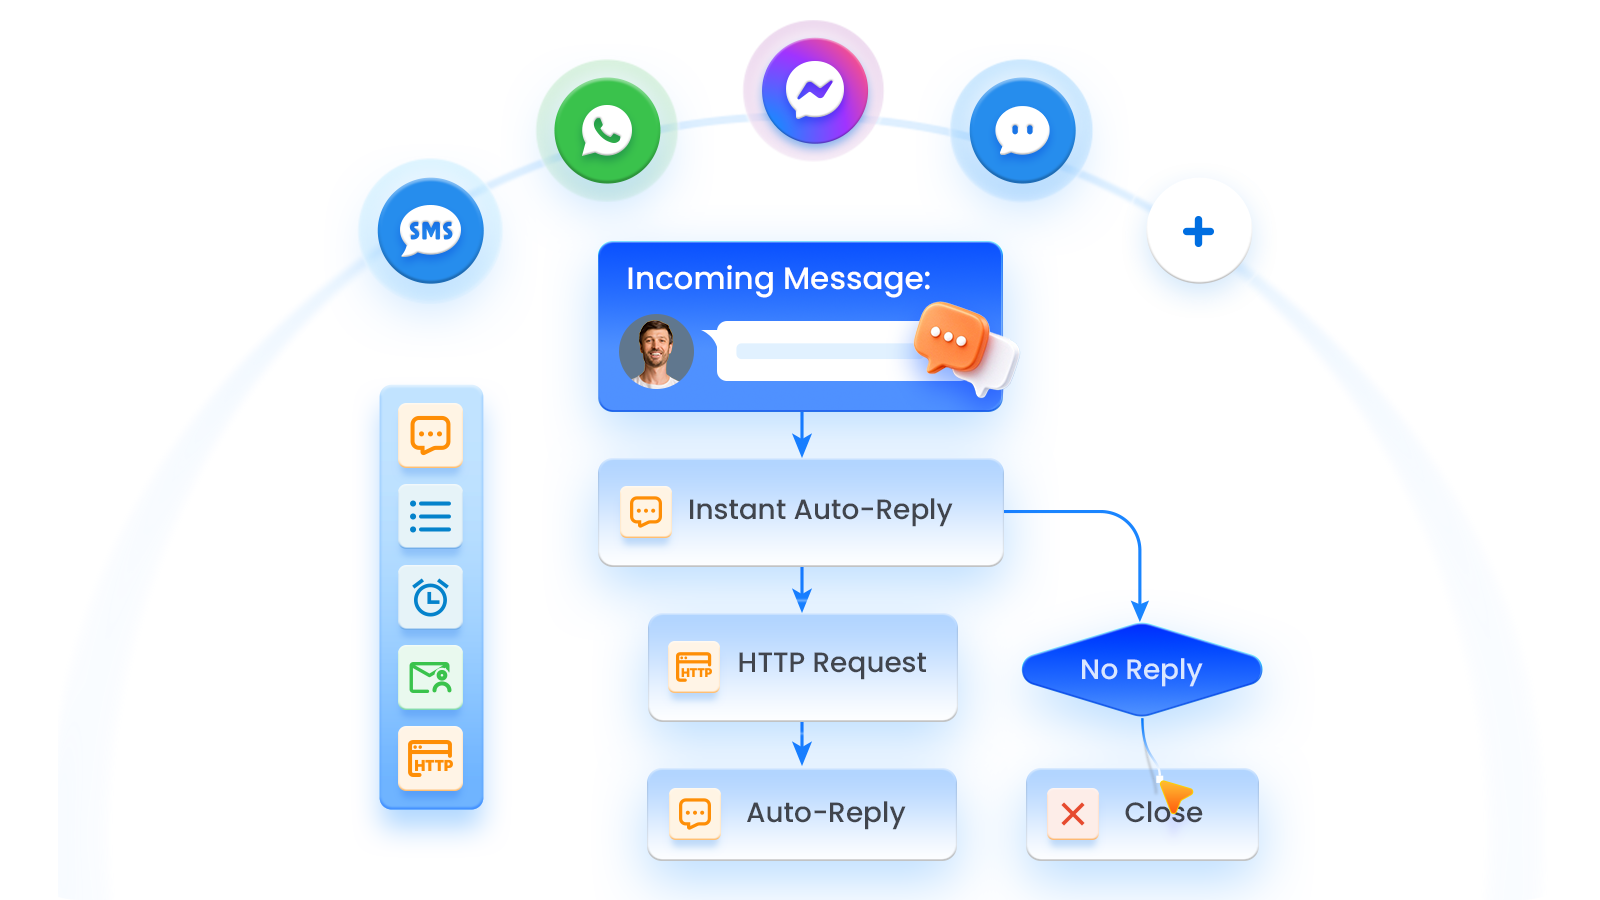
Managing multi-channel customer inquiries just got effortless. Yeastar has introduced the Message Flow Designer for the P-Series Phone System, empowering businesses to build automated reply flows across SMS, WhatsApp, Facebook Messenger, and Live Chat. Every inbound message can now be answered, routed, and followed up automatically, slashing response times for customers and giving hours back to your team.
What Is Message Flow Designer
A message flow designer is a visual tool used to build automated messaging workflows, defining precisely how inbound customer messages are received, routed, and resolved. In the unified communications space, you may also hear it called a chatbot builder, conversation flow designer, or messaging automation platform.
Yeastar Message Flow Designer brings this technology natively into the P-Series Phone System. Featuring an intuitive drag-and-drop canvas, every node directly triggers built-in PBX functionality, whether that’s sending an auto-reply, transferring a chat, or querying an integrated CRM. Fully compatible with SMS, WhatsApp, Facebook Messenger, and Live Chat, it also handles incoming replies from bulk messaging campaigns, ensuring end-to-end automation for all your digital communications.
How Message Flow Designer Works
Built on an intuitive, low-code visual canvas, the Yeastar Message Flow Designer empowers non-technical teams, like marketing, sales, and support, to create and manage messaging flows on their own. However you choose to start (template, scratch, or an existing flow), getting your flow live takes just three main steps:
Step 1: Start Your Message Flow
Begin by selecting a starting point:
- Choose a pre-built template: Pick from ready-made designs for common scenarios, like Route Session by Time, Route Session by Conversation Content, or Order Inquiry.
- Build from scratch or clone: Create a custom flow from a blank canvas, or duplicate an existing one and tweak it.
- Import/export (JSON): Export proven designs as JSON files and import them across channels, sites, or client systems, no rebuild required.
Step 2: Design the Conversation
Drag components onto the canvas, connect them, and configure the wording and logic. Fifteen building blocks cover the full journey from the first trigger to the final handoff:
| Group | Component | What It Does |
|---|---|---|
| Entry | Session Start | Entry point of every flow: fires when a message arrives |
| Customer Interaction | Send Message | Sends an automated reply to the customer |
| Send WhatsApp Template Message | Sends pre-approved WhatsApp template messages (WhatsApp only) | |
| Menu | Displays interactive options and routes based on customer choices | |
| Wait for Reply | Waits for the customer’s response, with timeout handling | |
| Routing & Logic | Business Hours | Routes differently based on your business hours |
| Condition | Branches the flow with logic expressions and variables | |
| Wait | Moves the flow forward automatically after a set time | |
| Loop | Repeats a set of components based on your strategy | |
| Data & Integration | Internal Data Ops | Queries PBX data (extension presence, extension info, company contacts) |
| Database Access | Runs SQL to read or write external databases | |
| HTTP Request | Connects to third-party web services and APIs | |
| Email Sender | Sends email notifications to your team | |
| Conversation Wrap-up | Transfer | Hands the conversation to a destination (e.g., a live agent) |
| Close | Ends the conversation automatically |
Step 3: Link Flow as Your Channel Destination
Assign the completed flow as the inbound destination for your preferred channels: SMS, WhatsApp, Facebook Messenger, Live Chat, or even bulk messaging campaigns. From that point on, every incoming message runs on autopilot.
Want to see it in action? Watch the Demo video to see a message flow built from scratch.
12 Message Automation You Can Build Today
We’ve distilled the most common ways businesses use messaging automation into 12 examples. Use them to understand how the components work together and get ideas for your own flows. The constants, variables, and functions supported in expressions are listed in Constants and Variables in Yeastar MFD Expression.
1. Welcome Message for New Chats
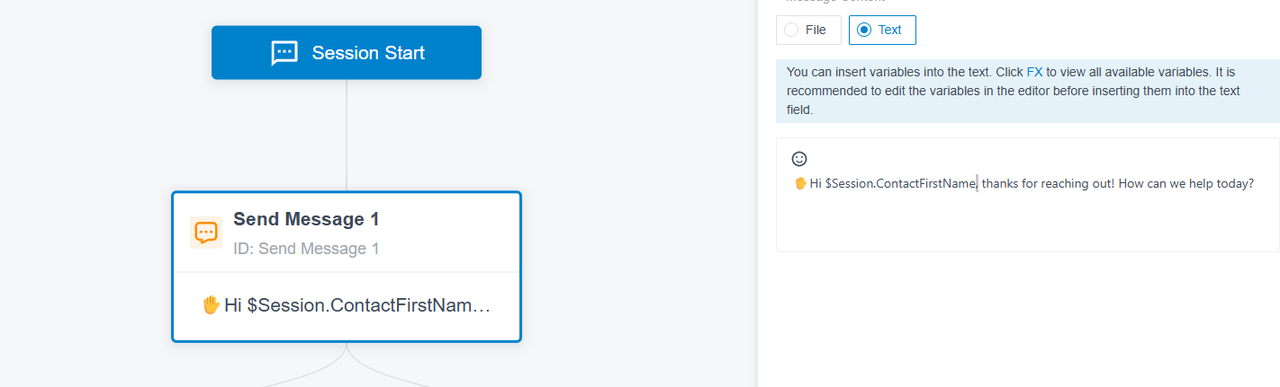
What it does: Greets every customer the moment they reach out on any message channel, and guides them with quick options so the conversation starts structured. First impressions become instant and consistent, 24/7.
Core components: Send Message.
Example: Personalize the greeting with a session variable: Hi $Session.contactFirstName, thanks for reaching out!
2. After-Hours Auto-Reply
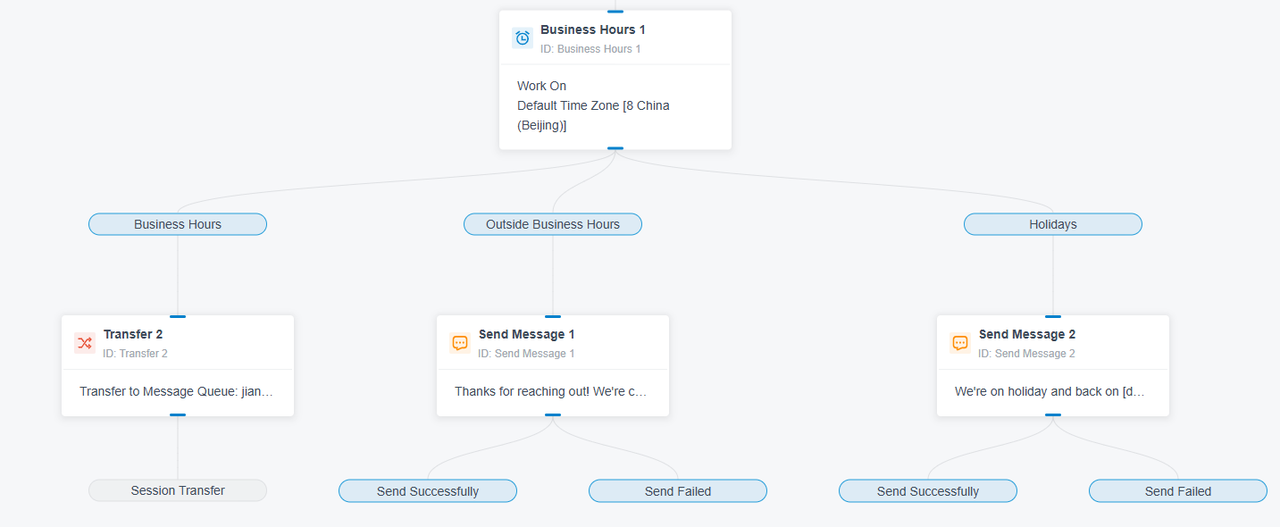
What it does: Answers messages that arrive at night or on weekends, lets customers know when you’ll be back, and invites them to leave a message so no lead ever feels ignored.
Core components: Business Hours + Send Message. Ready to launch with the built-in Route Session by Time template; edit the wording.
3. Frequent Questions Auto-Reply
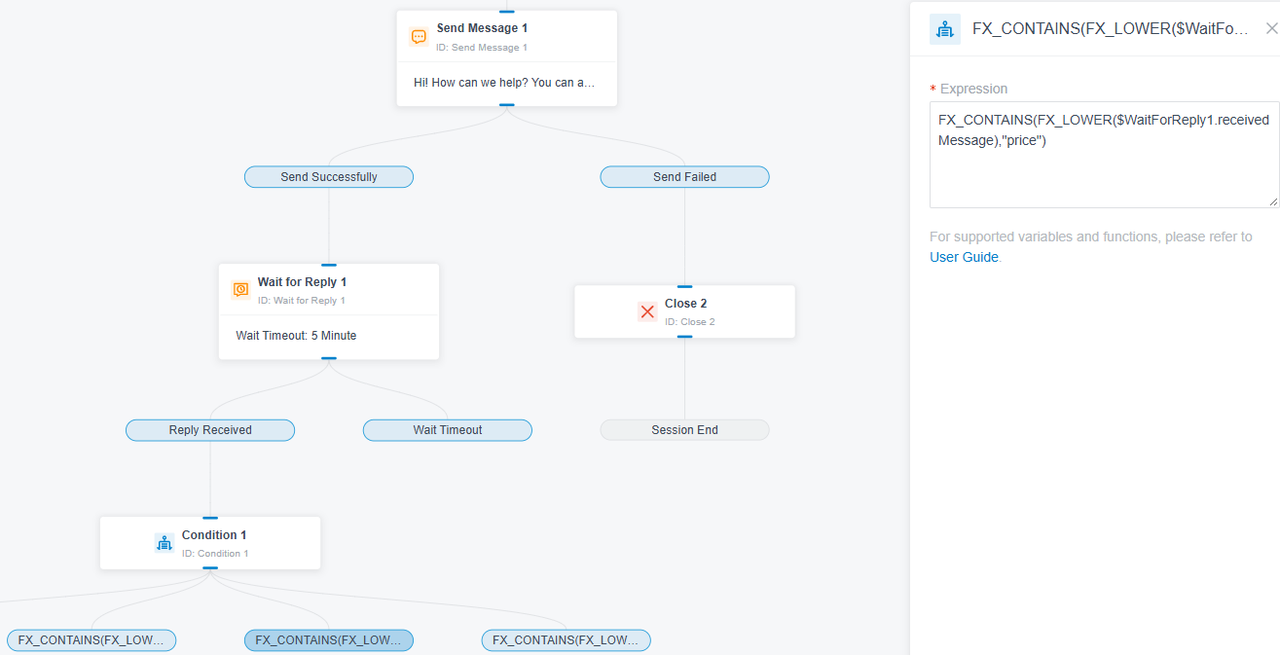
What it does: Detects common keywords in a customer’s message, such as “address,” “price,” or “refund policy,” and sends an instant answer, resolving your highest-volume repetitive questions with less agent time.
Core components: Condition + Send Message. Ready to launch with the built-in Route Session by Conversation Content template.
Example: Add one Condition branch per question type: FX_CONTAINS(FX_LOWER($WaitForReply1.receivedMessage),”refund”) sends your return policy, a second branch with “price” sends pricing, a third with “address” sends your location. FX_LOWER(text) keeps every match working no matter how the customer capitalizes the word, and anything unmatched falls through to your menu or a live agent.
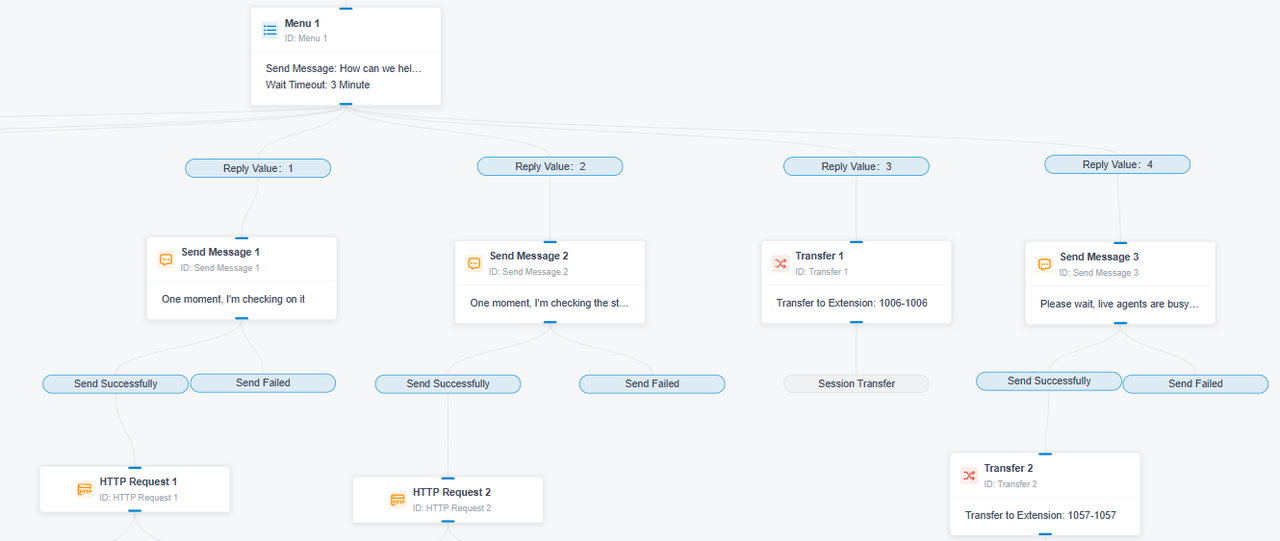
4. IVR-Style Self-Service Menu
What it does: Presents a numbered menu (check an order, request a refund, get support) and routes each choice automatically, with “0” always reaching a live agent. The familiar call-IVR experience, rebuilt for messaging.
Core components: Menu + Transfer.
Example: Set the menu to “1) Check order ID 2) Check order status 3) Support 0) Live agent”, then give each key its own path: key 1 connects to the order-lookup flow in Scenario 10, keys 2 and 3 send automated answers via Send Message, and key 0 transfers the chat to an agent queue.
5. Smart Inquiry Routing
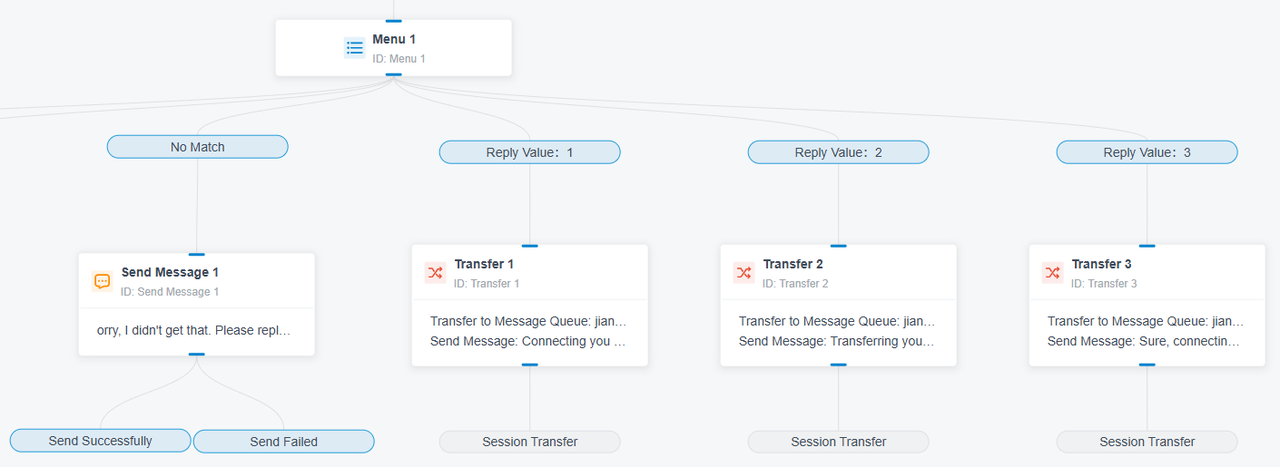
What it does: Lets customers pick what they need (pre-sales questions, after-sales support, or talking to sales) and sends them to the right team on the first touch. No more manual triage or bouncing between departments.
Core components: Menu (or Condition for keyword-based intent) + Transfer.
Example: Offer the menu “1) Pre-sales 2) After-sales 3) Sales”, then give each menu branch its own path: reply 1, 2, or 3 transfers the chat directly to the matching team’s queue, and the No Match branch re-prompts the customer to choose again.
6. Targeted Product Campaigns with Automated Follow-Up
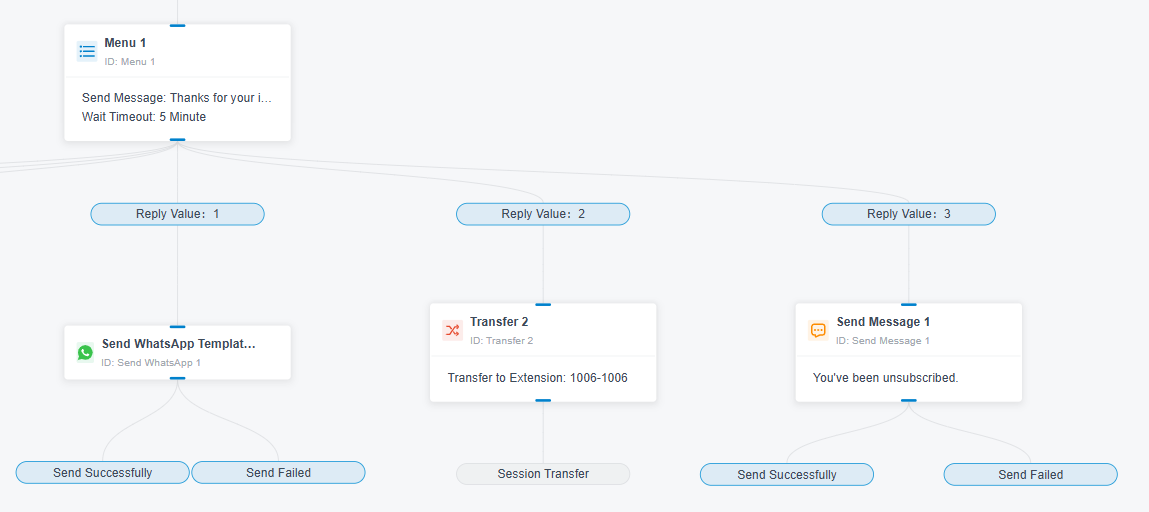
What it does: Sends a promotional WhatsApp template to a customer segment, then handles every reply automatically. A menu sorts interest (learn more, buy now, unsubscribe), and hot leads go straight to sales. Your broadcast becomes a two-way conversion funnel.
Core components: Send WhatsApp Template Message + Menu + Transfer.
Example: Fill the template’s variables with flow data, such as greeting each recipient with $Session.contactFirstName, then let the menu sort the replies: “1” sends product details in a follow-up WhatsApp template, “2” transfers the chat to sales, and “3” confirms the unsubscription.
7. Delivery Updates with Exception Handling
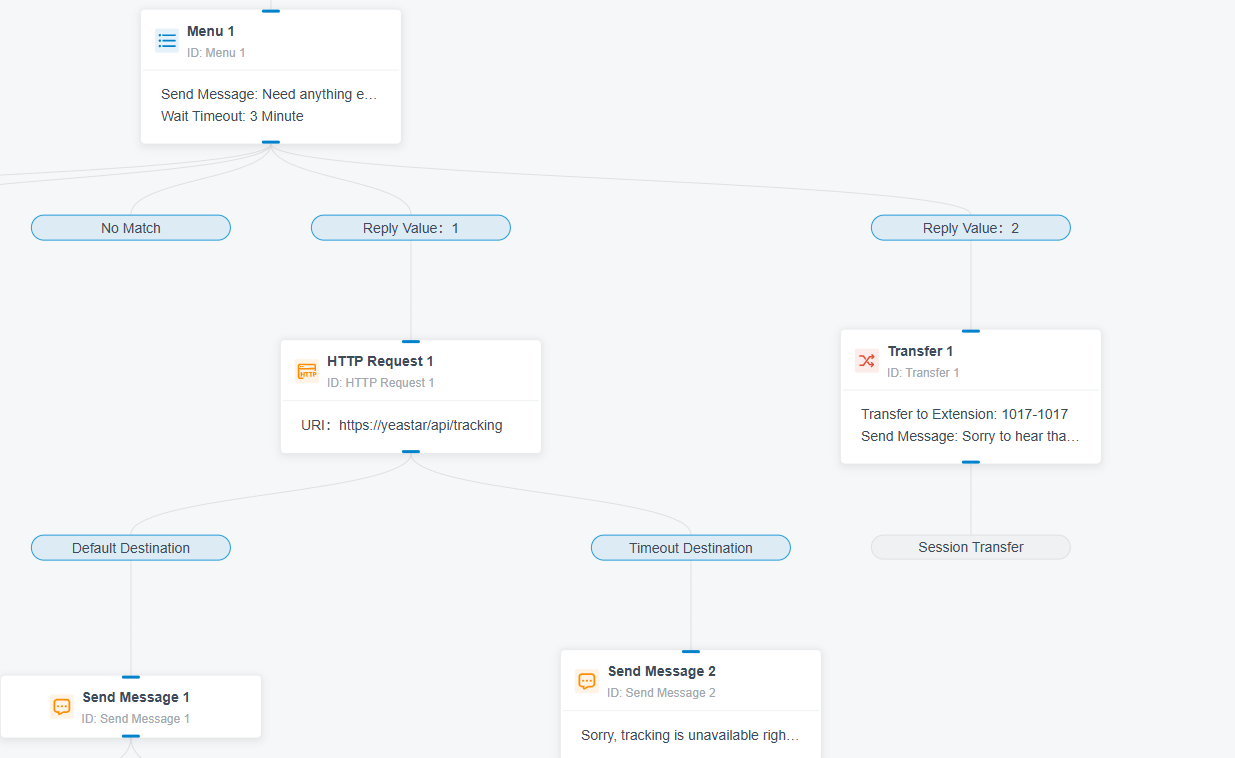
What it does: Notifies customers when orders ship, complete with tracking links. If someone reports a problem, the flow escalates to a human instantly, before frustration turns into a complaint.
Core components: Send WhatsApp Template Message + Menu + Transfer.
Example: Add a menu line “Reply 1 to track your package, 2 to report a problem”: reply “1” checks the tracking status via an HTTP Request, and reply “2” transfers the chat to a support agent right away.
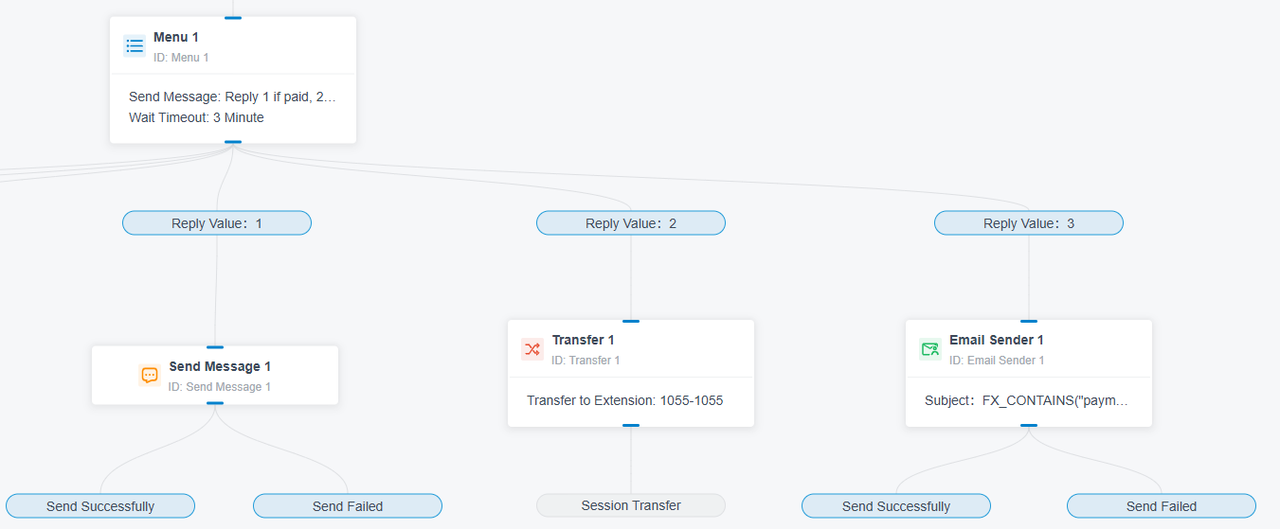
8. Payment Reminders That Handle Replies
What it does: Sends friendly due-date reminders with payment links, then lets customers reply paid, need help, or need more time. Each path is handled automatically, with the right cases routed to your finance team, so collections stop depending on manual follow-up.
Core components: Send WhatsApp Template Message + Menu + Transfer.
Example: Each reply gets its own path: “1” (paid) sends an automatic thank-you via Send Message, “2” (need help) transfers the chat to your finance team, and “3” (need more time) notifies finance by email so they can follow up with the customer.
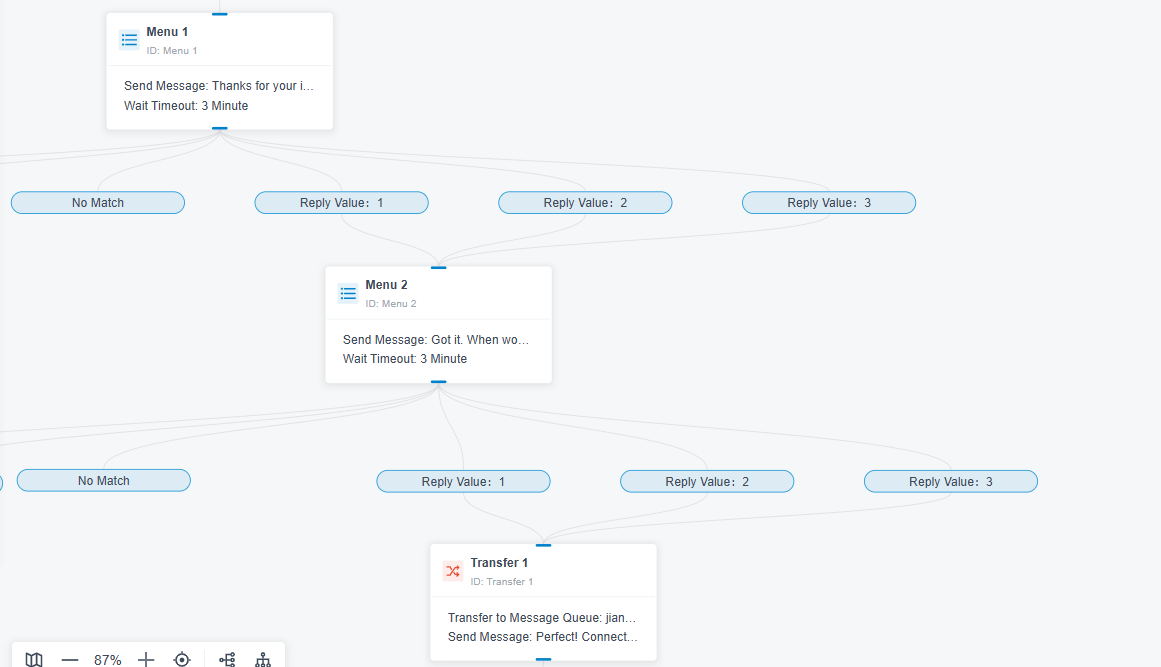
9. Appointment Request Intake
What it does: Collects the service type and preferred time slot through a short menu sequence, then hands the conversation to scheduling staff with all the details already captured. No more back-and-forth just to book a slot.
Core components: Menu + Transfer.
Example: Chain two Menus; the first asks for the service type, the second asks for the preferred time slot. Insert both answers into the Transfer message with $Menu1.receivedMessage and $Menu2.receivedMessage, so the scheduling agent sees the details before picking up the chat.
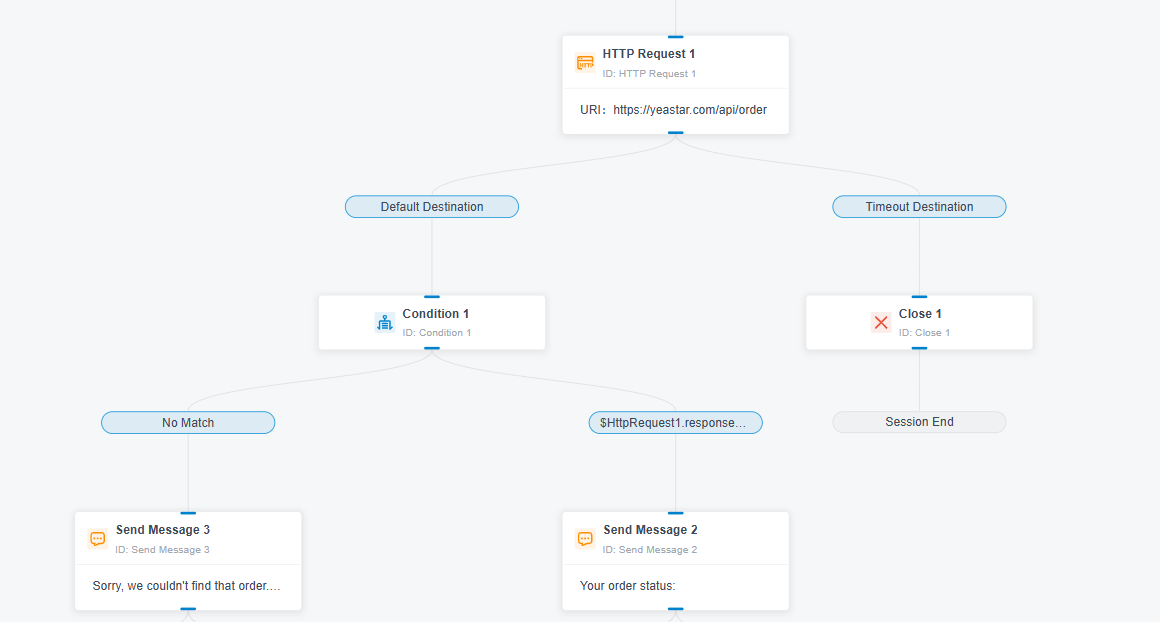
10. Self-Service Order Status
What it does: Lets customers send an order number, checks your system automatically, and replies with the status instantly, no agent involved.
Core components: HTTP Request + Condition + Send Message. Ready to launch with the built-in Order Inquiry template.
Example: Pass the collected order number $WaitForReply1.receivedMessage into an HTTP Request to your order system; a Condition checks FX_EQUAL($HttpRequest1.responseStatusCode,”200″): on success, Send Message replies with the parsed result, for example FX_JSON_GET_STRING($HttpRequest1.responseContent,”status”); on failure, the chat transfers to an agent instead of leaving the customer hanging.
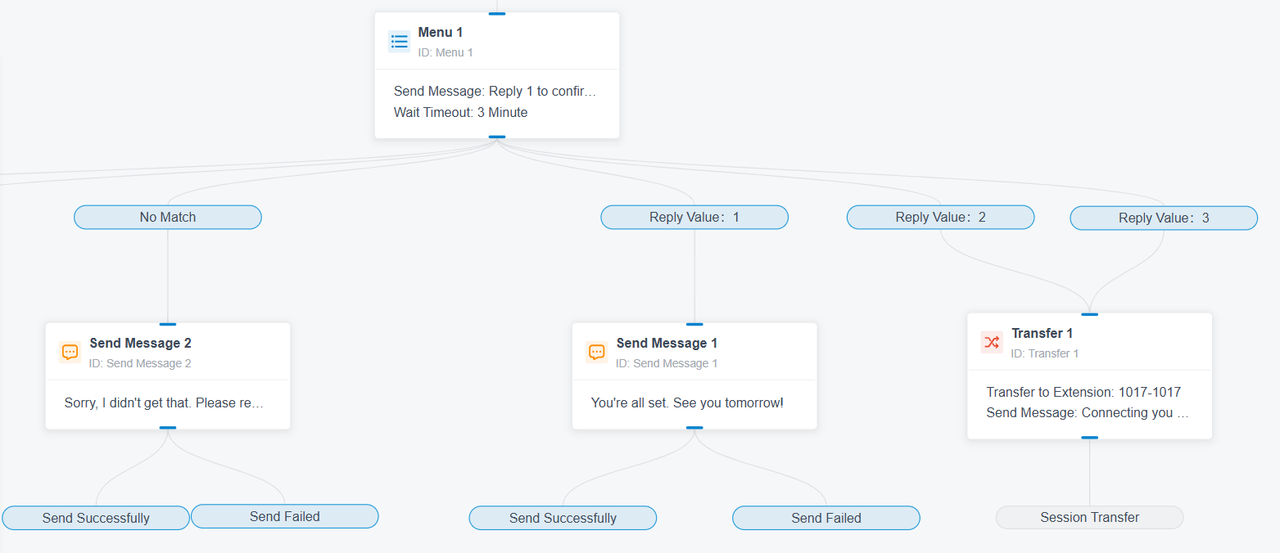
11. Appointment Reminders and Confirmations
What it does: Sends a reminder the day before an appointment (“Reply 1 to confirm, 2 to reschedule, 3 to cancel”). Confirmations close automatically; changes route to your front desk. A complete booking lifecycle without phone calls.
Core components: Send WhatsApp Template Message + Menu + Transfer / Close.
Example: Reply “1” sends a confirmation message via Send Message and ends the session with Close; “2” or “3” transfers the chat to your front desk to rearrange the appointment.
12. Customer Satisfaction Follow-Up (CSAT)
What it does: Invites a quick rating after an issue is resolved. Happy customers get an automatic thank-you; low ratings alert a supervisor by email and connect the customer to a human for service recovery, before they churn.
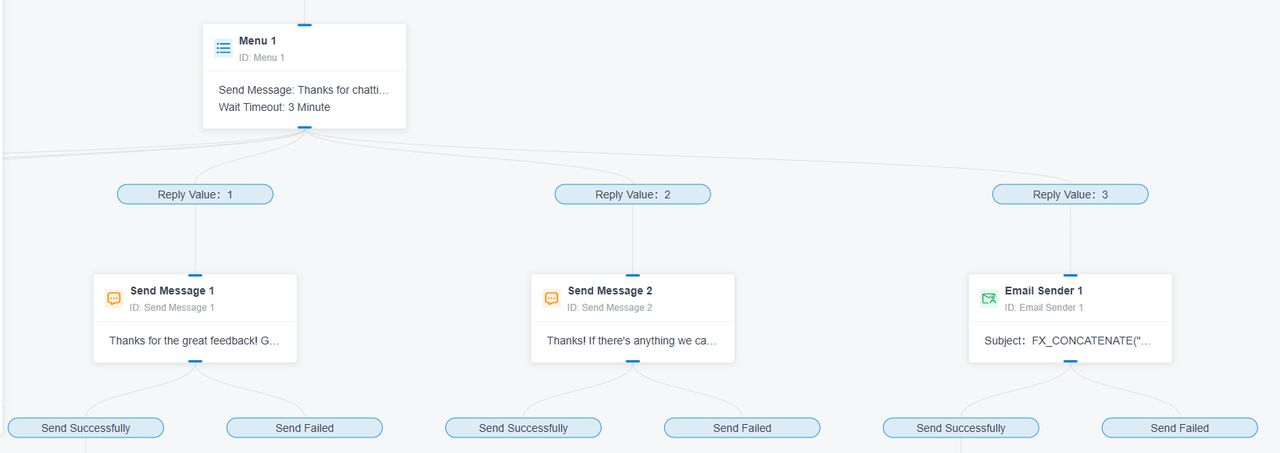
Core components: Menu + Email Sender + Transfer.
Example: Reply “3” is caught by its own menu branch: the Email Sender alerts a supervisor, with a subject like FX_CONCATENATE(“Low CSAT from “,$Session.contactNumber) to identify the customer, and the chat transfers to a human for service recovery.
Start Automating Your Messaging Today
Message automation is no longer a large-enterprise luxury. With Message Flow Designer, anyone running the P-Series Phone System can put SMS, WhatsApp, Facebook Messenger, and Live Chat on autopilot, using drag-and-drop components and ready-made templates.
Whether you’re automating your own customer communications or looking to deliver more complete communication solutions to your customers, the best way to understand it is to try it. Start your 30-day free trial today and build your first message flow in minutes-pick a template, customize the wording, and watch your first automated conversation go live.