

Since its launch in July, the Yeastar P-Series PBX Call Flow Designer (CFD) has been making waves. Customers have quickly adopted it, starting with built-in components to automate everyday tasks, then moving on to Developer tools and third-party integrations to push workflow automation even further.
This is exactly why we built Call Flow Designer (CFD): to let your PBX react, route, and act automatically—without coding hurdles or steep learning curves. It’s designed so anyone in the industry can build workflows that are simple to create yet powerful enough to adapt to evolving business needs.
Whether it’s setting up a basic process in just minutes or building multi-branch workflows with advanced logic, CFD flexes to fit your needs.
In this article, we’ll share practical use cases—from straightforward examples to more advanced scenarios—and spark ideas for how automation could seamlessly integrate into your business.
Catch Every Part of This Blog
- 2 Template Examples for Your First Automation →
- 2 Advanced Examples with Integration →
- 1 Mastery Example of DIY Destinations →
- CFD Quick Start Resources →
5 Minutes to Your First Automation
Getting started with Call Flow Designer doesn’t have to be complicated. Your first workflow can be as simple as routing calls based on time or following a clear, linear process—common needs in almost every business. In business, managing multiple workflows or switching between different tools could take hours. With CFD, you can set them up in minutes.
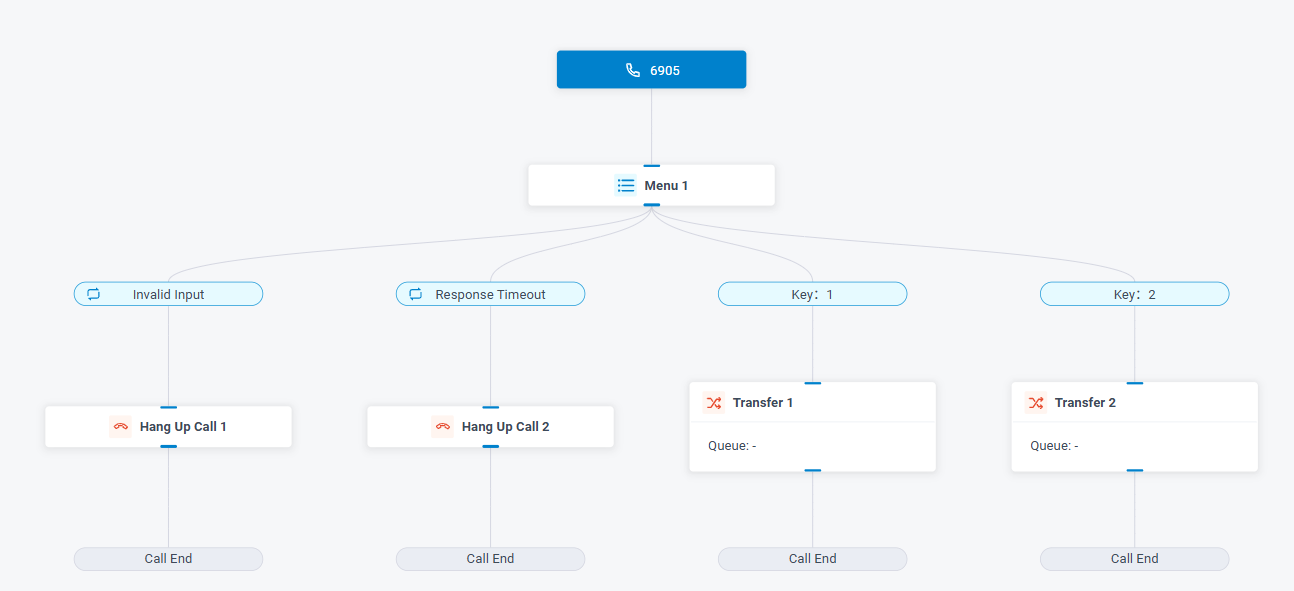
Example 1: Linear Flow
Suppose you want incoming calls to be routed to different queues based on the caller’s choice—for instance, sending them to the technical support team, directing them to the sales team, or other destinations for optimized handling.
With CFD components like Menu, Prompt / Text-to-Speech (TTS), Voicemail / Recording, and Queue—even using a built-in template—you can set up this workflow in just 3 steps:
1.Open the CFD interface and start from scratch or select the Linear Call Flow template.
2.Configure your call menu and assign actions for each option. For example:
- Invalid input or timeout → play a prompt, then hang up.
- Caller requests a live agent → route to the appropriate queue.
3.Review and test the flow to ensure every step works as intended.
In just a few minutes, you’ll have an effective linear call flow that prioritizes and segments calls from the start—reducing wait times and easing your team’s workload.
Example 2: Holiday Auto-Switch
Another quick win is handling calls during holidays or outside working hours. The goal is to clearly inform callers of your availability and give them a way to leave a message.
With CFD’s Time-Based Call Flow Template, you can do this in just a few steps:
1. Start with the prebuilt template.
2.Set call destinations for different time periods. For example:
- Business hours → route to a queue or specific agents.
- Outside hours/holidays → play a holiday greeting or send the call to voicemail.
3.Add optional alerts by using the Developer tool to trigger an email notification to the admin whenever a voicemail is left—ensuring prompt follow-up.
This way, every caller feels acknowledged—no matter when they reach out.

Thanks to CFD’s drag-and-drop interface, setting up workflows like these is easier than ever, cutting workflow configuration time by up to 70%.
Beyond these two quick-start scenarios, CFD comes with 4 native prebuilt templates—including Linear Call Flow, Time-Based Call Flow, Certified Call Flow (route calls by evaluating user input against pre-defined expressions), and Database Authentication (route calls by validating user input against database)—plus 22+ native action blocks for call handling, flow control, developer integration, and more. With these tools, you can design, customize, and deploy even complex call flows in minutes.

Add Depth: APIs + Database Integration
Beyond fixed, template-based flows, many real-world scenarios require deeper flexibility—such as integrating your PBX with a CRM, Helpdesk, or AI-powered tools. This allows you to create advanced workflows like order lookups, shipment tracking, or customer-specific routing.
With CFD’s Developer components and API support, these integrations are not only possible but also straightforward to configure. Let’s walk through two common examples.
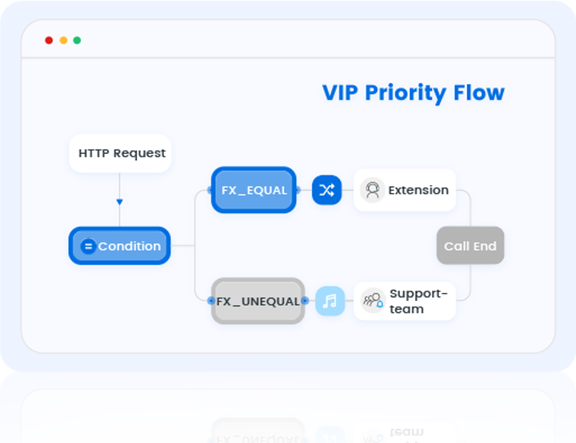
Example 1: VIP Caller Recognition & Priority Routing
No company wants to risk losing a VIP customer. The faster your team can answer their calls, the better the service experience. Using CFD, you can build a “fast lane” for VIPs—routing them directly to their dedicated account manager instead of the general support queue.
How to configure it:
1. Capture the caller’s number (DID or Caller ID) as soon as the call reaches your PBX.
2.Send a CRM lookup request – Use the Developer (HTTP) component to query your CRM for the customer’s status. For example:
FX_CONCATENATE(“https://crm.example.com/check-caller?callernum=”,$Session.ani)
3.“Get” the CRM response – The CRM returns data indicating whether the caller is a VIP.
4.Evaluate the result – Use the Condition component to route calls accordingly:
- FX_EQUAL($HttpRequest1.responseContent,”FOUND”). Then send directly to the specific extension or account manager.
- FX_EQUAL($HttpRequest1.responseContent,”NOTFOUND”). Then continue through the standard customer support queue.
5.Add a personalized greeting (optional) – Use Text-to-Speech (TTS) or a pre-recorded prompt to acknowledge the VIP caller before routing them to the right support path.
This ensures VIP customers get immediate, personalized service with minimal manual effort.
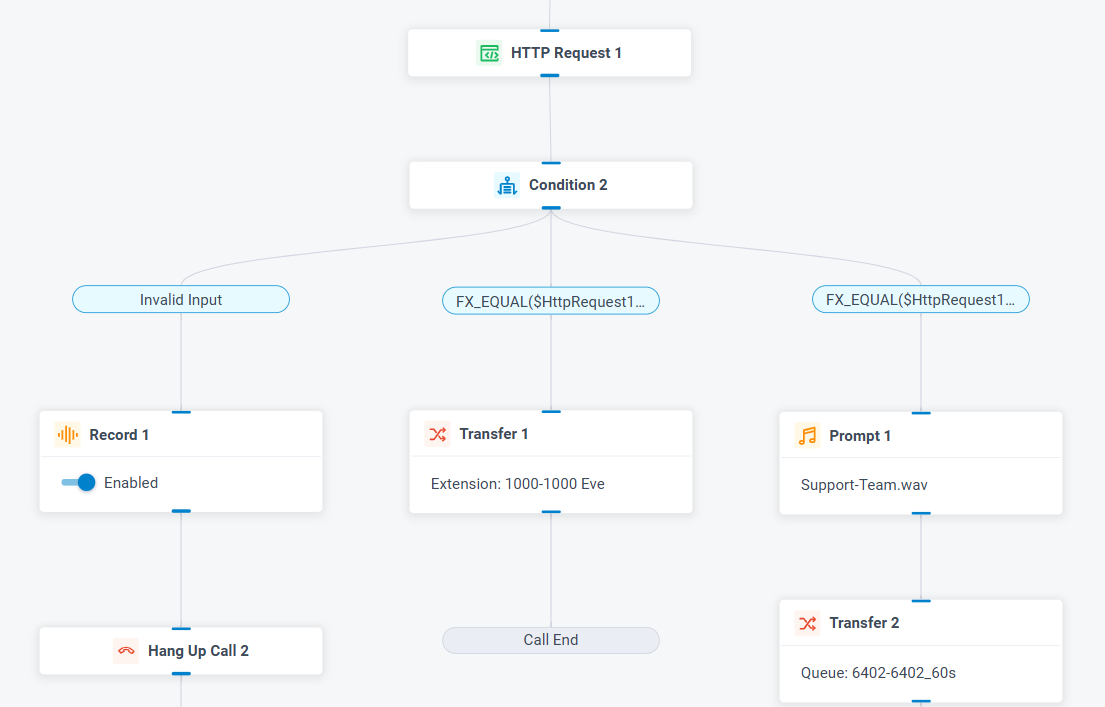
Example 2: Self-Service Order Lookup
Sometimes, you don’t have enough agents to handle every customer call. Wouldn’t it be great if your PBX could act as an intelligent assistant—instantly pulling data and providing answers without human intervention?
With CFD, you can integrate your PBX with your order management system to verify an order’s status and then guide the caller using fixed audio prompts or related notifications.
For example:
1.When the call comes in, the system plays an instructional recording asking the caller to enter their order number.
2.Use the Developer (HTTP) component to send a request to your order management platform. For example:
FX_CONCATENATE(“https://orders.example.com/check?ordernum=”,$Session.ani)
3.Receive the order status – The system returns whether the order exists and if it has been shipped.
4.Evaluate the result – Use the Condition component to respond accordingly:
- FX_EQUAL($UserInput1.userInput,200). Retrieve the order status and play a TTS or pre-recorded message such as: “Your order is being processed. For delivery details, please contact our support team.”
- FX_NOT_EQUAL($UserInput1.userInput,200). Play a fixed message such as: “We could not find your order number. Please check and try again, or speak to an agent.”
In real-world scenarios, there must be more complex conditions and varied responses. The power of CFD lies in its flexibility—you can easily fetch or push data from/to any third-party platform that supports APIs.
In HTTP Requests, P-Series Call Flow Designer supports 7 request types (GET, PUT, DELETE, etc.), over 10 content types (application/json, text/css, image/png, etc.), and request variables for dynamic data handling.
This means you can restructure, optimize, and connect workflows without limits, creating automated processes that save time, reduce manual work, and deliver consistent customer experiences—day or night.
Beyond Getting Calls: DIY Destinations & Action Push Engine
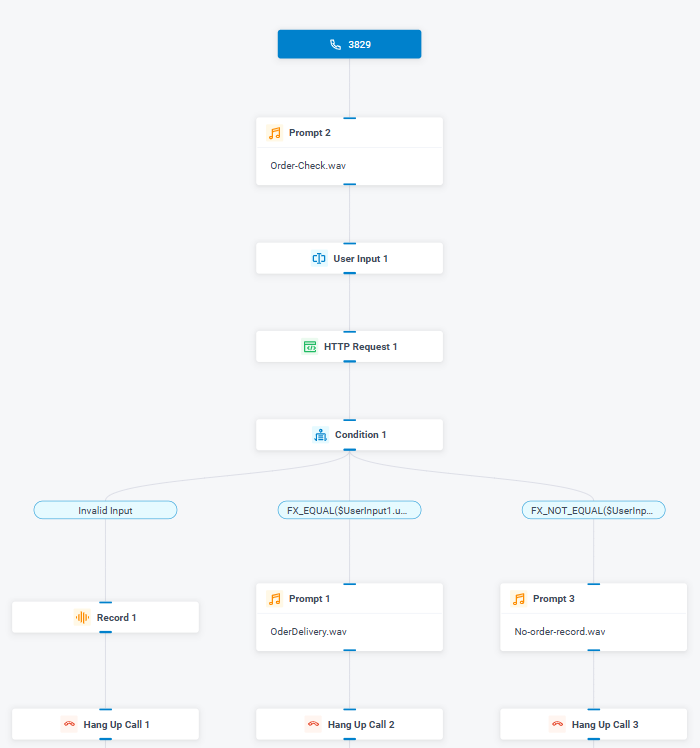
As we’ve explained the automation power of Call Flow Designer, another question often comes up: Can we have a final “push” action or DIY call flow destination?
The answer is absolutely yes! Businesses often need this kind of flexibility. For example, one of our partners wanted their PBX to automatically push a call to the related sales rep when a customer requested a specific contact.
How to DIY this destination with CFD:
1.When the call comes in, the PBX plays a custom prompt telling the customer to hold for their dedicated sales support.
2.PBX quickly pushes the request with Developer tool to CRM to find the related sales rep based on the caller’s number. For example:
FX_CONCATENATE(“https://crm.example.com/check-caller?callernum=”,$Session.ani)
3.The CRM receives the request, searches its database, and sends back the sales rep’s phone number.
4.Condition processes the data:
FX_NOT_EQUAL($HttpRequest1.responseContent, “”)
5.PBX then custom-transfers the call to that sales rep using:
FX_CONCATENATE(“+86”, $HttpRequest1.responseContent)
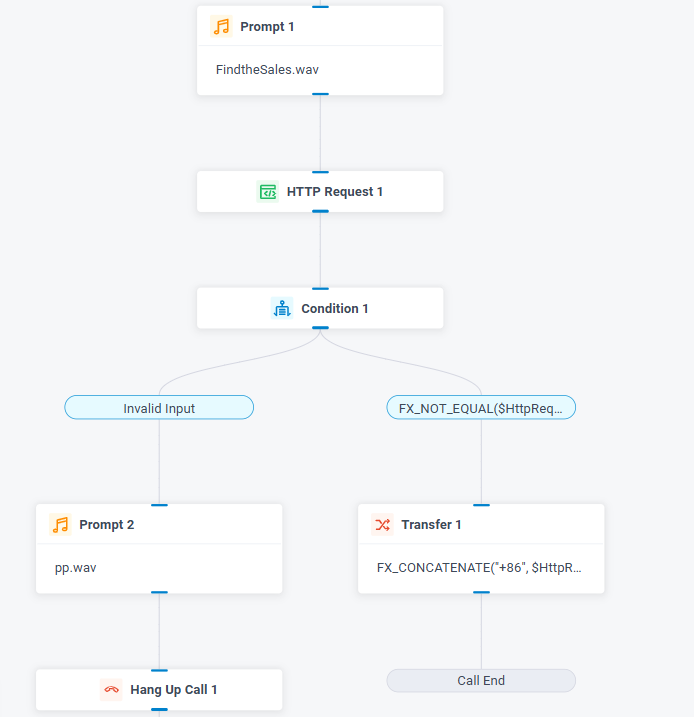
You can totally achieve incoming call → check → match → direct outbound transfer without any manual work. CFD goes beyond call handling—it becomes your last-action push engine, and that’s just marvelous for your business!
Beyond the Example: Your Workflow, Your Way
Of course, what we’ve covered here is just the tip of the iceberg. Call Flow Designer can do far more than order lookups, agent routing, or post-call follow-ups—everything is open to your design. From automating appointment reminders to triggering multi-channel marketing campaigns, the possibilities are only limited by your imagination.
Even better, CFD is a tool made for creativity and collaboration. We’d love to hear how you’re using it—or the automation challenges you wish could be solved. Share your ideas, workflows, or success stories in the comments below, and let’s learn, inspire, and innovate together!
Design Your Automated Workflow Now!
- Already using Yeastar P-Series PBX? Upgrade to the released version with Ultimate Plan now and unlock Call Flow Designer instantly. Appliance Edition | Software Edition | Cloud Edition
- New to Yeastar? Sign up for our 30-day free trial and explore Call Flow Designer’s full capabilities—free, fast, and risk-free.