Am häufigsten gestellte Fragen zur S-Serie
About Login
Wie lautet die Standard-IP der VoIP-Telefonanlage der S-Serie?
Die Standard-IP der VoIP-Telefonanlage der S-Serie lautet 192.168.5.150.
Why do I get an error message on the browser when I try to access the S-Series VoIP PBX?
This kind of error message, for example, “Your connection is not private” message in Chrome browser, is caused by SSL error. The S-Series VoIP PBX uses HTTPS protocol for login with a local IP address. But SSL certification authority don’t issue certificate for local IP address.
There is nothing to worry about and you can proceed to visit the link.
If you wish to get the SSL certificate, you need to bind a domain or public IP to the S-Series PBX, and then get the certification from the certification authority. You may need to pay for the certification.
Wie lauten der Standardbenutzername und das Standardpasswort des Administratorkontos in der VoIP-Telefonanlage der S-Serie?
Die Passwörter des Standardadministratorkontos der VoIP-Telefonanlage der S-Serie lauten „admin“ und „password“ Aus Sicherheitsgründen empfehlen wir dringend, das Standardpasswort nach der ersten Anmeldung zu ändern.
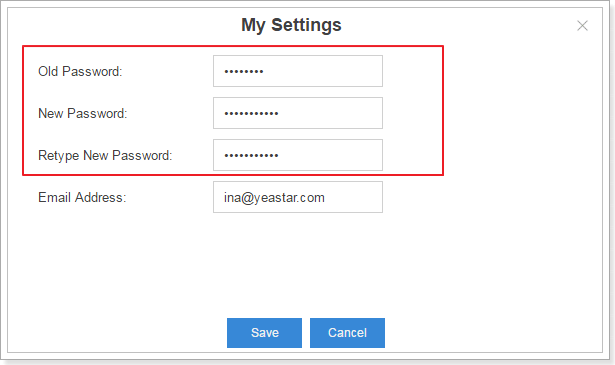
Wie ändere ich das Passwort des Administratorkontos?
Bitte klicken Sie auf ![]() und gehen Sie zu „Meine Einstellungen“, um das Passwort zu ändern, nachdem Sie sich im Web-GUI angemeldet haben.
und gehen Sie zu „Meine Einstellungen“, um das Passwort zu ändern, nachdem Sie sich im Web-GUI angemeldet haben.
How to log in the Extension User Web Interface?
Input the PBX’s IP address and use the username and password to login. The username and default password are “extension number (e.g. 1000)” and “pass + extension number (e.g. pss1000)”.
We highly suggest that you change the default password in extension edit page after your first login.
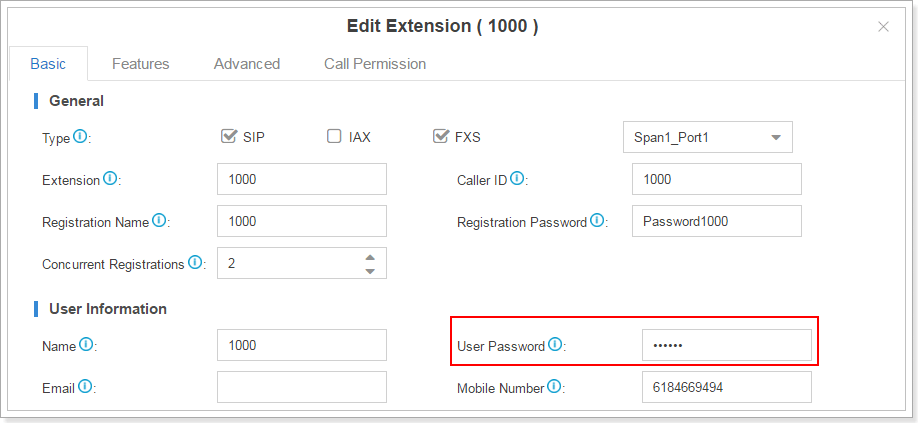
Wie ändere ich das Standardpasswort des Benutzerkontos?
Gehen Sie auf Einstellungen → Telefonanlage → Nebenstellen und ändern Sie das Benutzerpasswort.
Was kann ich tun, wenn ich mein Passwort vergessen habe?
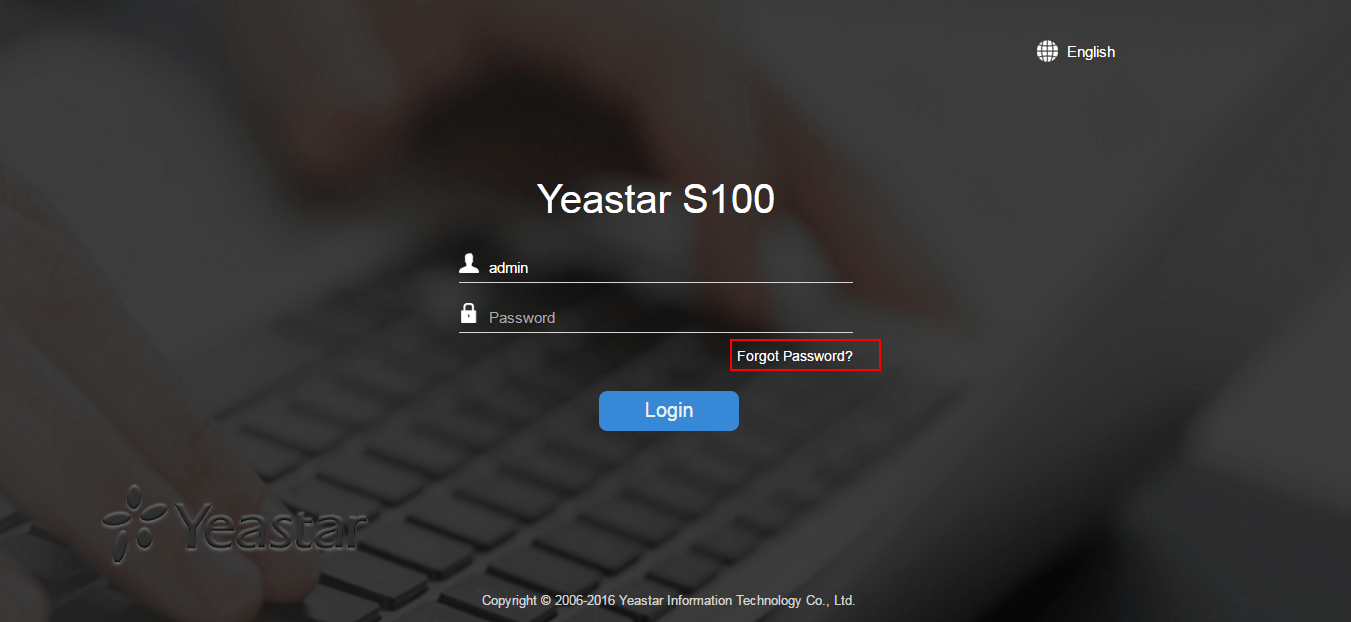
Klicken Sie auf der Anmeldeseite auf „Passwort vergessen?“, um Ihr Passwort zurückzusetzen.
Voraussetzungen für diese Funktion:
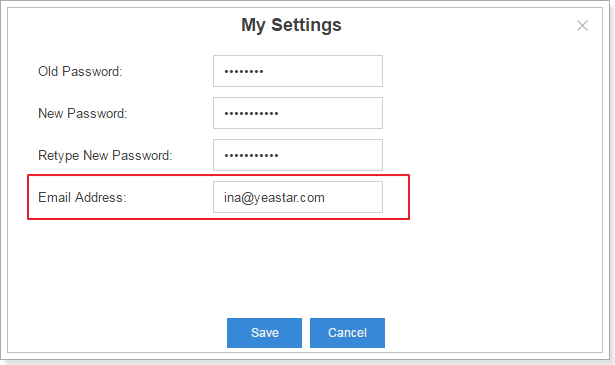
1. Das Konto ist mit einer E-Mail-Adresse verbunden. Als Administrator können Sie Einstellungen vornehmen, indem Sie auf ![]() „Meine Einstellungen“
„Meine Einstellungen“
klicken.
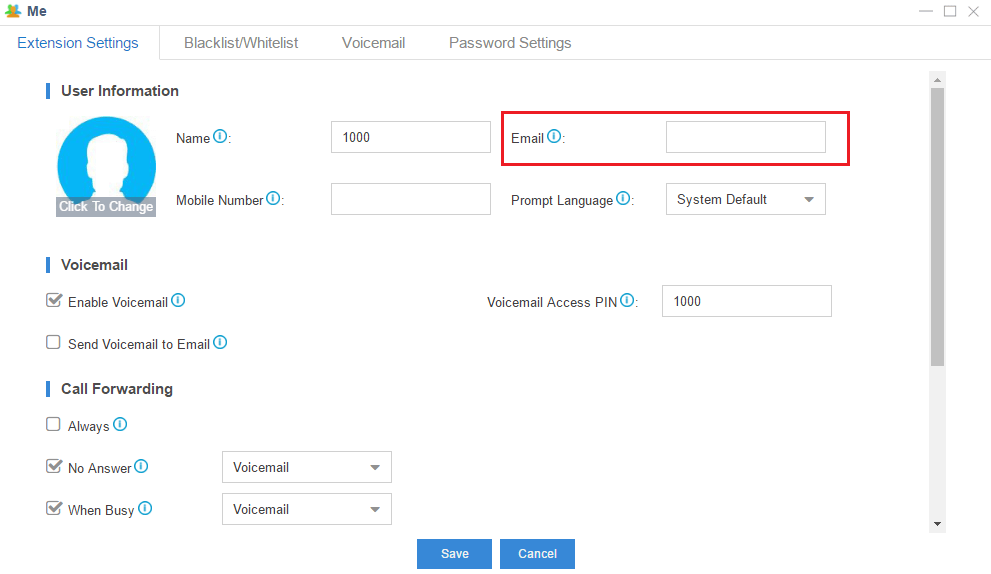
Als erweiterter Benutzer können Sie sich beim Extension User Web Interface anmelden und auf „Ich (Me)“ gehen, um eine E-Mail-Adresse mit diesem Konto zu verbinden.
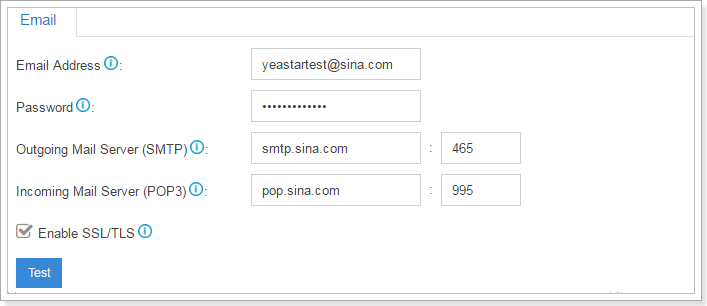
2. Sie haben die korrekten E-Mail-Einstellungen bereits vorgenommen und die Test-E-Mail erfolgreich gesendet. Gehen Sie auf Einstellungen → System → E-Mail und geben Sie die E-Mail-Adresse, das Passwort, SMTP, POP3, Ports ein und klicken Sie bei Bedarf auch „SSL/TLS aktivieren“ an.
Sehen wir uns nun an, wie das Passwort zurückgesetzt wird.1. Klicken Sie auf der Anmeldeseite auf „Passwort vergessen?“.
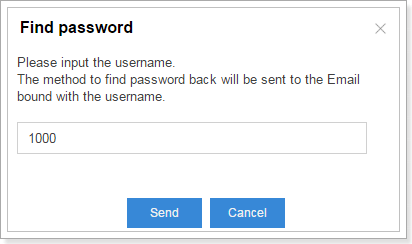
3. Geben Sie den Benutzernamen (Nebenstellennummer) ein und das System sendet eine E-Mail an die Adresse, die an das Konto gebunden ist.
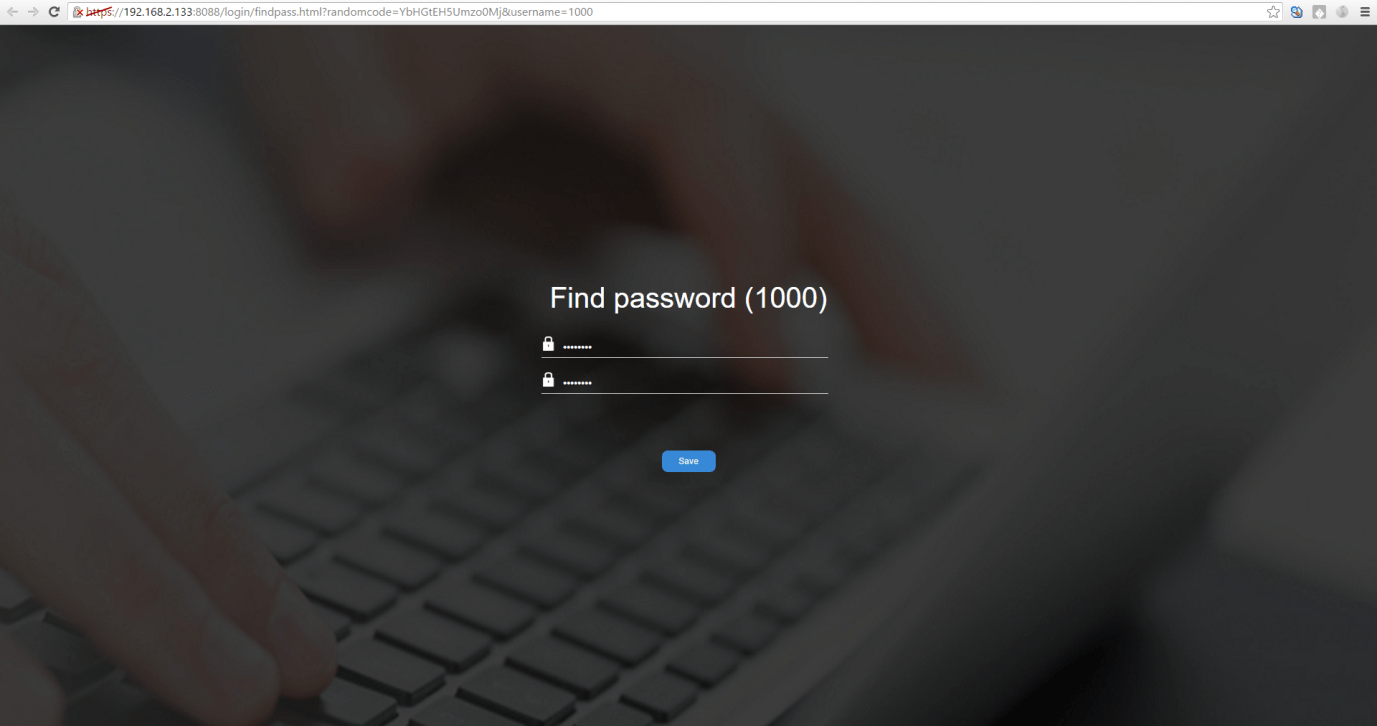
4. Klicken Sie auf den Link im E-Mail-Posteingang, um das Passwort zurückzusetzen. Bitte beachten Sie, dass der Link nur 30 Minuten lang im lokalen Netzwerk gültig ist.
5. Geben Sie ein neues Passwort ein und wiederholen Sie es.
About Extension
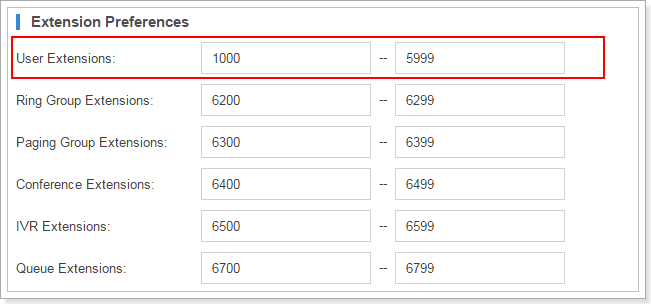
Wie ändere ich den Nebenstellenbereich?
A. Gehen Sie auf Einstellungen → Allgemein → Einstellungen und nehmen Sie die entsprechenden Einstellungen im Bereich „Benutzernebenstellen“ vor.
What is the range of extension numbers?
S-Series VoIP PBX can have extensions range from 2 digits to 7digits.
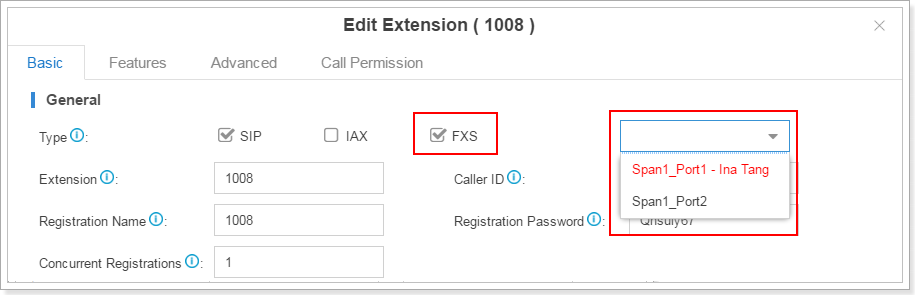
Wie füge ich eine FXS-Nebenstelle hinzu?
Gehen Sie auf Einstellungen → Telefonanlage → Nebenstellen und klicken Sie unter den Einstellungen für die Nebenstelle auf „Hinzufügen“.Markieren Sie unter „Type“ „FXS“ und wählen Sie den FXS-Span-Port aus.
Hinweise:
1. Die Nebenstellen der VoIP-Telefonanlage der S-Serie können gleichzeitig „SIP“, „IAX“ und „FXS“ sein.
2. Wenn „FXS“ markiert wurde, müssen Sie einen FXS-Port für die Nebenstelle zuweisen. Wenn der FXS-Port in der Dropdown-Liste ROT ist, bedeutet dies, dass der FXS-Port verwendet wird und Sie diesen Port nicht auswählen können. Wenn der Port SCHWARZ ist, bedeutet dies, dass der Port inaktiv ist.
How to register an IP phone or softphone to S-Series VoIP PBX?
A. S-Series VoIP PBX have passed compatibility test with lots of IP phone brands, such as Yealink, Grandstream, Cisco, Polycom, Snom, etc.
The detailed configuration manual can be found here: https://www.yeastar.com/auto-provisioning-on-the-yeastar-s-series-voip-pbx/#phonesupported.
How to register a remote extension?
1. Make port mapping for communication ports of PBX on router. The default ports are:
UDP (SIP): 5060
UDP (RTP): 10000-12000
2. Go to Settings →PBX→General→SIP→NAT. If you use static IP for S-Series VoIP PBX, please select “External IP Address” on “NAT settings” and input the public IP address of S-Series VoIP PBX. If you use dynamic IP for PBX, please input the domain in “External Host” field on the NAT settings page.
3. Got to Settings→ PBX→ Extensions. Choose the extension that needs to be registered remotely, click![]() . Select “Advanced” page, enable “NAT” and “Register Remotely”.
. Select “Advanced” page, enable “NAT” and “Register Remotely”.
4. Register to this extension configured.
For more configuration details please refer to this link: https://support.yeastar.com/hc/en-us/articles/229524467-Configuring-Remote-Extensions
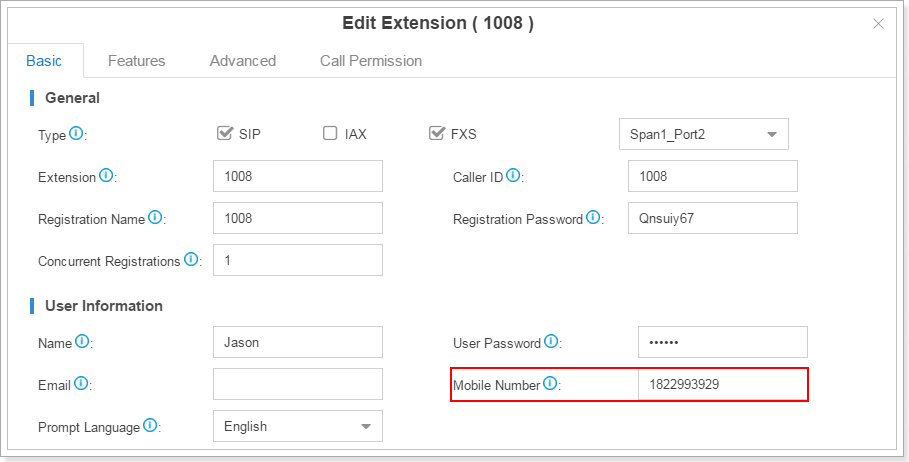
What is mobility extension? How to configure it?
Mobility extension is used to bind mobile number with an extension, so this mobile number will have the corresponding extension’s call privilege, such as: make internal calls, make outgoing calls, and play voicemail unread, etc. When the user uses this mobile number to call into S-Series VoIP PBX, the PBX will treat it as the corresponding extension, and he/she will hear the dial tone.
To configure mobility extension, follow the steps below.
1. Click Settings → PBX → Extensions, go to extension edit page. Click “Edit”.
2. Bind a mobile phone number in “Mobile Number” in “Basic” tab.
3. Click “Features”, and go to “Mobility Extension” settings. If you enable mobility extension, when the mobile number configured calls into S-Series VoIP PBX, it can act like this extension number, such as: make internal calls, make outgoing calls, and play voicemail unread, etc. If you enable Ring Simultaneously, the extension and the mobile phone will ring simultaneously.
Please note that you must configure the specific prefix to make sure S-Series VoIP PBX can reach this mobile number according to the outbound route.
Notes:
1. When a mobility extension makes an internal call, the caller ID presented on the called party’s screen will be the extension number instead of the mobile number.
2. The telephony line/trunk must have caller ID feature. Since PBX recognizes mobile number according to the caller ID detected.
3. Mobility extension feature can’t take effect if administrator has enabled call back feature in inbound routings.
Was ist SIP-Forking für die VoIP-Telefonanlage der S-Serie? Wie wird diese konfiguriert?
Bei SIP-Forking handelt es sich um eine Funktion, mit der eine Nebenstellennummer gleichzeitig von mehreren SIP-Endgeräten registriert werden kann. Es können höchstens 5 Terminals teilnehmen.
Klicken Sie auf Einstellungen → Nebenstelle hinzufügen/ändern und ändern Sie den Eintrag „Gleichzeitige Registrierungen“.

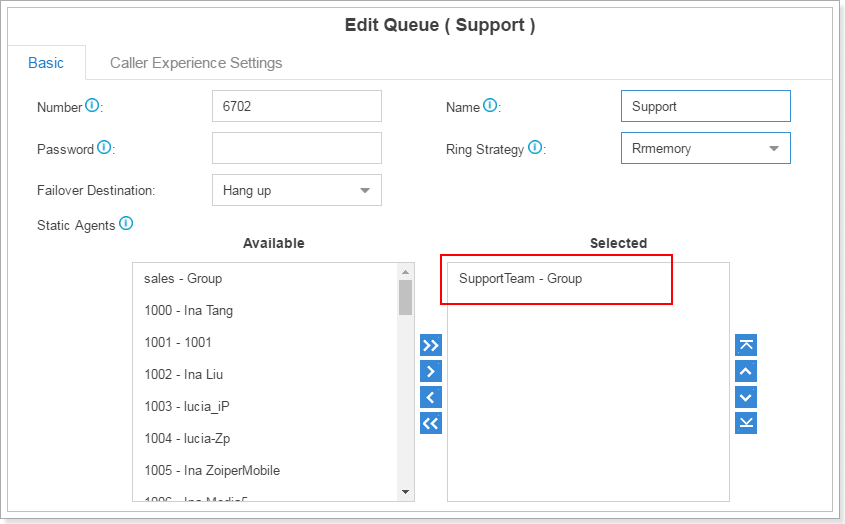
Wie werden bei der VoIP-Telefonanlage der S-Serie die Nebenstellen als Gruppe ausgewählt?
Bei der VoIP-Telefonanlage der S-Serie gibt es eine Funktion namens „Nebenstellengruppe“. Die Nebenstellengruppe lässt sich anpassen, indem Sie die gewünschten Nebenstellen zu dieser Gruppe hinzufügen und benennen.
So konfigurieren Sie die Nebenstellengruppe:
1. Gehen Sie auf Einstellungen → Telefonanlage → Nebenstellengruppe, klicken Sie auf der Seite, auf der die Nebenstellen aufgelistet sind, auf „Hinzufügen“.
2. Erstellen Sie eine Nebenstellengruppe, geben Sie den Namen der Gruppe ein und wählen Sie die gewünschten Nebenstellen für das ausgewählte Feld aus.
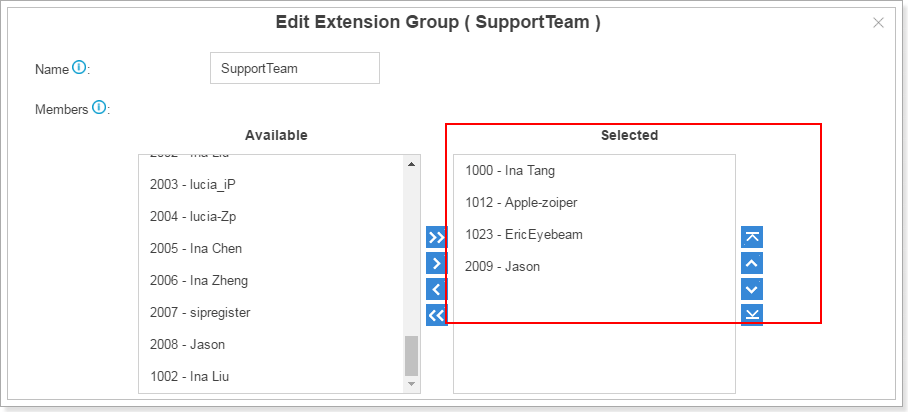
3. Anstatt die Nebenstellen einzeln auszuwählen, können Sie nach Erstellen der Nebenstellengruppe die gewünschte Gruppe im jeweiligen Feld auf der Seite mit den Einstellungen für die Nebenstellen auswählen. Wenn Sie beispielsweise eine Warteschlange erstellen, können Sie hierfür eine Nebenstellengruppe auswählen.
About Auto Provisioning
Which IP phones can be auto provisioned on S-Series VoIP PBX?
S-Series supports auto provisioning of IP phones from Yealink, Cisco, Snom, Panasonic, Mitel, Grandstream, Polycom, Htek, Fanvil, VTech, etc. Please find more details about the brands and models at: https://www.yeastar.com/de/kompatible-ip-telefone/.
What IP phones can I use with S-Series VoIP PBX?
Auto provision supported IP phones are all thoroughly tested with S-Series VoIP PBX and are compatible. More details can be found here. IP phones which support standard SIP protocol are also compatible with S-Series VoIP PBX.
If my phone model is not supported in the list of auto provisioning, how can I auto provision my phones?
Create and edit configuration file according to your needs. The file format should be .cfg or .xml.
Step 2. Make sure your phones are ready for auto provisioning.
- PnP mode
Enable PnP if your IP phone supports PnP function. - DHCP mode
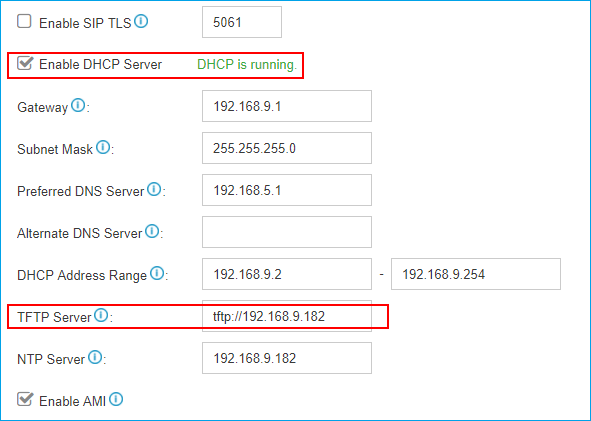
1) If your IP phone does not support PnP, then enable DHCP.
2) Enable DHCP server on your PBX, set the TFTP address to the IP address of the PBX.
Path: Settings > System > Security > Service
Note: Make sure PBX is the only one DHCP server in your local network, or auto provisioning would fail.
Step 3. Upload the configuration file into PBX.
Path: Auto Provisioning > Upload Files > Upload a File.
Step 4. Restart IP phones manually. IP phone will obtain configuration file from PBX and finish auto provisioning.
If my IP phone does not support configuration on Web interface, how to register extensions to S-Series VoIP PBX?
Step 1: Only IP phones which support SIP protocol are allowed to register to S-Series PBX, such as Panasonic KX-TSC11 and Cisco 8800.
Step2: Change IP phone’s firmware version to the one that supports SIP protocol. The firmware is usually available at the official website of the phone manufacturer. If you cannot find it, please consult the phone manufacturer.
Step 3: Finish registration by entering registration information on IP phone Web GUI.
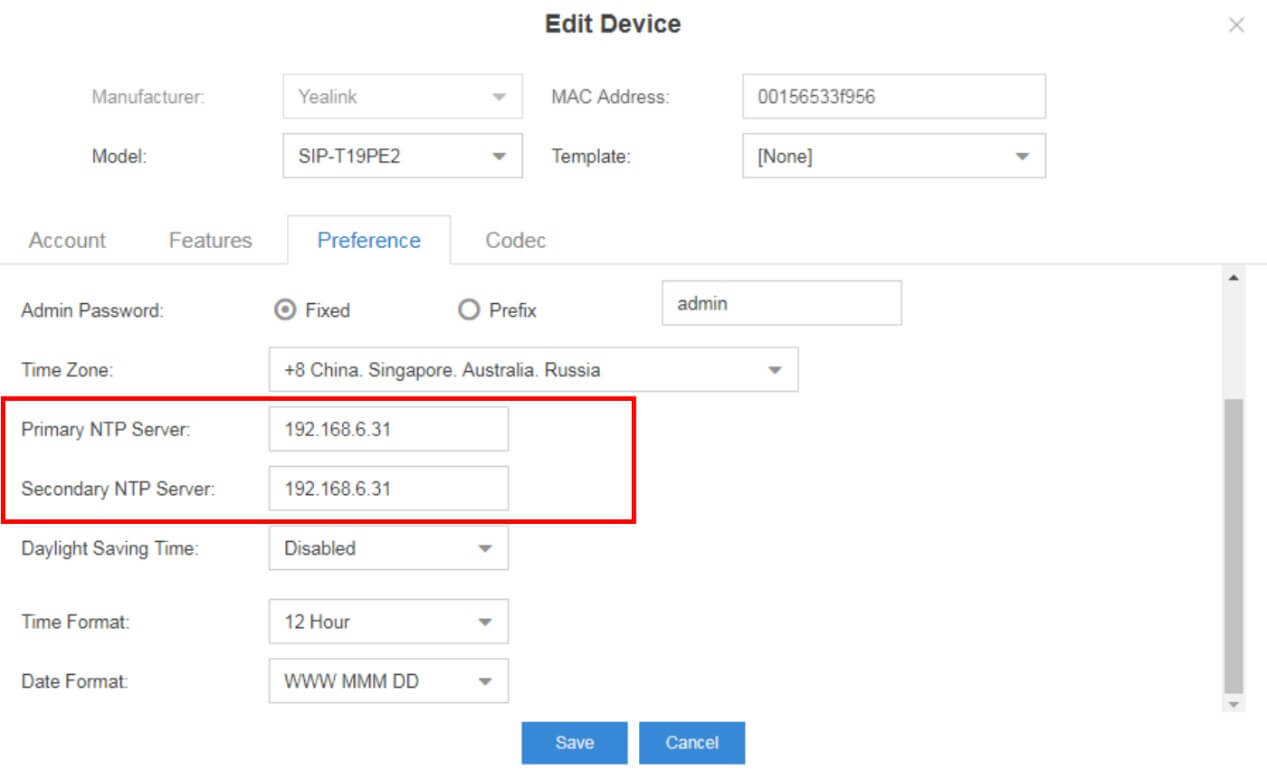
How to synchronize the IP phone time with the time of S-Series VoIP PBX?
Configure the time on Auto Provisioning configuration page.
Step1. Select and edit the phone.
Step2. On the Preference page, set the NTP server as the IP address of the S-Series PBX.
Step3. Click “Save” and reboot the phone to take effect.
How to share phonebooks by using remote phonebook?
The configuration details can be found in this knowledge base article.
How to upload local phonebook into S-Series VoIP PBX?
The configuration details can be found in this knowledge base article.
How to share phonebooks via LDAP Sever?
The configuration details can be found in this LDAP Server Guide.
Why does auto provisioning not work for my IP phones?
1. Make sure that you have only one S-Series VoIP PBX in your local network.
2. Make sure that your IP phones and the S-Series PBX are in the same network, and the phones and the S-Series PBX could communicate with each other.
3. Reboot your phones manually.
If after that, the function still cannot work, please submit a ticket on Support Portal for help.
Can Auto Provisioning work when IP phones and PBX are in VLAN environment?
No. Auto Provisioning will work only when IP phones and PBX are in the same local area network. Neither VLAN nor VPN can make the function work.
How to disable Auto Provisioning function?
You can do one of the following configurations to disable Auto Provisioning:
1. Delete the IP phones from Auto Provisioning> Device List page.
2. Disable TFTP Sever on the PBX.
3. Uninstall Auto Provisioning application from the PBX.
Can I upgrade IP phones’ firmware via Auto Provisioning?
Yes. Follow the steps below to upgrade your phones.
1. Register your phones to the PBX via Auto Provisioning.
2. Go to Auto Provisioning > Firmware Upgrade to upload the phone’s firmware file.
3. Reboot the phone to take effect.
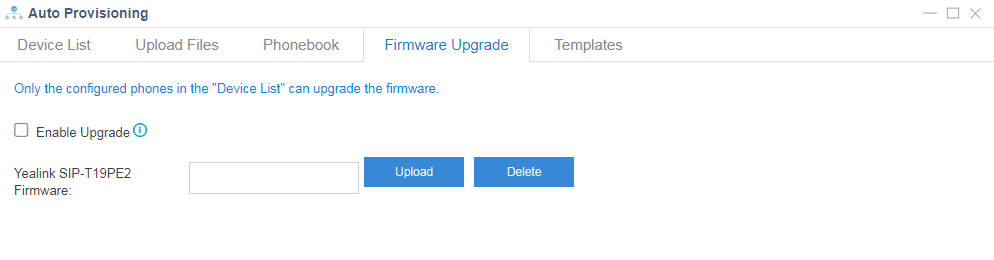
Note: only IP phones that can be auto provisioned by S-Series PBX support this kind of upgrade.
About Trunks
How to register a VoIP trunk in S-Series VoIP PBX?
1. Go to Settings → PBX → Trunk, Click ![]() to add a VoIP trunk.
to add a VoIP trunk.
2. Select protocol and trunk type.
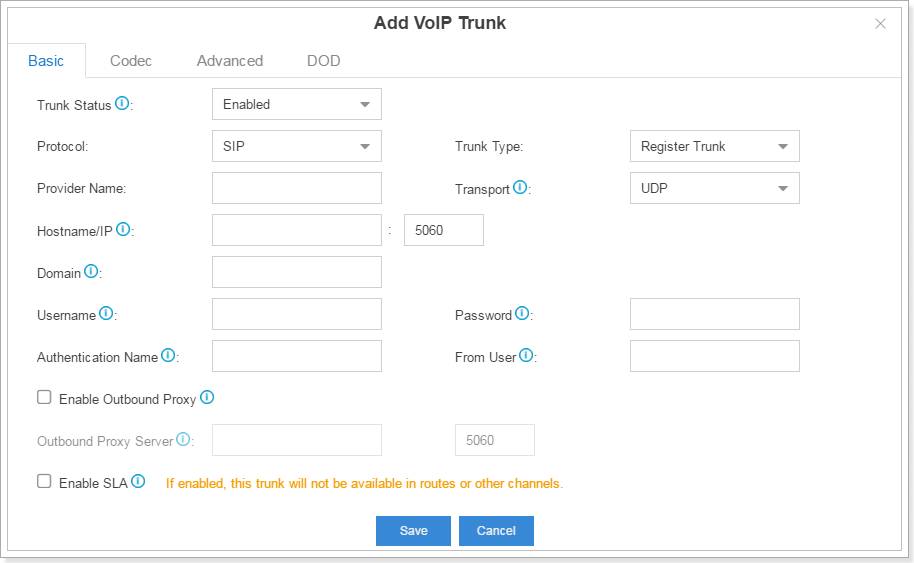
3. Input the VoIP information which is provided by the ISP. For example:
Provider Name: Chinamobile
Hostname/IP: the registration IP given by the ISP (e.g. 111.111.111.111)
Port: 5060
Domain: The domain server given by ISP (e.g. ims.fj.chinamobile.com)
Username: the username given by ISP (e.g. 865921111111@ims.fj.chinamobile.com )
Password: the account password given by the ISP
From user: the trunk number given by the ISP (e.g. +86592111111)
4.For more details please refer to S-Series VoIP PBX Administrator Guide.
About Call Control
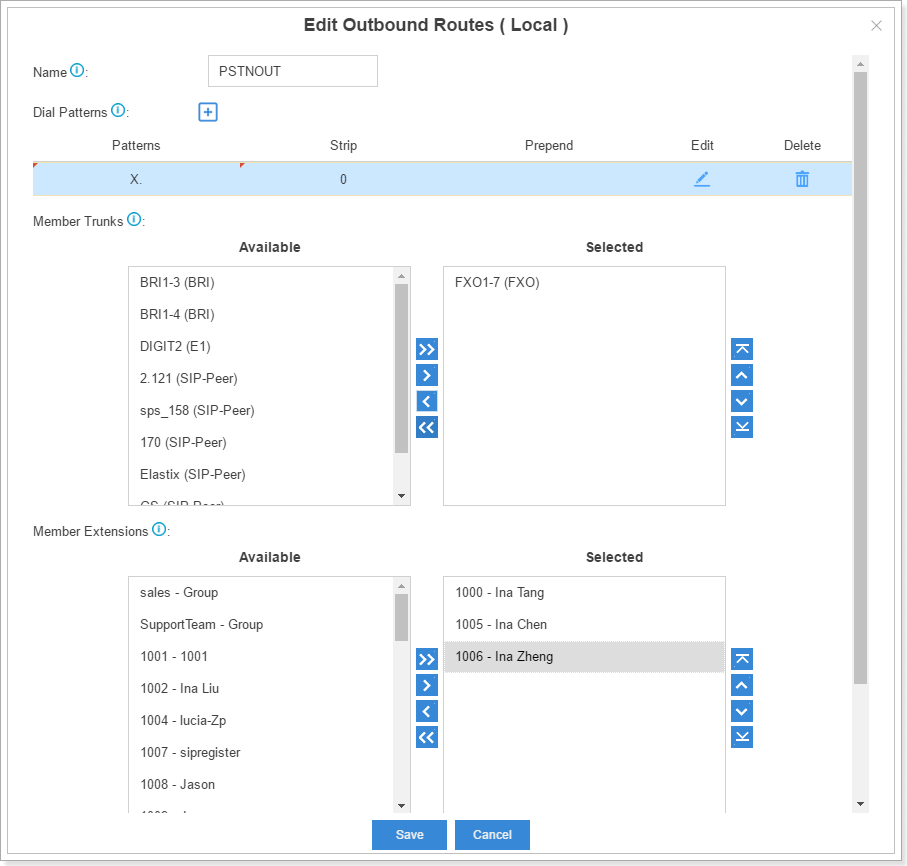
How to configure the outbound routes in S-Series VoIP PBX?
1. Go to PBX Monitor → Trunk to check the status of the trunk and make sure the trunk is available to use.
2. Go to Settings → PBX → Call Control → Outbound Routes, click ![]() in the outbound routes list page.
in the outbound routes list page.
3. Fill in the details in the edit page and save. For example, you could configure the outbound routes as follows if you want 1000, 1005 and 1006 to use FXO1-7 to dial out.
For more details, please refer to the S-Series VoIP PBX Administrator Guide.
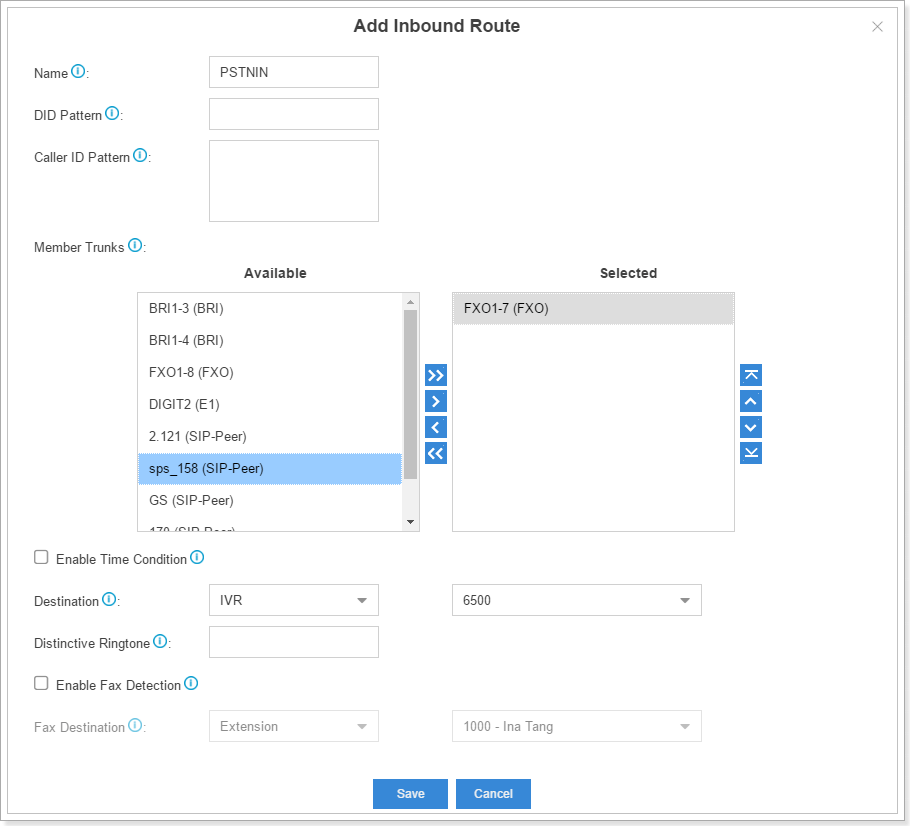
Wie konfiguriere ich die eingehenden Leitungen für die VoIP-Telefonanlage der S-Serie?
1. Gehen Sie zu Einstellungen → Telefonanlage (PBX) → Anrufsteuerung → Eingehende Leitungen und klicken Sie in der Übersicht für eingehende Leitungen auf ![]() .
.
2. Auf der Bearbeitungsseite für eingehende Leitungen müssen Sie die Amtsleitung im entsprechenden Feld auswählen und das Ziel auswählen, an das der Anruf weitergeleitet werden soll. Die Zeitbedingung kann eingerichtet werden, um den Anruf nach Zeitabschnitten zu leiten. Siehe folgendes Beispiel. Weitere Informationen finden Sie im Administratorhandbuch für die VoIP-Telefonanlage der S-Serie.
Wie leite ich eingehende Anrufe mithilfe von Zeitbedingungen zu verschiedenen Zeiten an unterschiedliche Ziele weiter?
1. Gehen Sie auf Telefonanlage → Anrufsteuerung → Zeitbedingungen und fügen Sie die Bedingungen oder einen Feiertag hinzu.
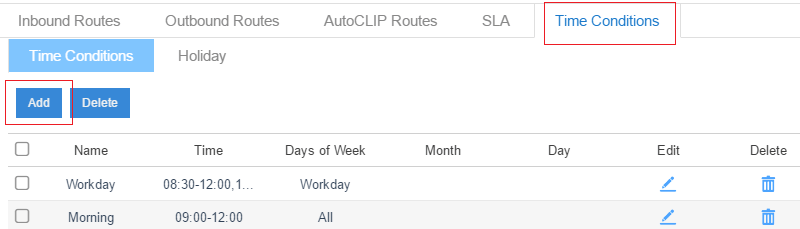
2. Gehen Sie zu Einstellungen → Telefonanlage → Anrufsteuerung → Eingehende Leitungen und klicken Sie in der Übersicht für eingehende Leitungen auf ![]() .
.
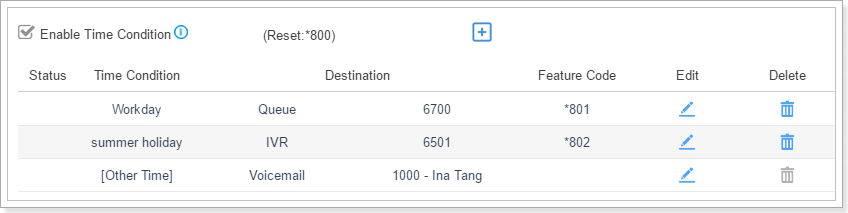
Aktivieren Sie „Zeitbedingung aktivieren“ und klicken Sie auf ![]() . Fügen Sie die anschließend die Zeitbedingung hinzu und richten Sie das Ziel ein. Der Zeitraum, der nicht mit der von Ihnen erstellten Zeitbedingung übereinstimmt, führt zum unter „[andere Zeit]“ angegebenen Ziel.
. Fügen Sie die anschließend die Zeitbedingung hinzu und richten Sie das Ziel ein. Der Zeitraum, der nicht mit der von Ihnen erstellten Zeitbedingung übereinstimmt, führt zum unter „[andere Zeit]“ angegebenen Ziel.

Wie kann die Zeitbedingung überschrieben und wie die Überschreibung abgebrochen werden?
1. Überprüfen Sie den Funktionscode auf der Bearbeitungsseite für eingehende Leitungen. Auf dem folgenden Bild befinden sich drei Funktionscodes: „*801“, „*802“ und „*800“. „*800“ wird verwendet, um das Überschreiben abzubrechen und das ursprüngliche Ziel zurückzusetzen.
2. Verwenden Sie die Nebenstelle, um den Funktionscode wie „* 801“ einzugeben, der die Zeitbedingung „Arbeitstag“ überschreibt.
3. Die überschriebene Zeitbedingung wird durch ein Häkchen markiert.
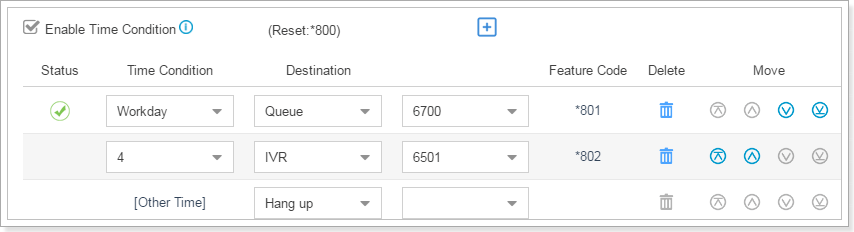
4. Wenn Sie die Überschreibung aufheben und Anrufe an die von Ihnen eingerichteten ursprünglichen Ziele leiten möchten, können Sie die Nebenstelle verwenden, um den Zurücksetzungsfunktionscode zu drücken, wie im Beispiel „*800“.
What is AutoCLIP? How to use it?
S-Series VoIP PBX will automatically record outgoing calls into the AutoCLIP route list. When the called party calls back, the system will lead the call to the extension which dialed this number recently.
To set up AutoCLIP:
1. Go to Settings → PBX → Call Control → AutoCLIP Routes, and open the AutoCLIP configuration page.
2. The fields in the AutoCLIP:
Record Keep Time: how long each record will be kept in the AutoCLIP List.
Digits Match: how many digits from the last digit of the incoming phone number will be used to match the AutoCLIP record.
Member trunks: AutoCLIP Route will apply to which trunk and which trunk`s record will be kept in the list.
Wo finde ich die AutoCLIP-Liste?
Gehen Sie auf Einstellungen → Telefonanlage → Anrufsteuerung → AutoCLIP-Leitungen und klicken Sie auf „AutoCLIP-Liste anzeigen“, um die Informationen zu überprüfen.
About Calls
Warum höre ich vor dem Freizeichen einen Signalton, wenn ich den Hörer abhebe?
In diesem Fall haben Sie ungelesene Voicemails. Wählen Sie bitte „*2“, um diese abzuhören. Wenn alle Voicemails abgehört wurden, ertönt kein Signalton mehr.
About Call Feature
Wie wird die Whitelist/Blacklist-Funktion der VoIP-Telefonanlage der S-Serie verwendet?
A. Die Blacklist wird verwendet, um nach Nummern zu filtern. Wenn sich eine Nummer in der Blacklist befindet, kann der Benutzer weder anrufen noch sich einwählen. Die Whitelist wird verwendet, um eine Nummer in das Feld „Vertrauen“ zu setzen.
Hinweise:
1. Sie können Nummern nach einem bestimmten Muster in die Blacklist/Whitelist eingeben.
Wenn Sie z. B. eine Nummer, die mit 0592 beginnt, einschränken möchten, aber den Nummernbereich 05925503301-05925503309 erlauben möchten, können Sie „0592550330z“ auf die Whitelist und „0592“ auf die Blacklist setzen.
2. Die Whitelist besitzt eine höhere Priorität als die Blacklist.
About Call Recording
Where can I store call recording files?
You can store the auto recording files in:
1. External storage devices, such as HDD, USB, TF/SD card
2. Network Drive
Can I back up call recording files?
No, you cannot back up call recording files.
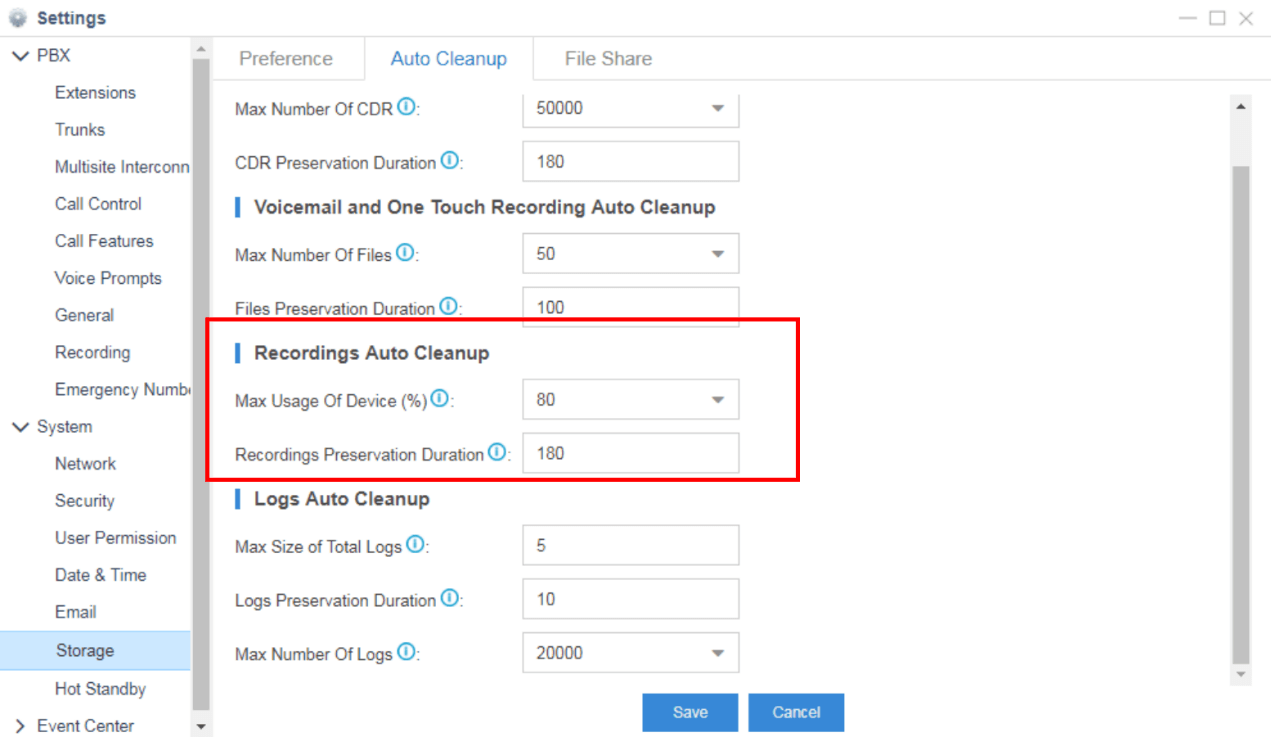
How to set auto cleanup of recording files?
Go to Settings -> System -> Storage -> Auto Cleanup -> Recordings Auto Cleanup, and design max usage of device and longest preservation period.
What is the format of recording files?
The file format is .wav.
When call recording is enabled, will a prompt be played notifying the calling and called parties that the call is being recorded?
Yes, you can set up the prompt in Settings -> PBX -> Recording. If it’s an external call (inbound or outbound call through a trunk), the external party will hear the prompt no matter he is the called party or caller. If it’s an internal call, the called party will hear the prompt.
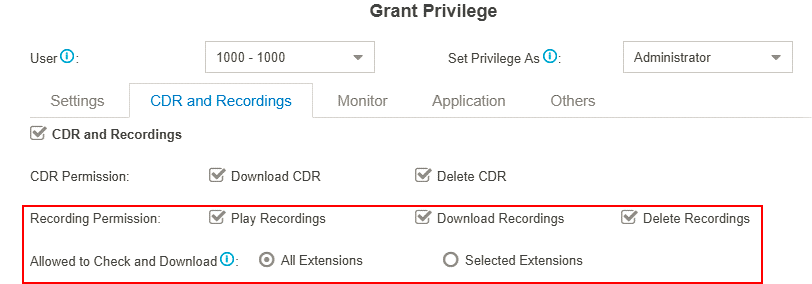
Do the extension users have permission to manage call recording files?
By default, only the super administrator has the permission to manage call recording files. The administrator can go to Settings > System > User Permission to add permission to desired users.
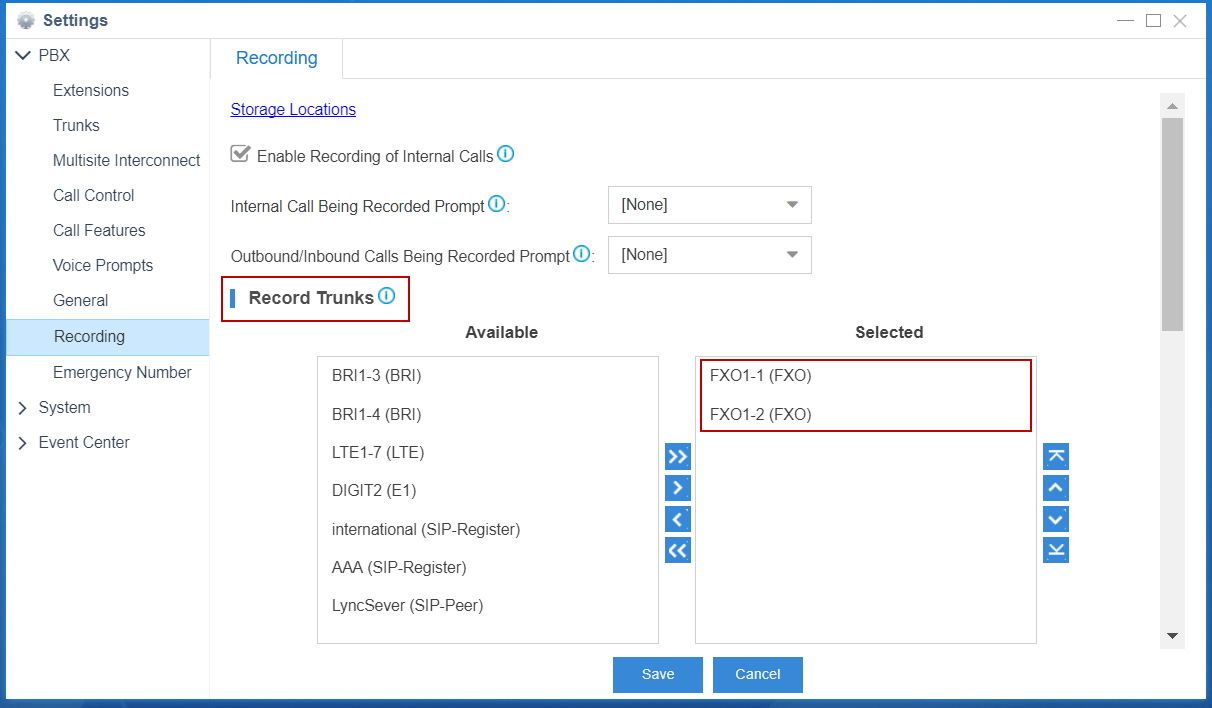
Can I record all the calls which are made through a specific trunk?
Yes. Go to Settings> PBX> Recordings, select the desired trunk, click Save and Apply.
All the calls through the selected trunk will be recorded.
How to check recordings via File Share?
The configuration details can be found this knowledge base article.
About Voice Prompts
How to change system prompt in S-Series VoIP PBX?
S-Series VoIP PBX allows two ways to modify the system prompt: update manually or download online prompt.
Manually update:
1. Go to Settings → PBX → Voice Prompts→ System Prompt
2. Browse a local “.tar” file and click “Upload”
3. You could download the system prompt file in the links below
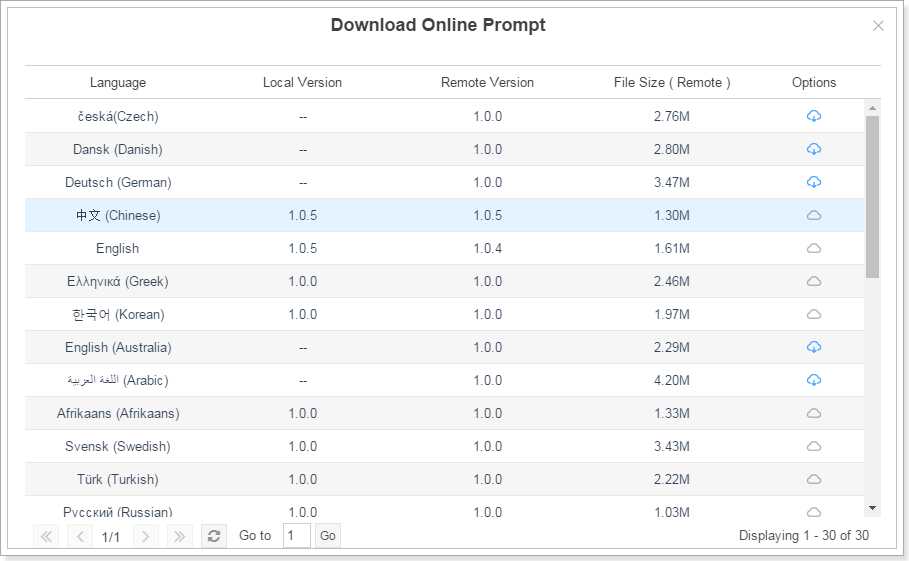
Download online prompt:
Go to Settings → PBX → Voice Prompts → System Prompt
Click “Download Online Prompt” and choose the prompt you want.
How to change the voicemail prompts?
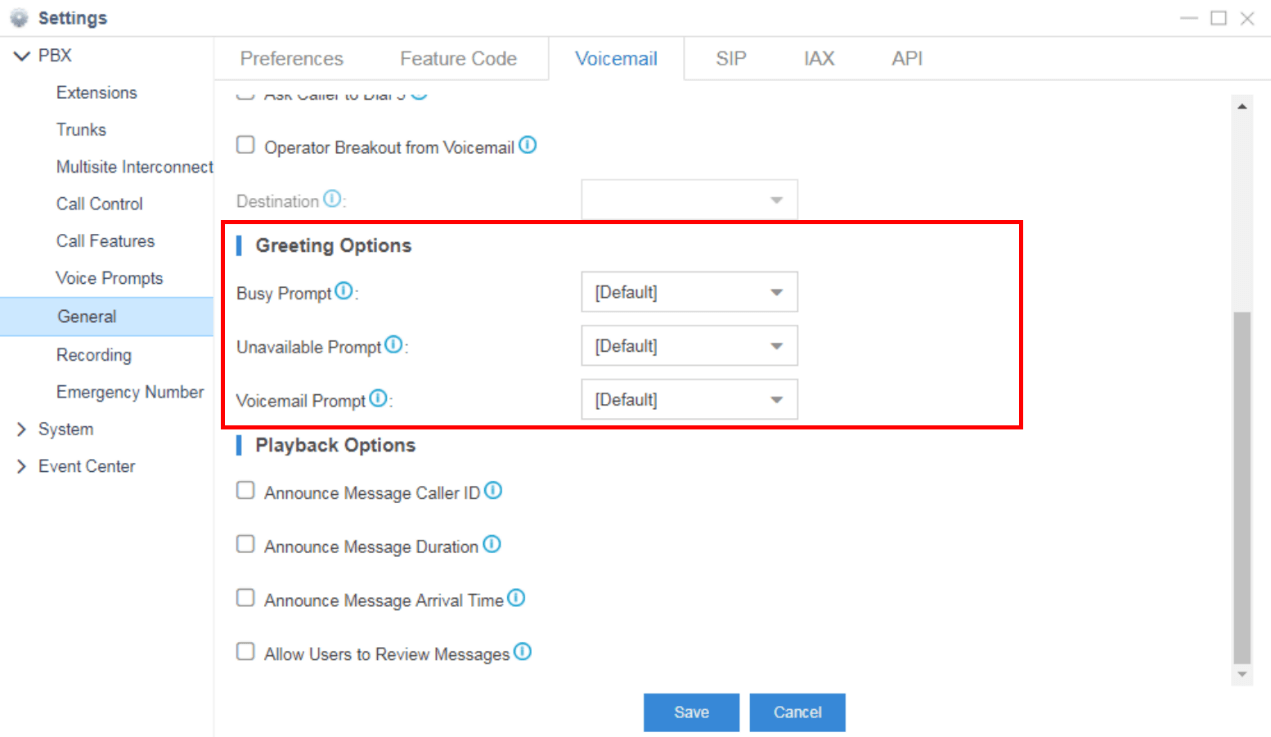
1. Super admin can set voicemail prompts played over all internal extensions.
Step1: Go to Settings -> PBX -> Voice Prompts -> Custom Prompts, and upload prompt files to PBX.
Step2: Go to Settings -> PBX -> General -> Voicemail -> Greeting Options and select the custom prompt to be applied.
Step3: Click “Save” and “Apply”.
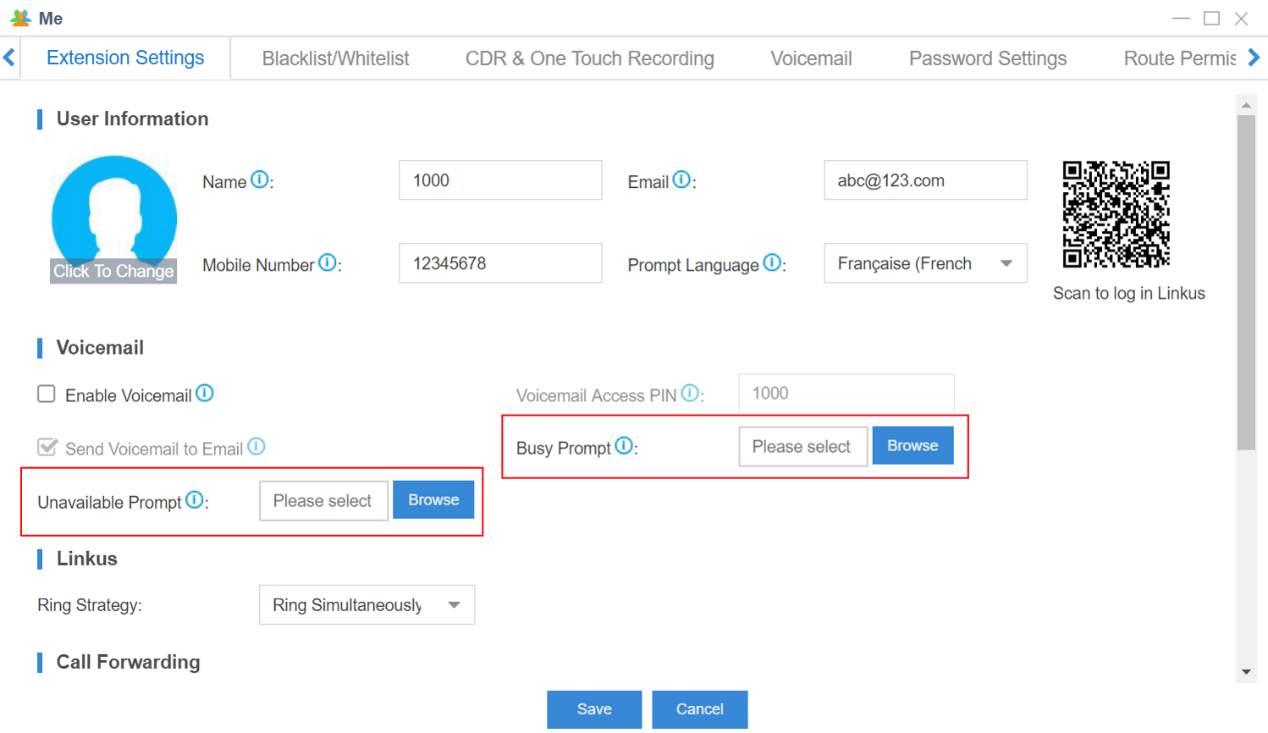
2. Extensions users can also set their own voicemail prompt.
Step1: Login to user account via Web GUI.
Step2: Go to Me-> Extension Settings, and change the voicemail prompt.
Which audio file format does S-Series VoIP PBX support?
File format: “.wav”, “.WAV”, or “.gsm”.
File size: smaller than 8MB.
Supported wav format:
- PCM, 8K, 16bit, 128kbps;
- alaw (g.711), 8k, 8bit, 64kbps;
- u-law (g.711), 8k, 8bit, 64kbps;
- gsm, 6.10, 8k, 13kbps.
How to convert audio file format?
You can convert audio file format in two ways, by web tool or Wave Pad. Please visit this knowledge base article for details.
What’s the maximum duration of a custom audio file?
There is no duration limit for custom audio files.
How to disable custom voicemail prompt?
Step 1: Delete the applied custom audio file on S-Series VoIP PBX Web interface.
Step 2: Dial *2 on an extension.
Step 3: Follow the prompt, and press 0->4->2 sequentially.
About Hardware
What’s the power consumption of S-Series VoIP PBX?
S412: 9.0-25.6W
S20: 1.8-10.6W
S50: 2.1-18.5W
S100: 5.5-41.2W
S300: 6.2-59.1W
Does S-Series VoIP PBX support rack mounting?
S412: No
S20: No
S50: Yes, need mounting ears (Yeastar supplied)
S100: Yes
S300: Yes
How many modules does S-Series VoIP PBX support? What kind of module can be installed?
What’s the maximum number of modules allowed to be installed on each model of S-Series:
S412: 4
S20: 2
S50: 4
S100: 8
S300: 12
| Model.Module | S412 | S20 | S50 | S100 | S300 |
| S2 Module | Max. 2 | Max. 2 | Max. 4 | Max. 8 | Max. 12 |
| O2 Module | Max. 2 | Max. 2 | Max. 4 | Max. 8 | Max. 12 |
| SO Module | Max. 2 | Max. 2 | Max. 4 | Max. 8 | Max. 12 |
| B2 Module | Max. 2 | Max. 2 | Max. 4 | Max. 8 | Max. 12 |
| GSM/3G/4G Module | Max. 1 | Max. 1 | Max. 4 | Max. 6 | Max. 6 |
Note: only one channel can use cellular data of 4G LTE SIM card. And the 4G LTE module must be installed in the first slot of the EX08 Expansion Board in Span1.
Are there any requirements for the storage space of external storage devices?
No. Storage space does not matter.
What is the recommended TF/SD card?
Write Speed >= 60MB/s
- Sandisk Extreme Pro Series
- Sandisk Extreme Series
- TOSHIBA EXCERIA Series
- Samsung Pro Series
Does Yeastar supply antenna and antenna extension cable?
If you order GSM/3G/4G modules, your S-Series VoIP PBX will be supplied with the relevant number of antennas, but not antenna extension cable. You need to buy an extension cable if you need it. Please refer to the knowledge base article to see specifications of Yeastar supplied antenna.
What are the model names of GSM/3G/4G LTE Modules?
GSM Module: SIM800
3G Module: UC15
4G LTE Module: EC20 or EC25
About Backup and Upgrade
Could the backup file work in a different model of S-Series VoIP PBX?
No, the backup file will not work across different models.
Which files can I back up in S-Series VoIP PBX?
You can select to back up the following files in S-Series PBX:
1. System Settings
2. Custom Prompts
3. Call Logs
Can I store the auto-generated backup files to an external storage device?
Yes.
How to check auto-generated backup files by the file name?
The name of the auto-generated backup files is in the format: model_firmware version_date_time.
For example, the file name “S300_30.6.0.6_201711151539” means that the file was generated on S300 with firmware version 30.6.0.6 at 15:39 on November 15, 2017.
Is it necessary to reset S-Series VoIP PBX before upgrading?
No, it’s unnecessary.
How to upgrade S-Series VoIP PBX without the Internet?
There are three ways available:
1. Upload local firmware to S-Series PBX
2. Upgrade through HTTP
3. Upgrade through TFTP Server
It is easier to upgrade by uploading local firmware. Please refer to the configuration at https://support.yeastar.com/hc/en-us/articles/115011710888-How-to-Do-Firmware-Update-for-S-Series VoIP PBX-PBX.
If I upgrade the S-Series VoIP PBX’s firmware, will the Apps in App Center be upgraded automatically?
1. The PBX Center and Auto Provisioning App will be upgraded to the latest version automatically when you upgrade the S-Series’ firmware.
2. For other Apps, you need to upgrade them independently.
Note: if you cannot upgrade an application to the latest version, you need to upgrade the S-Series’ firmware first.
What can I do if I forget the SSH login password?
1. Create a backup file on the S-Series PBX.
2. Download the backup file to your PC.
3. Reset the S-Series PBX.
4. Restore the backup file to the S-Series PBX.
5. Use the default password (iyeastar) to log in the S-Series PBX via SSH.
Where to download the latest firmware of S-Series VoIP PBX?
Download the firmware file here at https://www.yeastar.com/firmware-download/
When I download a firmware .bin file from the website, and try to open the file, I’m asked to enter a password, what can I do?
The firmware file is encrypted so you can’t open it, but you don’t need to. Just upload the .bin file to your S-Series PBX to upgrade the firmware.
Will the S-Series PBX be reset to factory settings automatically after upgrade?
No, it won’t.
Is it necessary to check “Reset Configuration to Factory Default” before downgrading?
Yes, it’s necessary.
Can I restore backup files generated in higher version of firmware on S-Series PBX with lower firmware version?
No, restoring of backup files is only allowed to be carried out between PBXs with the same firmware version.
Others
Warum wird die neue Änderung an der VoIP-Telefonanlage der S-Serie nicht wirksam?
Klicken Sie auf „Übernehmen“ rechts oben in der Ecke der Seite, wenn Sie die geänderte Konfiguration speichern möchten. Es dauert 1 bis 2 Sekunden, bis die Änderung übernommen wird.
How many Ethernet modes do S-Series VoIP PBX have? And what is the difference?
S-Series VoIP PBX supports three Ethernet modes: Single, Dual and Bridge.
Single: only use LAN port, WAN port will not be in use.
Dual: the two ports are being used. But it is necessary to choose the default interface on Network configuration page.
Bridge: LAN port will be used for uplink connection. WAN port will be used as bridge for PC connection.
Warum muss die Standardschnittstelle konfiguriert werden, wenn der Ethernet-Modus „Dual“ lautet?
Wenn der Ethernet-Modus „Dual“ lautet, geht das gesamte Kommunikationspaket bis auf die Leitungen unter „Statische Leitung“ sämtliche Standardschnittstellen durch.
Wie kann der Administrator der Nebenstelle Berechtigungen zuweisen?
1. Gehen Sie auf Einstellungen → System → Benutzerberechtigungen und klicken Sie auf der Berechtigungsseite auf s-se-faq-trunk-14.
2. Aktivieren Sie das Kontrollkästchen der Berechtigung, die Sie zuweisen möchten.

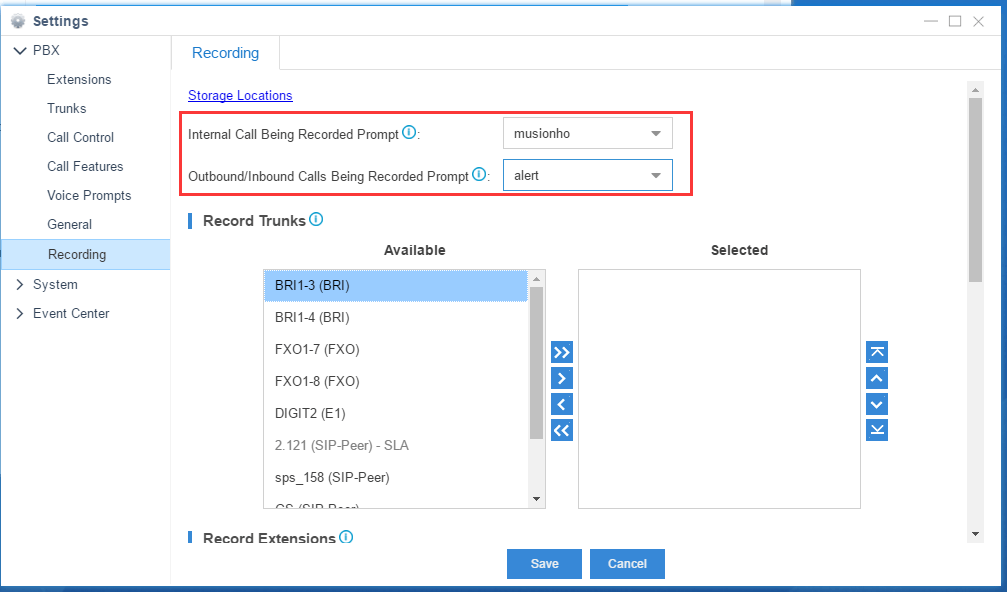
Wie kann der angerufene Teilnehmer darüber benachrichtigt werden, dass das Gespräch aufgezeichnet wird, wenn die Anrufaufzeichnung aktiviert ist?
1. Gehen Sie auf Einstellungen → Telefonanlage → Aufzeichnen
2. Richten Sie die Ansage „Interne Anrufe werden aufgezeichnet“ bzw. „Ausgehende/eingehende Anrufe werden aufgezeichnet“ ein und klicken Sie auf „Speichern“.
Which ports should I forward if I want to use Linkus Mobile Client in a public network?
The default ports your need to forward are:
- Linkus server port: TCP 8111 & UDP 8111
- SIP port: UDP 5060
- RTP ports: UDP 10000-12000.
Note: TCP 8111 is only required when downloading and playing one touch recordings and voicemails in Linkus Mobile Client.
What’s the correspondence between time duration of recordings and usage of storage devices?
| Usage.Capacity of Storage Device | 50% | 60% | 70% | 80% | 90% |
| 1GB | 9.10 h | 10.92 h | 12.74 h | 14.56 h | 16.38 h |
| 2GB | 18.2 h | 21.85 h | 25.49 h | 29.13 h | 32.77 h |
| 4GB | 36.41 h | 43.69 h | 50.97 h | 58.25 h | 65.54 h |
| 6GB | 54.61 h | 65.54 h | 76.46 h | 87.38 h | 98.30 h |
| 8GB | 72.82 h | 87.38 h | 101.94 h | 116.51 h | 131.07 h |
| 16GB | 145.64 h | 174.76 h | 203.89 h | 233.02 h | 262.14 h |
| 32GB | 173.03 h | 207.64 h | 242.25 h | 276.85 h | 311.46 h |
| 64GB | 582.54 h | 699.05 h | 815.56 h | 932.07 h | 1048.58 h |
| 128GB | 1165.08 h | 1398.10 h | 1631.12 h | 1864.14 h | 2097.15 h |
| 256GB | 2330.17 h | 2796.20 h | 3262.24 h | 3728.27 h | 4194.30 h |
| 512GB | 4660.34 h | 5592.41 h | 6524.47 h | 7456.54 h | 8388.61 h |
| 640GB | 5825.42 h | 6990.51 h | 8155.59 h | 9320.68 h | 10485.76 h |
| 1TB | 9320.68 h | 11184.81 h | 13048.95 h | 14913.08 h | 16777.22 h |
| 1.5TB | 13981.01 h | 16777.22 h | 19573.42 h | 22369.62 h | 25165.82 h |
| 2TB | 18641.35 h | 22369.62 h | 26097.89 h | 29826.16 h | 33554.43 h |
| 3TB | 27962.03 h | 33554.43 h | 39146.84 h | 44739.24 h | 50331.65 h |
| 4TB | 37282.70 h | 44739.24 h | 52195.78 h | 59652.32 h | 67108.86 h |
Note: a one-second recording needs 16KB space. So a one-minute recording need 16KB/s*60s=960KB space.
Ich möchte die integrierte Warteschleifenmusik verwenden. Brauche ich eine Lizenz?
Die integrierten Dateien für Warteschleifenmusik werden unter der Creative Commons Attribution-ShareAlike 3.0-Lizenz mit ausdrücklicher Genehmigung ihrer Autoren vertrieben.
Die Lizenz finden Sie hier.
Wenn Sie in unseren FAQs keine Antwort auf Ihre Frage gefunden haben,
besuchen Sie bitte unser Support-Portal.