FAQ serie S
About Login
Qual è l’IP predefinito del centralino VoIP serie S?
L’IP predefinito del centralino VoIP serie S è 192.168.5.150.
Why do I get an error message on the browser when I try to access the S-Series VoIP PBX?
This kind of error message, for example, “Your connection is not private” message in Chrome browser, is caused by SSL error. The S-Series VoIP PBX uses HTTPS protocol for login with a local IP address. But SSL certification authority don’t issue certificate for local IP address.
There is nothing to worry about and you can proceed to visit the link.
If you wish to get the SSL certificate, you need to bind a domain or public IP to the S-Series PBX, and then get the certification from the certification authority. You may need to pay for the certification.
Quali sono il nome utente e la password predefiniti dell’account amministratore del centralino VoIP serie S?
L’account amministratore predefinito del centralino VoIP serie S è “admin” e “password”. E per una maggiore sicurezza, consigliamo vivamente di cambiare la password predefinita dopo il primo accesso.
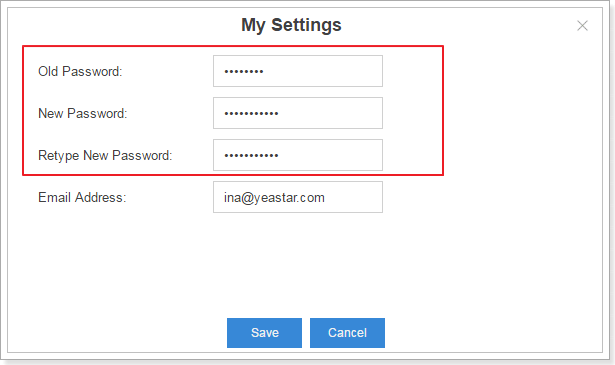
Come cambiare la password dell’account amministratore?
Clicca ![]() e vai a “Le mie impostazioni” e cambia la password dopo aver effettuato l’accesso nella GUI Web.
e vai a “Le mie impostazioni” e cambia la password dopo aver effettuato l’accesso nella GUI Web.
How to log in the Extension User Web Interface?
Input the PBX’s IP address and use the username and password to login. The username and default password are “extension number (e.g. 1000)” and “pass + extension number (e.g. pss1000)”.
We highly suggest that you change the default password in extension edit page after your first login.
Come cambiare la password predefinita dell’account utente?
Vai su Impostazioni → Centralino → Interni e modifica la “Password utente” nella modifica dell’interno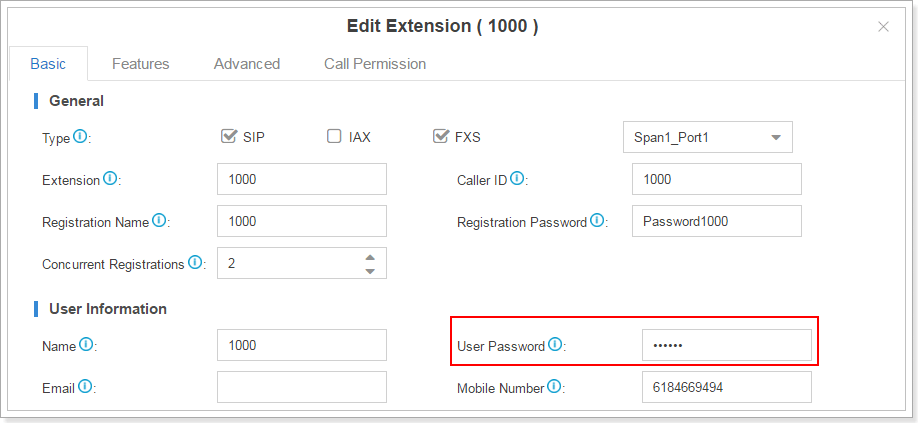
Cosa posso fare se ho dimenticato la password?
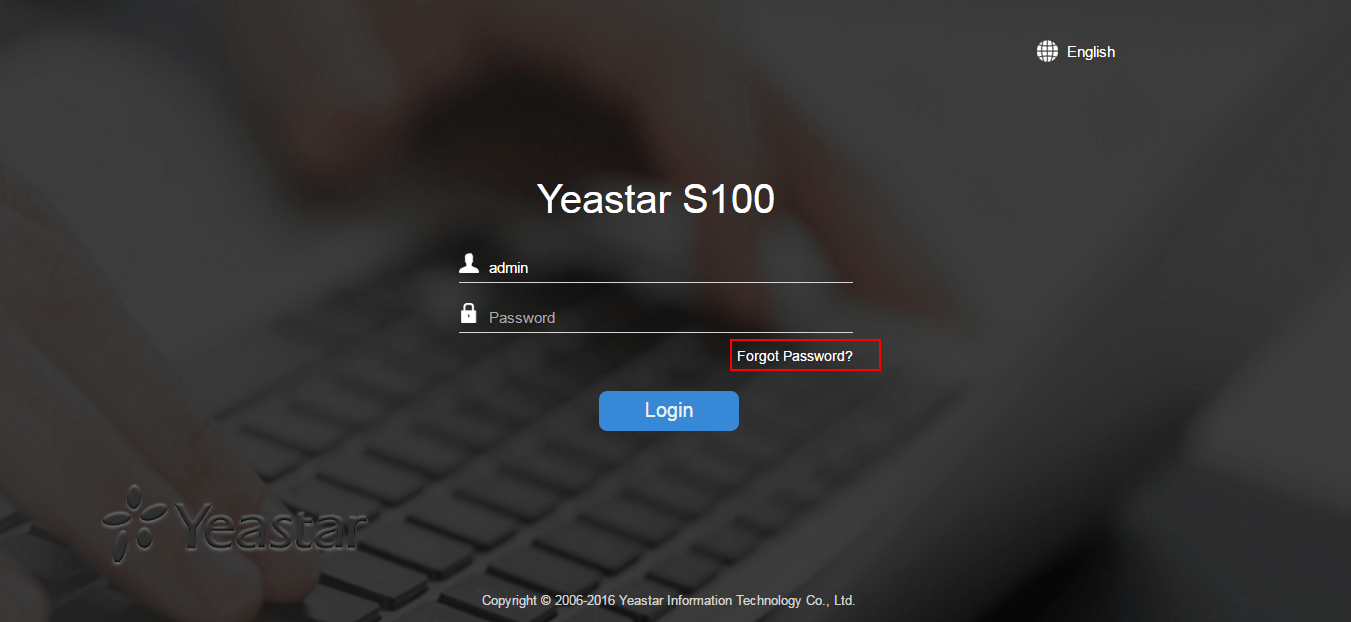
Per reimpostare la password è possibile fare clic su “Password dimenticata?” nella pagina di accesso.
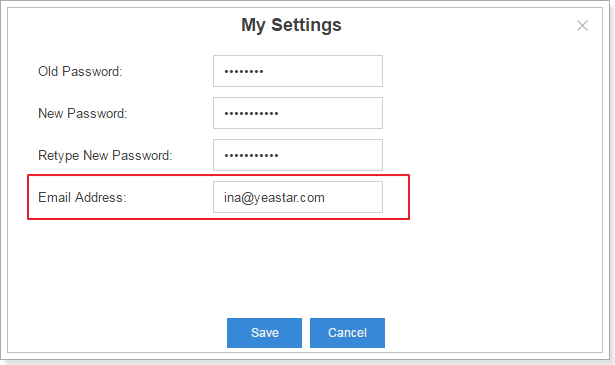
I prerequisiti per questa funzione sono:
1. L’account è legato a un indirizzo e-mail. Se sei l’amministratore puoi configurare facendo clic su![]() e su “Le mie impostazioni”.
e su “Le mie impostazioni”.
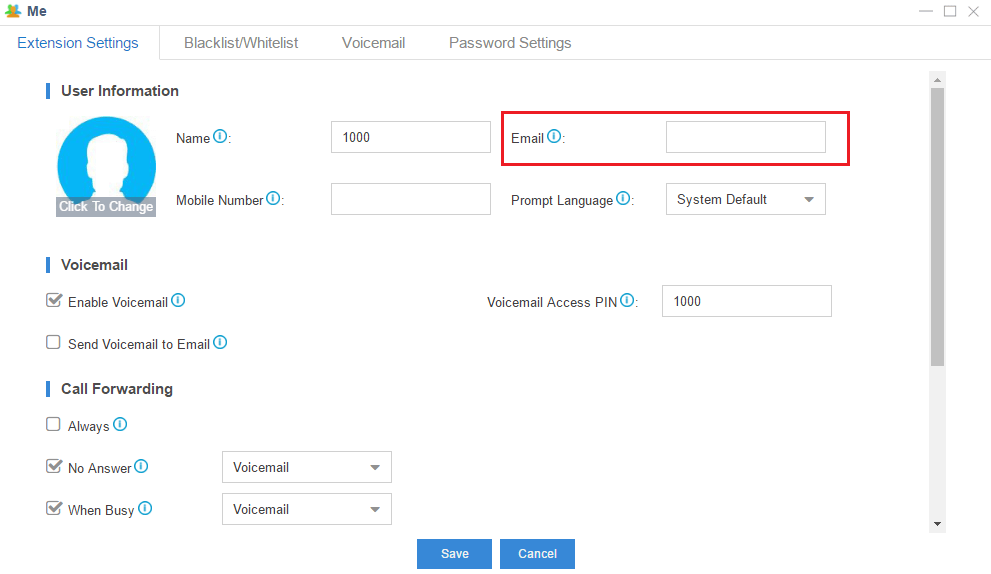
Se sei utente di interno puoi accedere all’interfaccia Web per l’utente dell’interno e passare a “Me” per legare una e-mail a questo account.
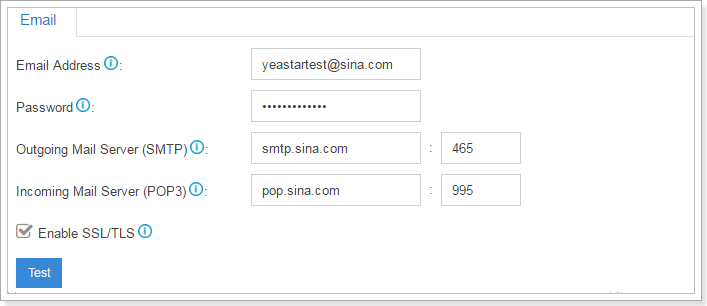
2. Hai già configurato le impostazioni e-mail corrette e hai inviato correttamente la e-mail di prova. Vai su Impostazioni → Sistema → E-mail e inserisci l’indirizzo e-mail, la password, SMTP, POP3, le porte e, se necessario, seleziona “abilita SSL / TLS”.
Ora vediamo come reimpostare la password.1. Fai clic su “Password dimenticata?” nella pagina di accesso.
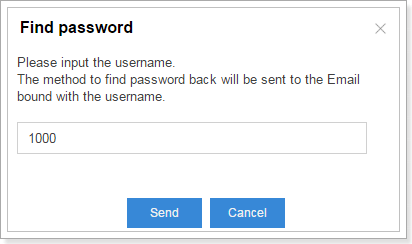
3. Inserisci il nome utente (numero di interno) e il sistema invierà una e-mail alla tua casella di posta elettronica legata all’account.
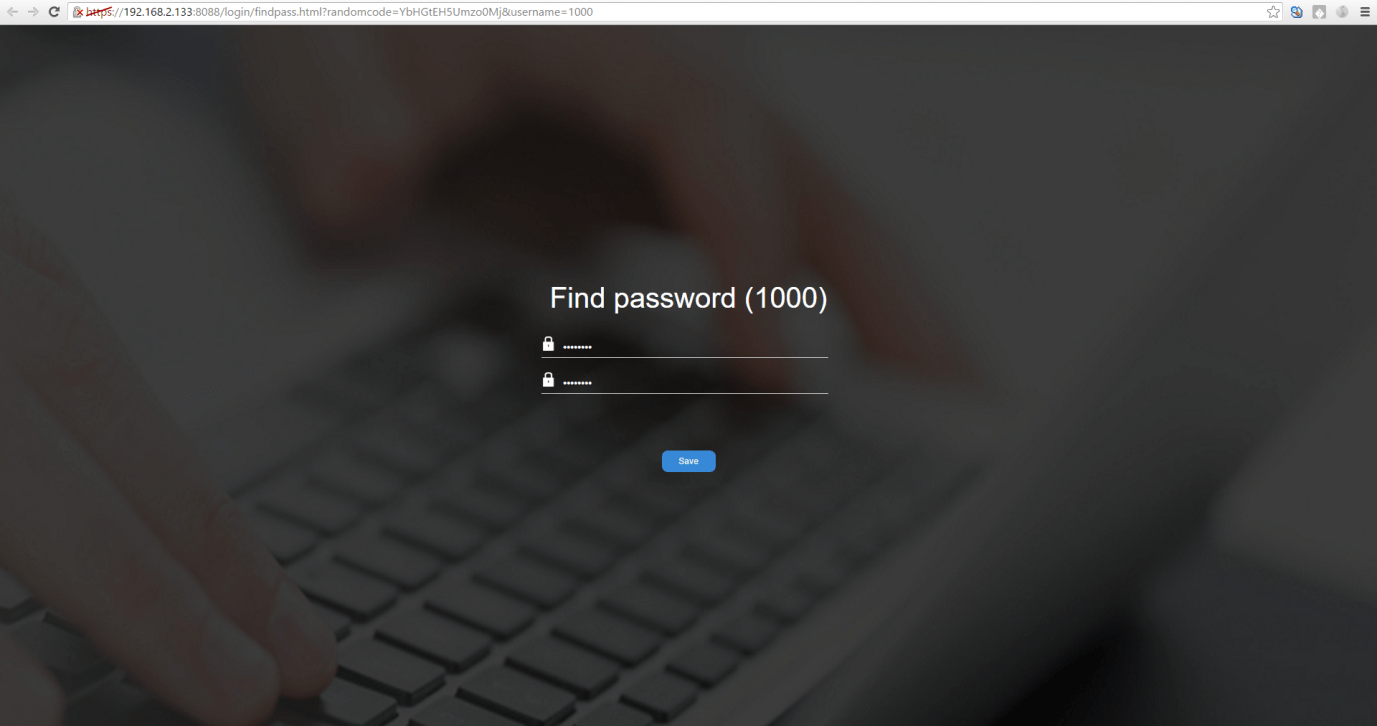
4. Fare clic sul link nella posta in arrivo per reimpostare la password. Attenzione: il link è valido solo nella rete locale entro 30 minuti.
5. Inserisci una nuova password e ridigita la nuova password.
About Extension
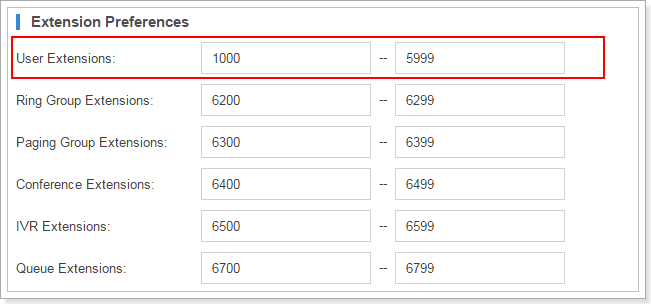
Come cambiare la gamma di interni?
A. Vai su Impostazioni → Generale → Preferenze e configurala in “Interni utente”.
What is the range of extension numbers?
S-Series VoIP PBX can have extensions range from 2 digits to 7digits.
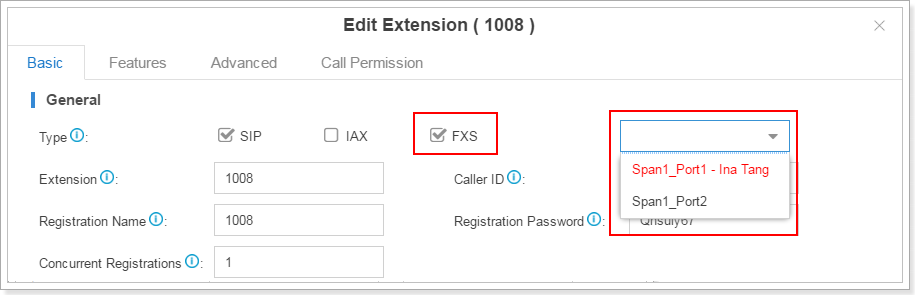
Come aggiungere un interno FXS?
Vai su Impostazioni → Centralino → Interni, fai clic su “aggiungi” nella pagina di modifica dell’interno.
Spunta “FXS” in “tipo” e scegli la porta nell’intervallo FXS.
Note:
1. Sul centralino VoIP serie S gli interni possono essere “SIP”, “IAX” e “FXS” allo stesso tempo.
2. Se l’interno ha “FXS” selezionato, devi assegnare una porta FXS all’interno. Se la porta FXS nell’elenco a discesa è ROSSA, significa che la porta FXS è in uso e non è possibile scegliere questa porta. Se la porta è NERA, significa che la porta è inattiva.
How to register an IP phone or softphone to S-Series VoIP PBX?
A. S-Series VoIP PBX have passed compatibility test with lots of IP phone brands, such as Yealink, Grandstream, Cisco, Polycom, Snom, etc.
The detailed configuration manual can be found here: https://www.yeastar.com/auto-provisioning-on-the-yeastar-s-series-voip-pbx/#phonesupported.
How to register a remote extension?
1. Make port mapping for communication ports of PBX on router. The default ports are:
UDP (SIP): 5060
UDP (RTP): 10000-12000
2. Go to Settings →PBX→General→SIP→NAT. If you use static IP for S-Series VoIP PBX, please select “External IP Address” on “NAT settings” and input the public IP address of S-Series VoIP PBX. If you use dynamic IP for PBX, please input the domain in “External Host” field on the NAT settings page.
3. Got to Settings→ PBX→ Extensions. Choose the extension that needs to be registered remotely, click![]() . Select “Advanced” page, enable “NAT” and “Register Remotely”.
. Select “Advanced” page, enable “NAT” and “Register Remotely”.
4. Register to this extension configured.
For more configuration details please refer to this link: https://support.yeastar.com/hc/en-us/articles/229524467-Configuring-Remote-Extensions
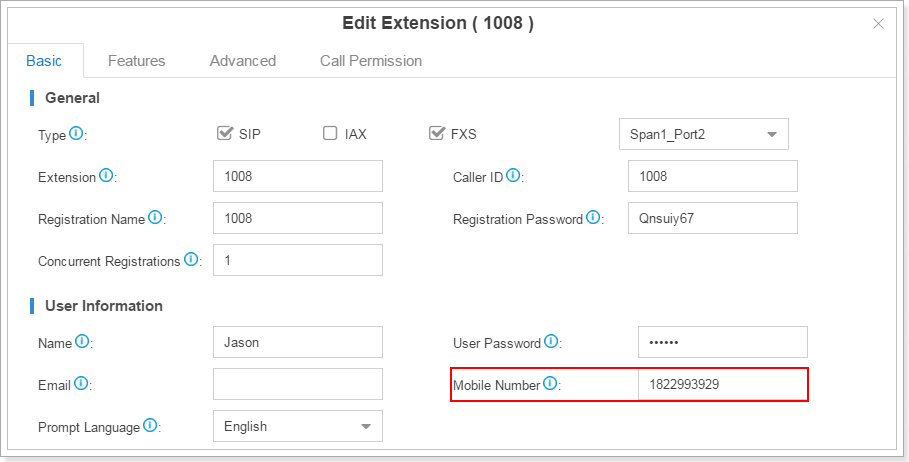
What is mobility extension? How to configure it?
Mobility extension is used to bind mobile number with an extension, so this mobile number will have the corresponding extension’s call privilege, such as: make internal calls, make outgoing calls, and play voicemail unread, etc. When the user uses this mobile number to call into S-Series VoIP PBX, the PBX will treat it as the corresponding extension, and he/she will hear the dial tone.
To configure mobility extension, follow the steps below.
1. Click Settings → PBX → Extensions, go to extension edit page. Click “Edit”.
2. Bind a mobile phone number in “Mobile Number” in “Basic” tab.
3. Click “Features”, and go to “Mobility Extension” settings. If you enable mobility extension, when the mobile number configured calls into S-Series VoIP PBX, it can act like this extension number, such as: make internal calls, make outgoing calls, and play voicemail unread, etc. If you enable Ring Simultaneously, the extension and the mobile phone will ring simultaneously.
Please note that you must configure the specific prefix to make sure S-Series VoIP PBX can reach this mobile number according to the outbound route.
Notes:
1. When a mobility extension makes an internal call, the caller ID presented on the called party’s screen will be the extension number instead of the mobile number.
2. The telephony line/trunk must have caller ID feature. Since PBX recognizes mobile number according to the caller ID detected.
3. Mobility extension feature can’t take effect if administrator has enabled call back feature in inbound routings.
Che cos’è la diramazione SIP nel centralino VoIP serie S? Come configurarla?
Il diramazione SIP è una funzione che consente di registrare un numero di interno da parte di più terminali SIP contemporaneamente; la quantità di terminali può essere al massimo 5.
Fare clic su Impostazioni → Aggiungi / Modifica interno e modificare Registrazioni simultanee.

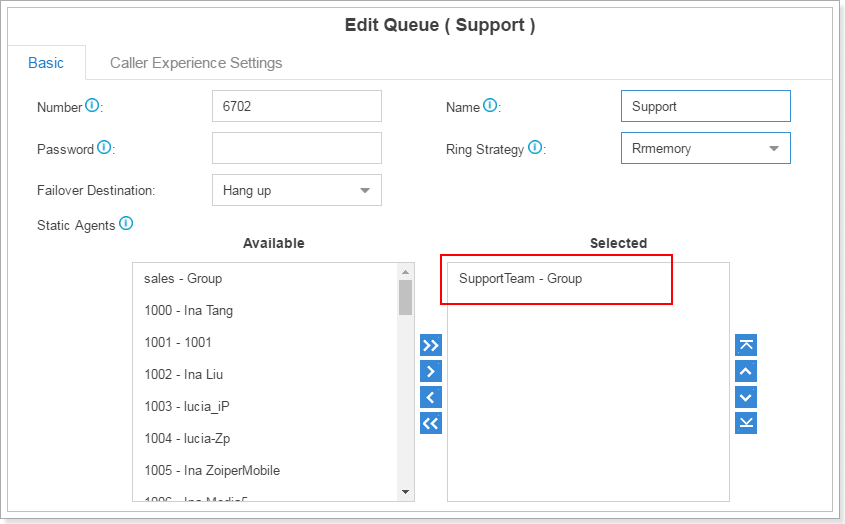
Come selezionare gli interni come gruppo nel centralino VoIP serie S?
Nel centralino VoIP serie S è presente una funzione chiamata “Gruppo di interni”. È possibile personalizzare il gruppo di interni aggiungendo gli interni desiderati a questo gruppo e assegnandogli un nome.
Ecco come configurare il gruppo di interni:
1. In Impostazioni → Centralino → Gruppo di interni, fare clic su “Aggiungi” nella pagina dell’elenco di interni.
2. Creare un gruppo di interni, inserire il nome del gruppo e scegliere gli interni dalla casella selezionata.
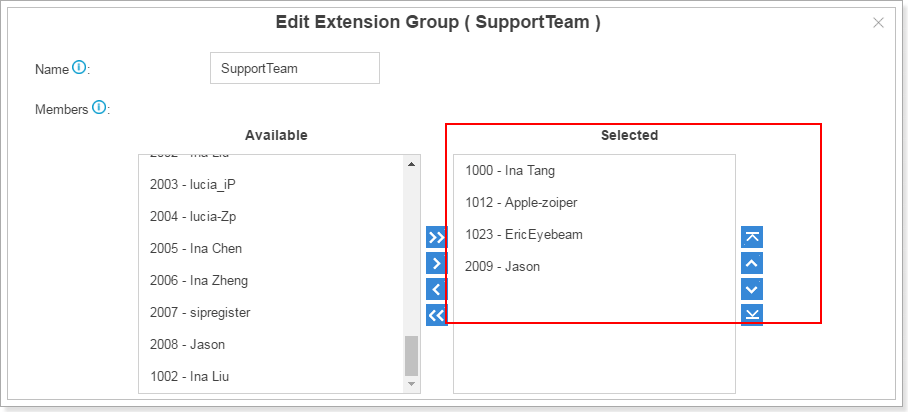
3. Dopo aver creato il gruppo di interni è possibile scegliere il gruppo di interni nella casella selezionata nella pagina di modifica degli interni, invece di scegliere gli interni uno ad uno. Ad esempio, quando si crea una coda, è possibile selezionare un gruppo di interni
About Auto Provisioning
Which IP phones can be auto provisioned on S-Series VoIP PBX?
S-Series supports auto provisioning of IP phones from Yealink, Cisco, Snom, Panasonic, Mitel, Grandstream, Polycom, Htek, Fanvil, VTech, etc. Please find more details about the brands and models at: https://www.yeastar.com/compatible-sip-terminals/.
What IP phones can I use with S-Series VoIP PBX?
Auto provision supported IP phones are all thoroughly tested with S-Series VoIP PBX and are compatible. More details can be found here. IP phones which support standard SIP protocol are also compatible with S-Series VoIP PBX.
If my phone model is not supported in the list of auto provisioning, how can I auto provision my phones?
Create and edit configuration file according to your needs. The file format should be .cfg or .xml.
Step 2. Make sure your phones are ready for auto provisioning.
- PnP mode
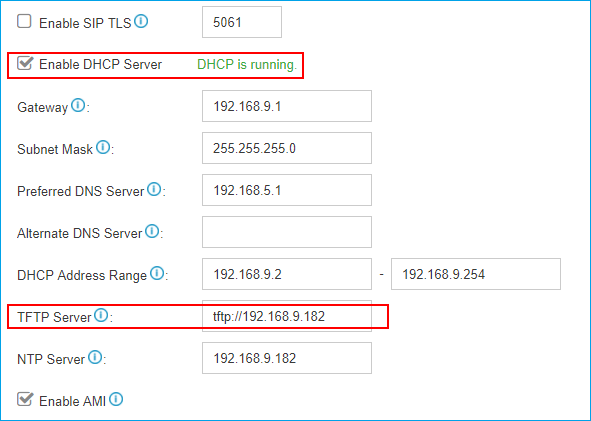
Enable PnP if your IP phone supports PnP function. - DHCP mode
1) If your IP phone does not support PnP, then enable DHCP.
2) Enable DHCP server on your PBX, set the TFTP address to the IP address of the PBX.
Path: Settings > System > Security > Service
Note: Make sure PBX is the only one DHCP server in your local network, or auto provisioning would fail.
Step 3. Upload the configuration file into PBX.
Path: Auto Provisioning > Upload Files > Upload a File.
Step 4. Restart IP phones manually. IP phone will obtain configuration file from PBX and finish auto provisioning.
If my IP phone does not support configuration on Web interface, how to register extensions to S-Series VoIP PBX?
Step 1: Only IP phones which support SIP protocol are allowed to register to S-Series PBX, such as Panasonic KX-TSC11 and Cisco 8800.
Step2: Change IP phone’s firmware version to the one that supports SIP protocol. The firmware is usually available at the official website of the phone manufacturer. If you cannot find it, please consult the phone manufacturer.
Step 3: Finish registration by entering registration information on IP phone Web GUI.
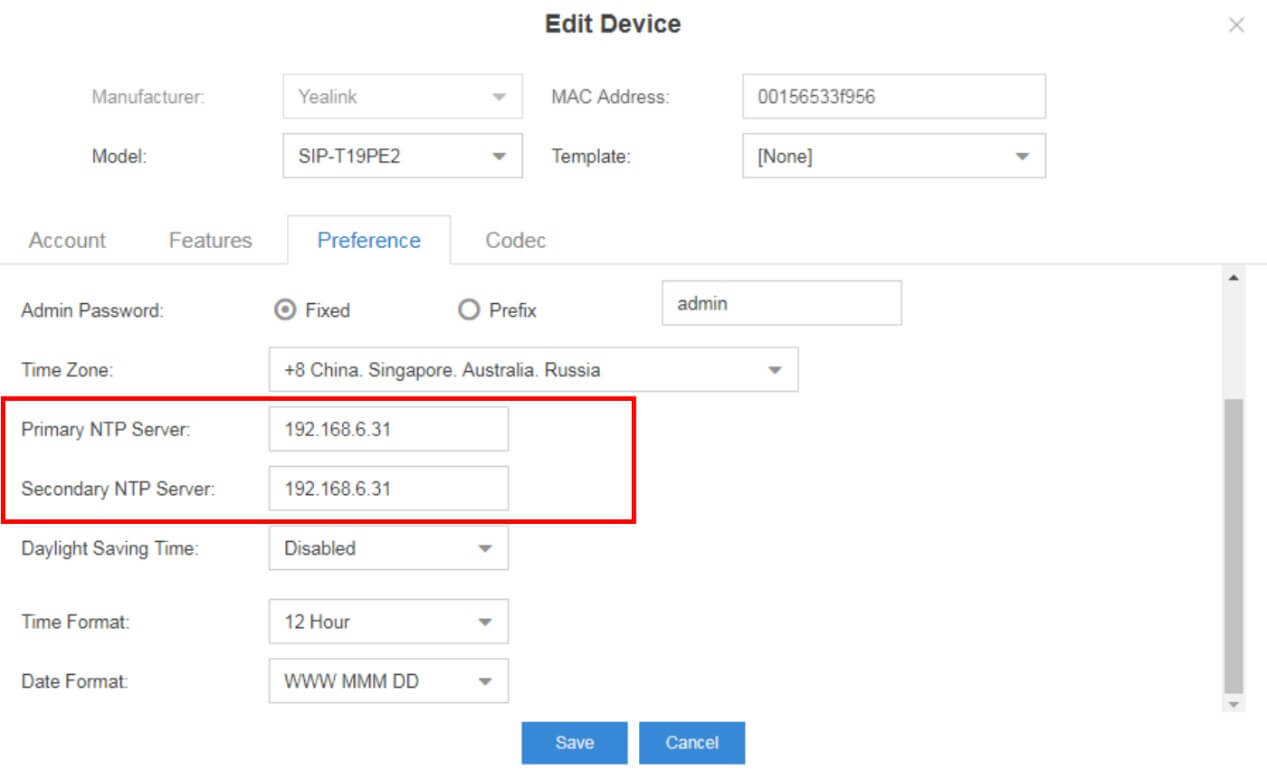
How to synchronize the IP phone time with the time of S-Series VoIP PBX?
Configure the time on Auto Provisioning configuration page.
Step1. Select and edit the phone.
Step2. On the Preference page, set the NTP server as the IP address of the S-Series PBX.
Step3. Click “Save” and reboot the phone to take effect.
How to share phonebooks by using remote phonebook?
The configuration details can be found in this knowledge base article.
How to upload local phonebook into S-Series VoIP PBX?
The configuration details can be found in this knowledge base article.
How to share phonebooks via LDAP Sever?
The configuration details can be found in this LDAP Server Guide.
Why does auto provisioning not work for my IP phones?
1. Make sure that you have only one S-Series VoIP PBX in your local network.
2. Make sure that your IP phones and the S-Series PBX are in the same network, and the phones and the S-Series PBX could communicate with each other.
3. Reboot your phones manually.
If after that, the function still cannot work, please submit a ticket on Support Portal for help.
Can Auto Provisioning work when IP phones and PBX are in VLAN environment?
No. Auto Provisioning will work only when IP phones and PBX are in the same local area network. Neither VLAN nor VPN can make the function work.
How to disable Auto Provisioning function?
You can do one of the following configurations to disable Auto Provisioning:
1. Delete the IP phones from Auto Provisioning> Device List page.
2. Disable TFTP Sever on the PBX.
3. Uninstall Auto Provisioning application from the PBX.
Can I upgrade IP phones’ firmware via Auto Provisioning?
Yes. Follow the steps below to upgrade your phones.
1. Register your phones to the PBX via Auto Provisioning.
2. Go to Auto Provisioning > Firmware Upgrade to upload the phone’s firmware file.
3. Reboot the phone to take effect.
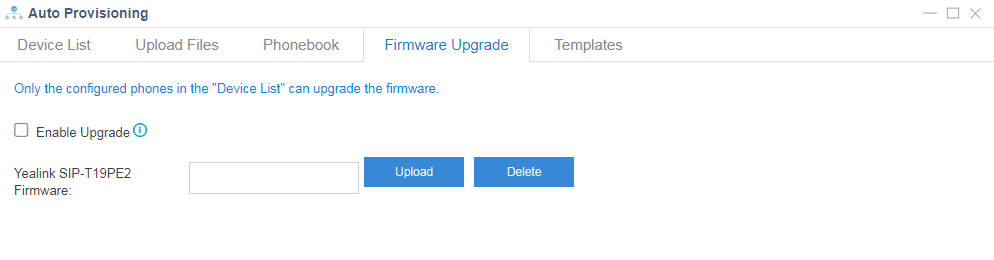
Note: only IP phones that can be auto provisioned by S-Series PBX support this kind of upgrade.
About Trunks
How to register a VoIP trunk in S-Series VoIP PBX?
1. Go to Settings → PBX → Trunk, Click ![]() to add a VoIP trunk.
to add a VoIP trunk.
2. Select protocol and trunk type.
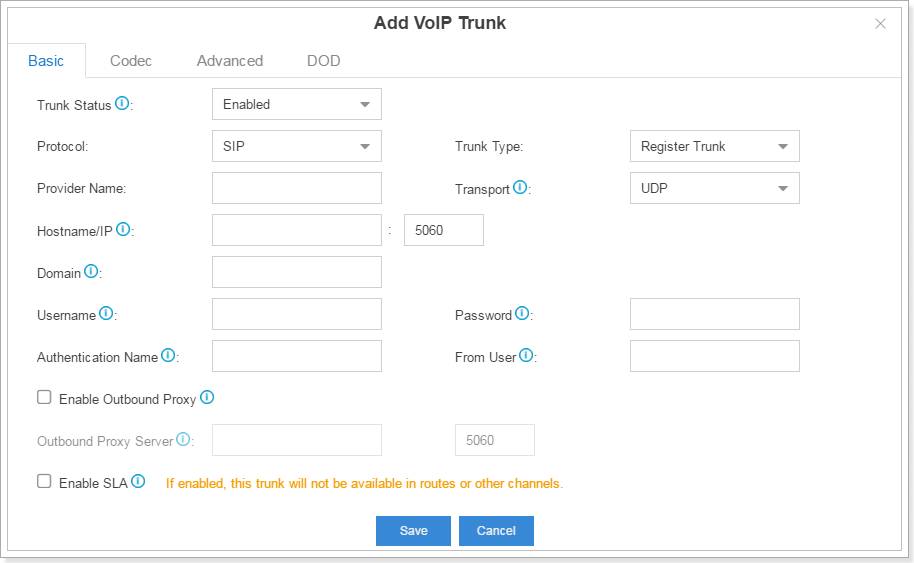
3. Input the VoIP information which is provided by the ISP. For example:
Provider Name: Chinamobile
Hostname/IP: the registration IP given by the ISP (e.g. 111.111.111.111)
Port: 5060
Domain: The domain server given by ISP (e.g. ims.fj.chinamobile.com)
Username: the username given by ISP (e.g. 865921111111@ims.fj.chinamobile.com )
Password: the account password given by the ISP
From user: the trunk number given by the ISP (e.g. +86592111111)
4.For more details please refer to S-Series VoIP PBX Administrator Guide.
About Call Control
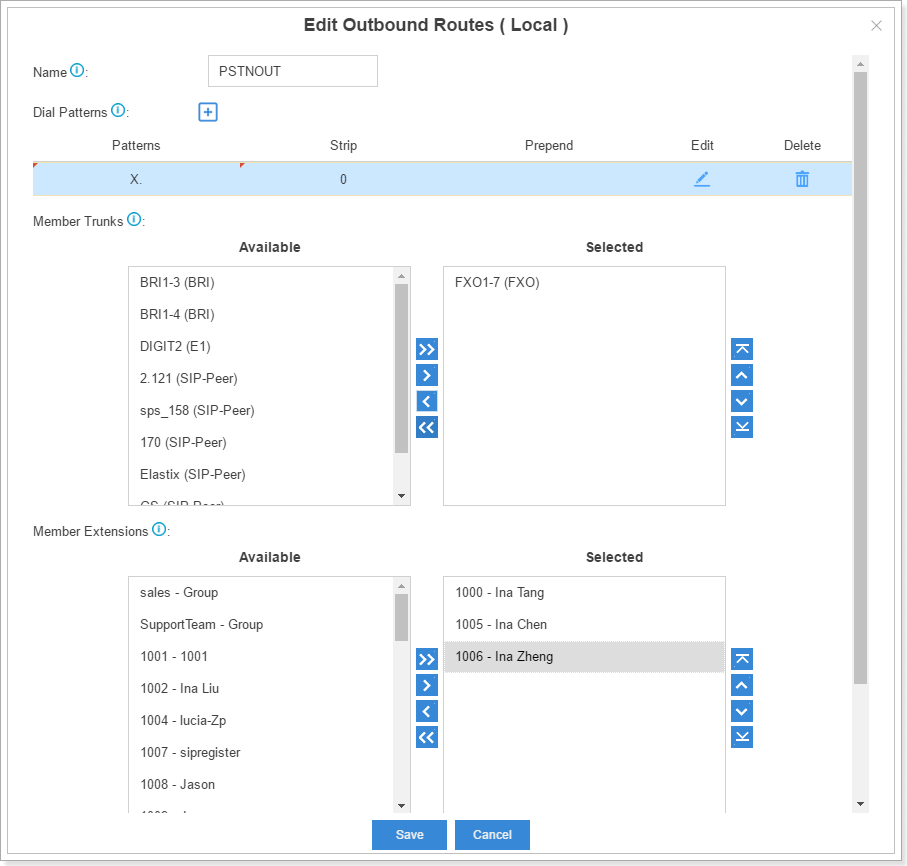
How to configure the outbound routes in S-Series VoIP PBX?
1. Go to PBX Monitor → Trunk to check the status of the trunk and make sure the trunk is available to use.
2. Go to Settings → PBX → Call Control → Outbound Routes, click ![]() in the outbound routes list page.
in the outbound routes list page.
3. Fill in the details in the edit page and save. For example, you could configure the outbound routes as follows if you want 1000, 1005 and 1006 to use FXO1-7 to dial out.
For more details, please refer to the S-Series VoIP PBX Administrator Guide.
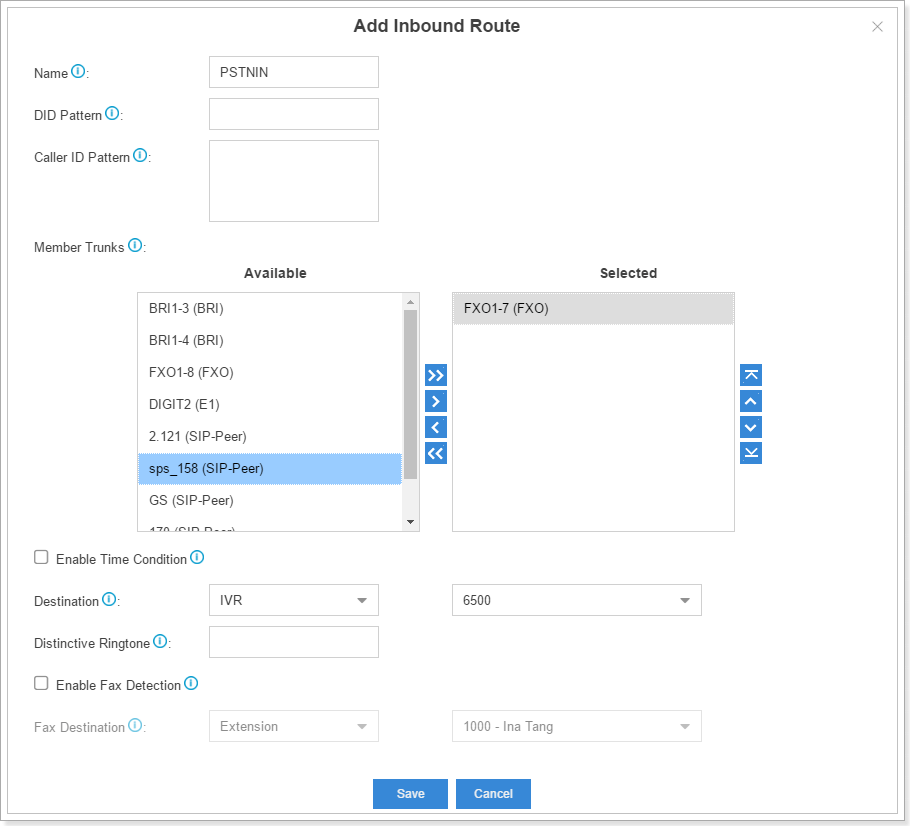
Come configurare gli instradamenti in entrata nel centralino VoIP serie S?
1. Vai a Impostazioni → Centralino → Controllo chiamate → Instradamenti in entrata, fai clic su ![]() nella pagina elenco degli instradamenti in entrata.
nella pagina elenco degli instradamenti in entrata.
2. Nella pagina di modifica degli instradamenti in entrata è necessario selezionare la linea principale nella casella selezionata e scegliere la destinazione per indirizzare la chiamata. È possibile impostare la condizione temporale per indirizzare la chiamata in base ai periodi di tempo. L’esempio è mostrato come segue. Per maggiori dettagli, fare riferimento alla Guida per l’amministratore del centralino VoIP serie S.
Come guidare le chiamate in entrata verso le diverse destinazioni in diversi periodi di tempo con la Condizione di tempo?
1. Vai a Centralino → Controllo chiamate → Condizioni tempo e aggiungi le condizioni o la festività se necessario.
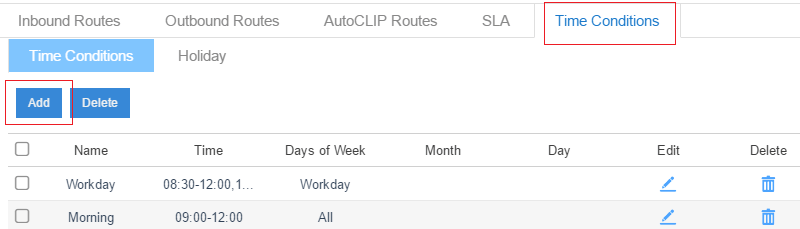
2. Vai a Impostazioni → Centralino → Controllo chiamate → Instradamenti in entrata, fare clic su ![]() per modificare l’elenco di instradamenti in entrata.
per modificare l’elenco di instradamenti in entrata.
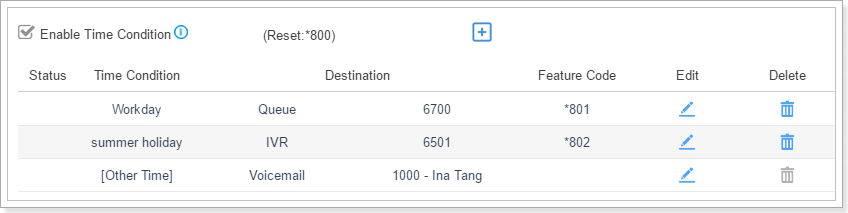
Spunta “Abilita condizione temporale” e fai clic su, ![]() aggiungi la condizione temporale e imposta la destinazione. Il periodo che non corrisponde alle condizioni temporali create arriverà a destinazione in “[altro tempo]”.
aggiungi la condizione temporale e imposta la destinazione. Il periodo che non corrisponde alle condizioni temporali create arriverà a destinazione in “[altro tempo]”.

Come sovrascrivere la condizione temporale e come annullare la sovrascrittura?
1. Seleziona il codice funzione nella pagina di modifica degli instradamenti in entrata. Nella figura seguente sono presenti tre codici funzione: “*801”, “*802” e “*800”. “*800” viene utilizzato per annullare la sovrascrittura e reimpostare la destinazione sullo stato originale.
2. Utilizza l’interno per premere il codice funzione come “*801” per sovrascrivere la condizione temporale “Giorno lavorativo”.
3. La Condizione temporale sovrascritta avrà un segno di spunta davanti ad essa.
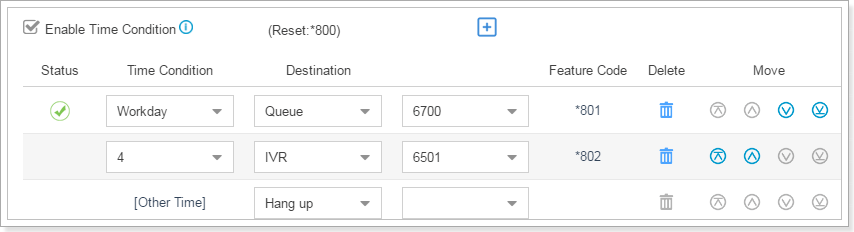
4. Se si desidera annullare la sovrascrittura e condurre le chiamate alle destinazioni originali che sono state configurate, è possibile utilizzare l’interno per premere il codice funzione Reset, come “*800” nell’esempio.
What is AutoCLIP? How to use it?
S-Series VoIP PBX will automatically record outgoing calls into the AutoCLIP route list. When the called party calls back, the system will lead the call to the extension which dialed this number recently.
To set up AutoCLIP:
1. Go to Settings → PBX → Call Control → AutoCLIP Routes, and open the AutoCLIP configuration page.
2. The fields in the AutoCLIP:
Record Keep Time: how long each record will be kept in the AutoCLIP List.
Digits Match: how many digits from the last digit of the incoming phone number will be used to match the AutoCLIP record.
Member trunks: AutoCLIP Route will apply to which trunk and which trunk`s record will be kept in the list.
Dove vedere la lista dei record di AutoCLIP?
Vai a Impostazioni → Centralino → Controllo chiamate → Percorso AutoCLIP, fai clic su “Visualizza elenco AutoCLIP” per verificare le informazioni.
About Calls
Perché sento un segnale acustico prima del segnale di linea quando il telefono è sganciato?
Questo perché hai messaggi vocali non letti: componi “* 2” per ascoltarli. Non verrà emesso alcun segnale acustico quando tutti i messaggi vocali saranno stati letti.
About Call Feature
Come utilizzare la funzionalità whitelist / blacklist del centralino VoIP serie S?
A. La blacklist viene utilizzata per filtrare il numero. Se un numero è nella blacklist, l’utente non sarà in grado di chiamare o essere chiamato. La whitelist viene utilizzata per inserire il numero nel campo di fiducia.
Note:
1. Nella blacklist/whitelist è possibile inserire numeri con schemi.
Ad esempio, se si desidera impedire di chiamare il numero che inizia con 0592, ma consentire la chiamata all’intervallo numerico di 05925503301-05925503309, è possibile inserire “0592550330z” nella whitelist e “0592” nella blacklist.
2. La whitelist ha una priorità più alta della blacklist.
About Call Recording
Where can I store call recording files?
You can store the auto recording files in:
1. External storage devices, such as HDD, USB, TF/SD card
2. Network Drive
Can I back up call recording files?
No, you cannot back up call recording files.
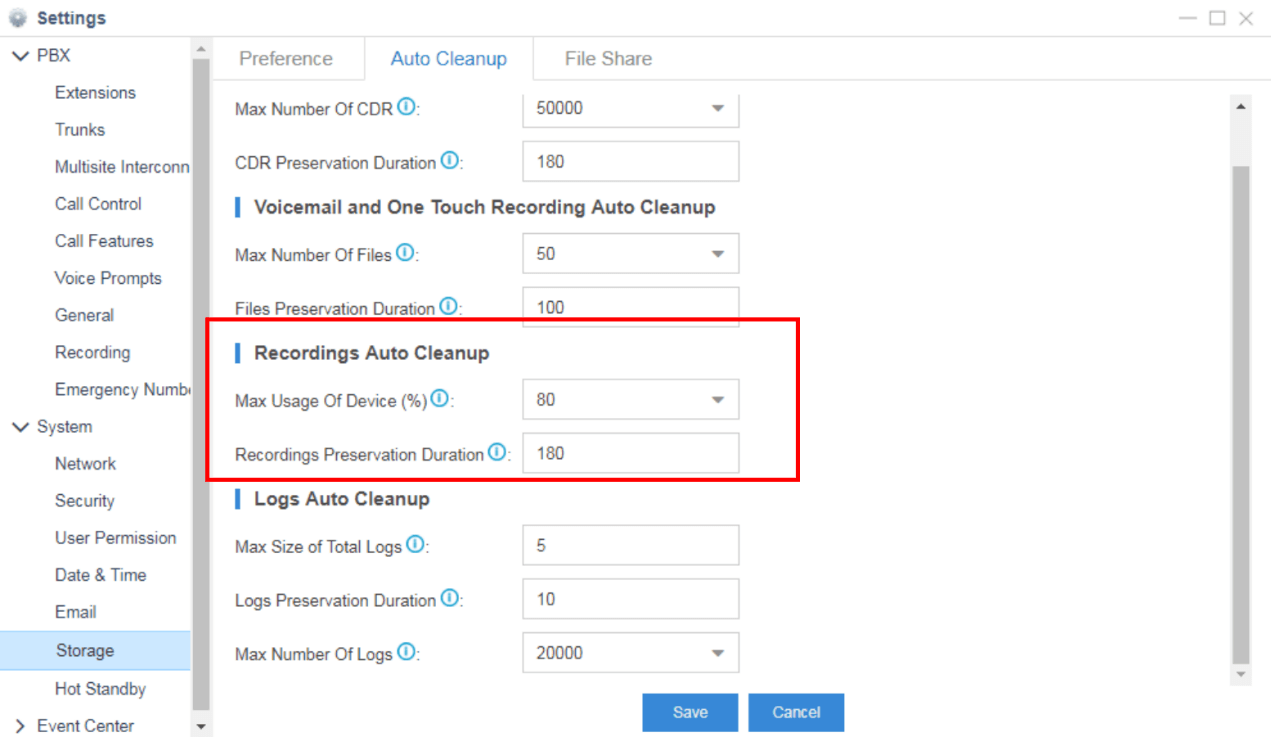
How to set auto cleanup of recording files?
Go to Settings -> System -> Storage -> Auto Cleanup -> Recordings Auto Cleanup, and design max usage of device and longest preservation period.
What is the format of recording files?
The file format is .wav.
When call recording is enabled, will a prompt be played notifying the calling and called parties that the call is being recorded?
Yes, you can set up the prompt in Settings -> PBX -> Recording. If it’s an external call (inbound or outbound call through a trunk), the external party will hear the prompt no matter he is the called party or caller. If it’s an internal call, the called party will hear the prompt.
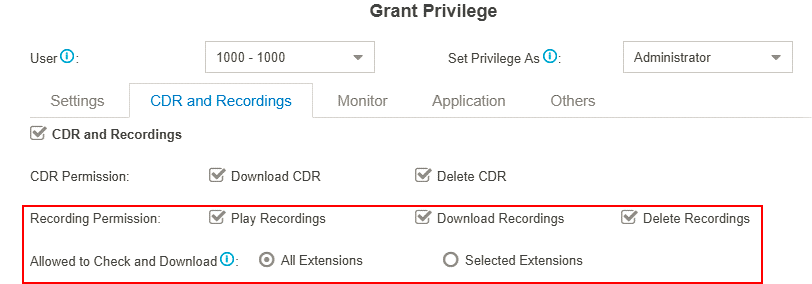
Do the extension users have permission to manage call recording files?
By default, only the super administrator has the permission to manage call recording files. The administrator can go to Settings > System > User Permission to add permission to desired users.
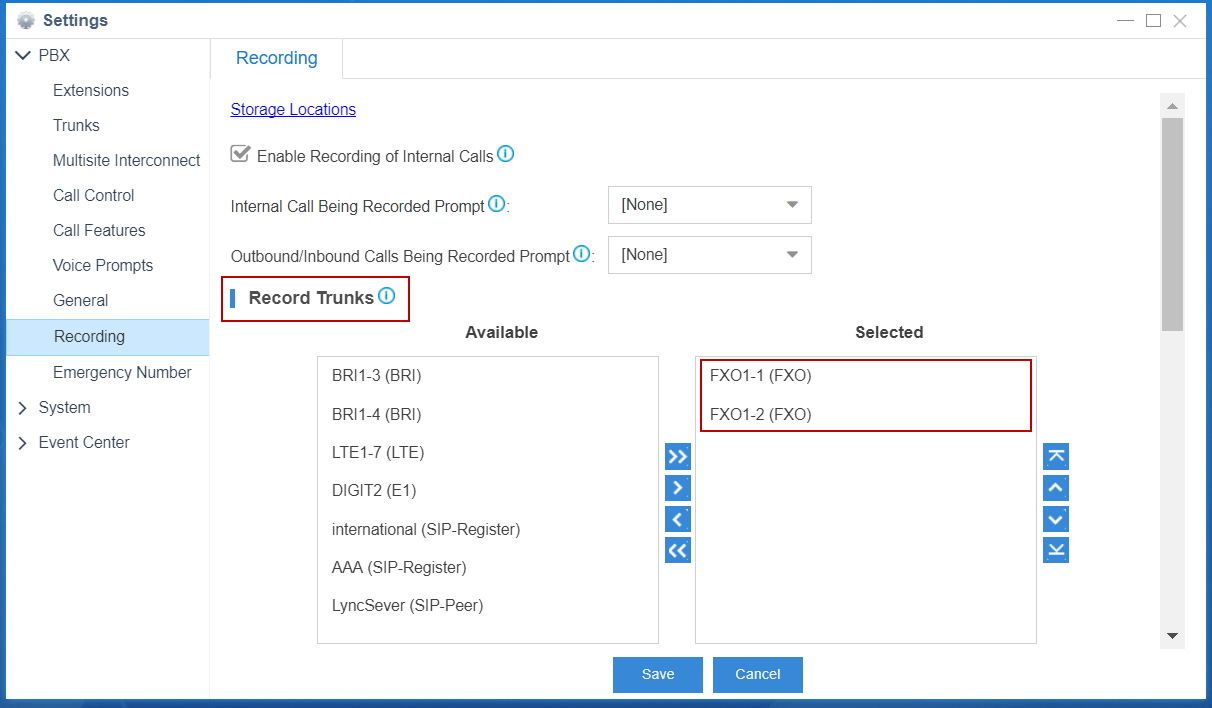
Can I record all the calls which are made through a specific trunk?
Yes. Go to Settings> PBX> Recordings, select the desired trunk, click Save and Apply.
All the calls through the selected trunk will be recorded.
How to check recordings via File Share?
The configuration details can be found this knowledge base article.
About Voice Prompts
How to change system prompt in S-Series VoIP PBX?
S-Series VoIP PBX allows two ways to modify the system prompt: update manually or download online prompt.
Manually update:
1. Go to Settings → PBX → Voice Prompts→ System Prompt
2. Browse a local “.tar” file and click “Upload”
3. You could download the system prompt file in the links below
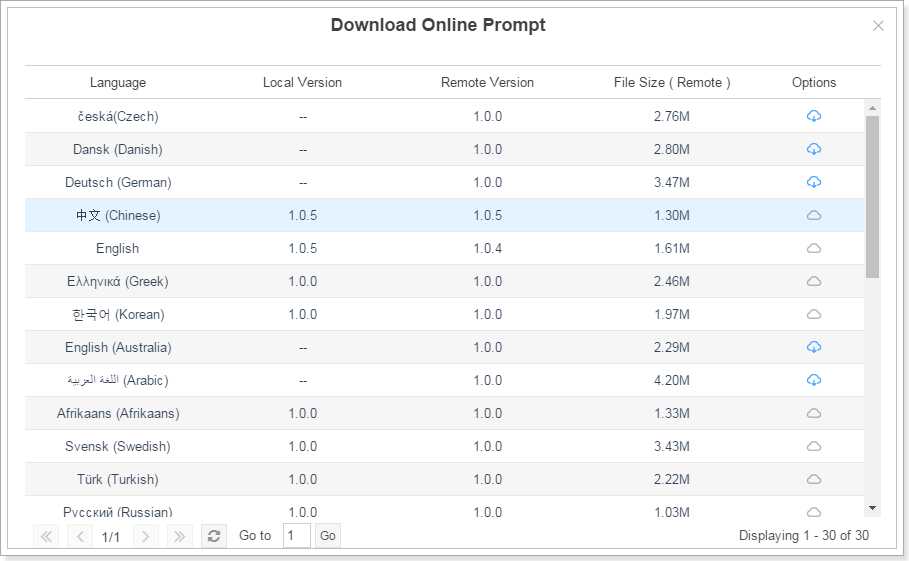
Download online prompt:
Go to Settings → PBX → Voice Prompts → System Prompt
Click “Download Online Prompt” and choose the prompt you want.
How to change the voicemail prompts?
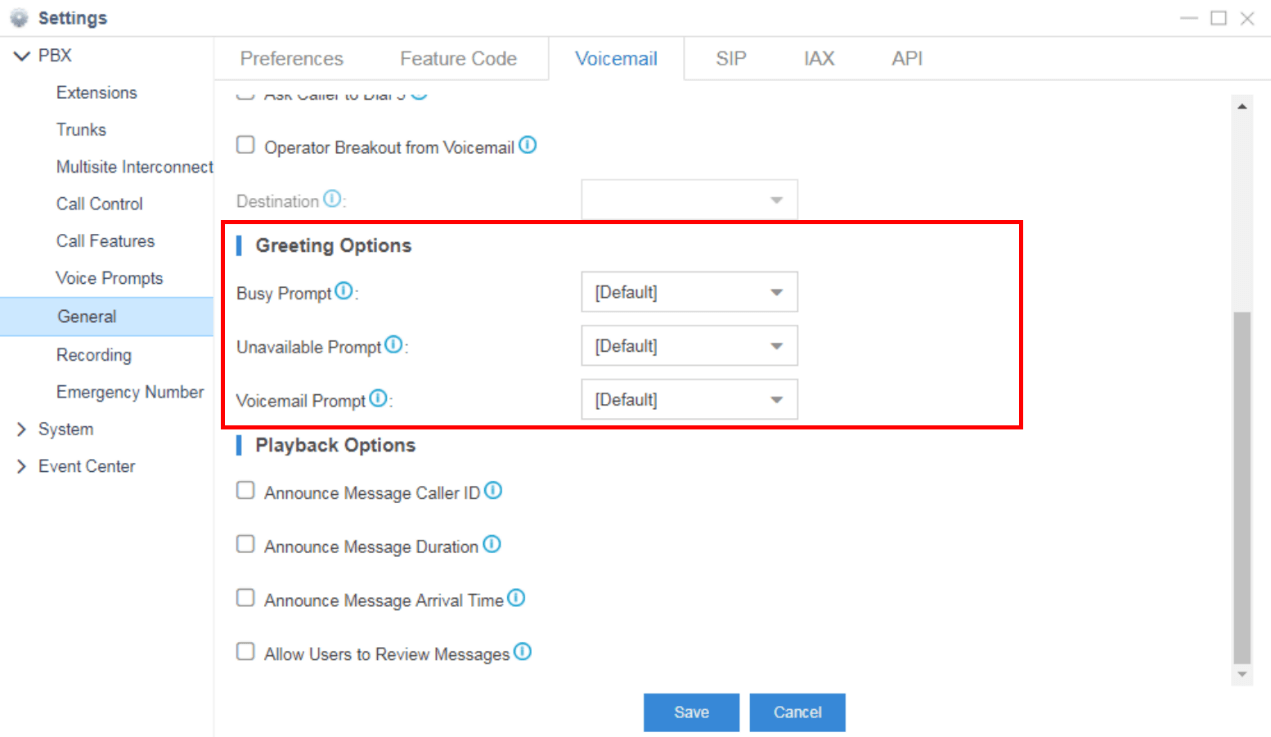
1. Super admin can set voicemail prompts played over all internal extensions.
Step1: Go to Settings -> PBX -> Voice Prompts -> Custom Prompts, and upload prompt files to PBX.
Step2: Go to Settings -> PBX -> General -> Voicemail -> Greeting Options and select the custom prompt to be applied.
Step3: Click “Save” and “Apply”.
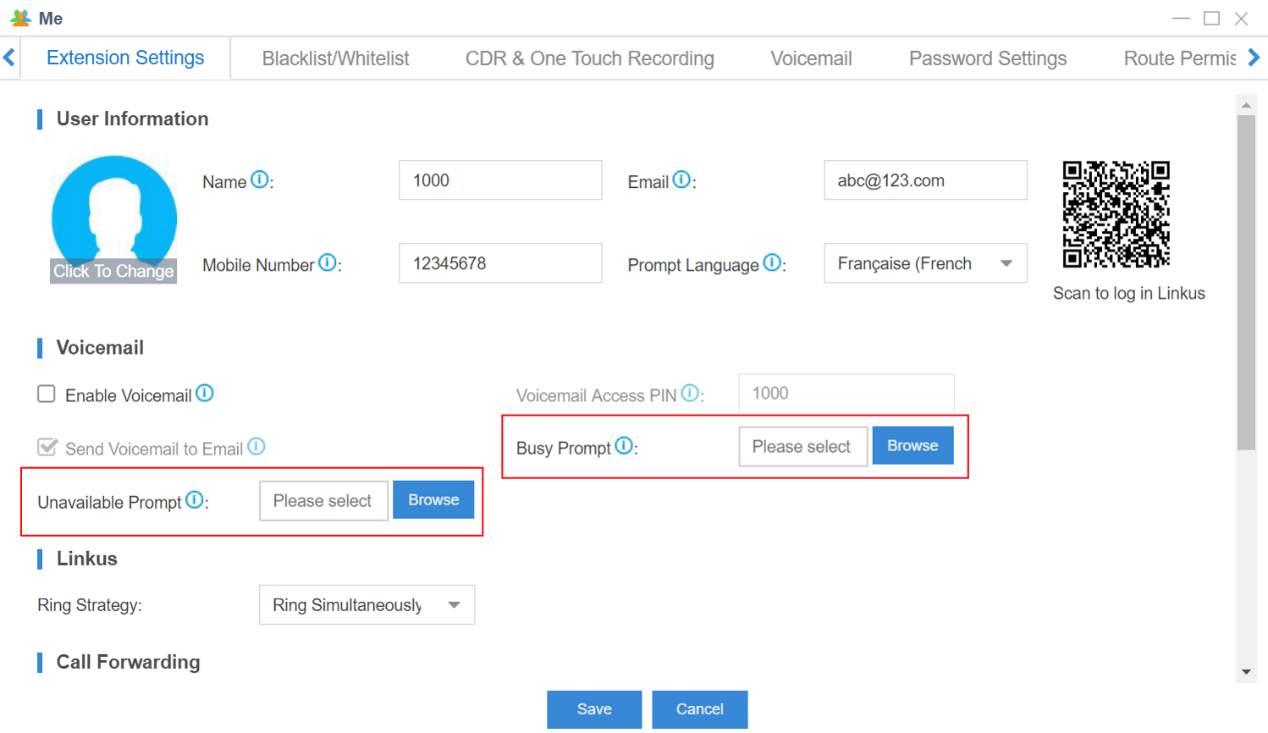
2. Extensions users can also set their own voicemail prompt.
Step1: Login to user account via Web GUI.
Step2: Go to Me-> Extension Settings, and change the voicemail prompt.
Which audio file format does S-Series VoIP PBX support?
File format: “.wav”, “.WAV”, or “.gsm”.
File size: smaller than 8MB.
Supported wav format:
- PCM, 8K, 16bit, 128kbps;
- alaw (g.711), 8k, 8bit, 64kbps;
- u-law (g.711), 8k, 8bit, 64kbps;
- gsm, 6.10, 8k, 13kbps.
How to convert audio file format?
You can convert audio file format in two ways, by web tool or Wave Pad. Please visit this knowledge base article for details.
What’s the maximum duration of a custom audio file?
There is no duration limit for custom audio files.
How to disable custom voicemail prompt?
Step 1: Delete the applied custom audio file on S-Series VoIP PBX Web interface.
Step 2: Dial *2 on an extension.
Step 3: Follow the prompt, and press 0->4->2 sequentially.
About Hardware
What’s the power consumption of S-Series VoIP PBX?
S412: 9.0-25.6W
S20: 1.8-10.6W
S50: 2.1-18.5W
S100: 5.5-41.2W
S300: 6.2-59.1W
Does S-Series VoIP PBX support rack mounting?
S412: No
S20: No
S50: Yes, need mounting ears (Yeastar supplied)
S100: Yes
S300: Yes
How many modules does S-Series VoIP PBX support? What kind of module can be installed?
What’s the maximum number of modules allowed to be installed on each model of S-Series:
S412: 4
S20: 2
S50: 4
S100: 8
S300: 12
| Model.Module | S412 | S20 | S50 | S100 | S300 |
| S2 Module | Max. 2 | Max. 2 | Max. 4 | Max. 8 | Max. 12 |
| O2 Module | Max. 2 | Max. 2 | Max. 4 | Max. 8 | Max. 12 |
| SO Module | Max. 2 | Max. 2 | Max. 4 | Max. 8 | Max. 12 |
| B2 Module | Max. 2 | Max. 2 | Max. 4 | Max. 8 | Max. 12 |
| GSM/3G/4G Module | Max. 1 | Max. 1 | Max. 4 | Max. 6 | Max. 6 |
Note: only one channel can use cellular data of 4G LTE SIM card. And the 4G LTE module must be installed in the first slot of the EX08 Expansion Board in Span1.
Are there any requirements for the storage space of external storage devices?
No. Storage space does not matter.
What is the recommended TF/SD card?
Write Speed >= 60MB/s
- Sandisk Extreme Pro Series
- Sandisk Extreme Series
- TOSHIBA EXCERIA Series
- Samsung Pro Series
Does Yeastar supply antenna and antenna extension cable?
If you order GSM/3G/4G modules, your S-Series VoIP PBX will be supplied with the relevant number of antennas, but not antenna extension cable. You need to buy an extension cable if you need it. Please refer to the knowledge base article to see specifications of Yeastar supplied antenna.
What are the model names of GSM/3G/4G LTE Modules?
GSM Module: SIM800
3G Module: UC15
4G LTE Module: EC20 or EC25
About Backup and Upgrade
Could the backup file work in a different model of S-Series VoIP PBX?
No, the backup file will not work across different models.
Which files can I back up in S-Series VoIP PBX?
You can select to back up the following files in S-Series PBX:
1. System Settings
2. Custom Prompts
3. Call Logs
Can I store the auto-generated backup files to an external storage device?
Yes.
How to check auto-generated backup files by the file name?
The name of the auto-generated backup files is in the format: model_firmware version_date_time.
For example, the file name “S300_30.6.0.6_201711151539” means that the file was generated on S300 with firmware version 30.6.0.6 at 15:39 on November 15, 2017.
Is it necessary to reset S-Series VoIP PBX before upgrading?
No, it’s unnecessary.
How to upgrade S-Series VoIP PBX without the Internet?
There are three ways available:
1. Upload local firmware to S-Series PBX
2. Upgrade through HTTP
3. Upgrade through TFTP Server
It is easier to upgrade by uploading local firmware. Please refer to the configuration at https://support.yeastar.com/hc/en-us/articles/115011710888-How-to-Do-Firmware-Update-for-S-Series VoIP PBX-PBX.
If I upgrade the S-Series VoIP PBX’s firmware, will the Apps in App Center be upgraded automatically?
1. The PBX Center and Auto Provisioning App will be upgraded to the latest version automatically when you upgrade the S-Series’ firmware.
2. For other Apps, you need to upgrade them independently.
Note: if you cannot upgrade an application to the latest version, you need to upgrade the S-Series’ firmware first.
What can I do if I forget the SSH login password?
1. Create a backup file on the S-Series PBX.
2. Download the backup file to your PC.
3. Reset the S-Series PBX.
4. Restore the backup file to the S-Series PBX.
5. Use the default password (iyeastar) to log in the S-Series PBX via SSH.
Where to download the latest firmware of S-Series VoIP PBX?
Download the firmware file here at https://www.yeastar.com/firmware-download/
When I download a firmware .bin file from the website, and try to open the file, I’m asked to enter a password, what can I do?
The firmware file is encrypted so you can’t open it, but you don’t need to. Just upload the .bin file to your S-Series PBX to upgrade the firmware.
Will the S-Series PBX be reset to factory settings automatically after upgrade?
No, it won’t.
Is it necessary to check “Reset Configuration to Factory Default” before downgrading?
Yes, it’s necessary.
Can I restore backup files generated in higher version of firmware on S-Series PBX with lower firmware version?
No, restoring of backup files is only allowed to be carried out between PBXs with the same firmware version.
Others
Perché la nuova modifica della configurazione del centralino VoIP serie S non ha effetto?
Fai clic su “Applica” nell’angolo in alto a destra della pagina se desideri salvare la configurazione modificata. Ci vorranno 1-2 secondi affinché la modifica abbia effetto.
How many Ethernet modes do S-Series VoIP PBX have? And what is the difference?
S-Series VoIP PBX supports three Ethernet modes: Single, Dual and Bridge.
Single: only use LAN port, WAN port will not be in use.
Dual: the two ports are being used. But it is necessary to choose the default interface on Network configuration page.
Bridge: LAN port will be used for uplink connection. WAN port will be used as bridge for PC connection.
Perché è necessario configurare l’interfaccia predefinita quando la modalità Ethernet è “Doppia”?
Quando la modalità Ethernet è doppia, tutti i pacchetti di comunicazione passeranno attraverso l’interfaccia predefinita eccetto per i percorsi del “Percorso statico”.
In che modo l’amministratore può assegnare l’autorizzazione all’interno?
1. Vai su Impostazioni → Sistema → Autorizzazione utente, fai clic su s-se-faq-trunk-14 nella pagina di elenco dei permessi utente.
2. Spunta la casella prima del permesso che vuoi assegnare.

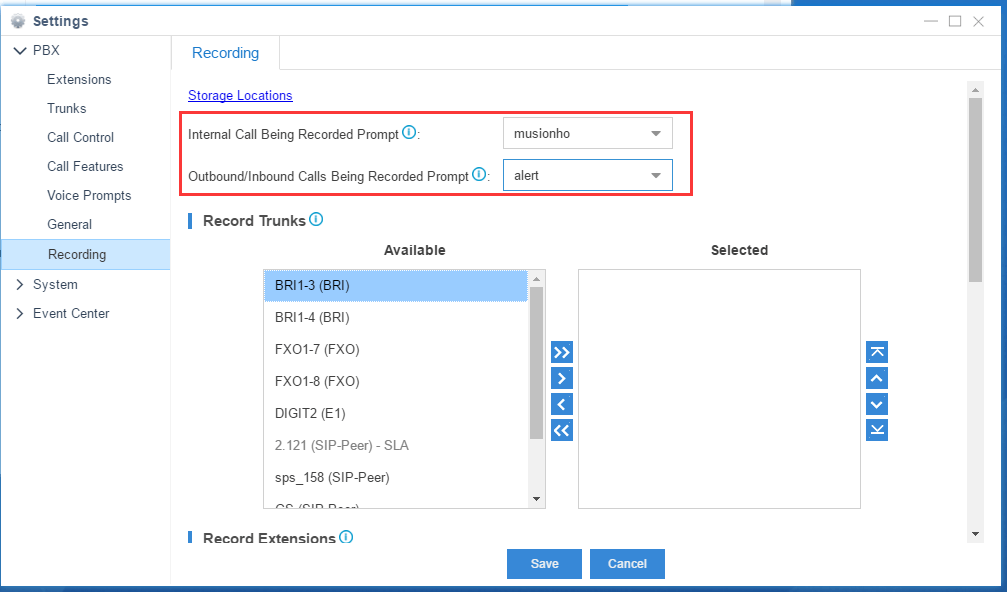
Quando è abilitata la registrazione delle chiamate, come comunicare alla parte chiamata che la chiamata verrà registrata?
1. Vai a Impostazioni → Centralino → Registrazione,
2. Imposta “Richiesta registrazione delle chiamate interne” e “Richiesta registrazione delle chiamate in uscita/in entrata”, poi fai clic su “Salva”.
Which ports should I forward if I want to use Linkus Mobile Client in a public network?
The default ports your need to forward are:
- Linkus server port: TCP 8111 & UDP 8111
- SIP port: UDP 5060
- RTP ports: UDP 10000-12000.
Note: TCP 8111 is only required when downloading and playing one touch recordings and voicemails in Linkus Mobile Client.
What’s the correspondence between time duration of recordings and usage of storage devices?
| Usage.Capacity of Storage Device | 50% | 60% | 70% | 80% | 90% |
| 1GB | 9.10 h | 10.92 h | 12.74 h | 14.56 h | 16.38 h |
| 2GB | 18.2 h | 21.85 h | 25.49 h | 29.13 h | 32.77 h |
| 4GB | 36.41 h | 43.69 h | 50.97 h | 58.25 h | 65.54 h |
| 6GB | 54.61 h | 65.54 h | 76.46 h | 87.38 h | 98.30 h |
| 8GB | 72.82 h | 87.38 h | 101.94 h | 116.51 h | 131.07 h |
| 16GB | 145.64 h | 174.76 h | 203.89 h | 233.02 h | 262.14 h |
| 32GB | 173.03 h | 207.64 h | 242.25 h | 276.85 h | 311.46 h |
| 64GB | 582.54 h | 699.05 h | 815.56 h | 932.07 h | 1048.58 h |
| 128GB | 1165.08 h | 1398.10 h | 1631.12 h | 1864.14 h | 2097.15 h |
| 256GB | 2330.17 h | 2796.20 h | 3262.24 h | 3728.27 h | 4194.30 h |
| 512GB | 4660.34 h | 5592.41 h | 6524.47 h | 7456.54 h | 8388.61 h |
| 640GB | 5825.42 h | 6990.51 h | 8155.59 h | 9320.68 h | 10485.76 h |
| 1TB | 9320.68 h | 11184.81 h | 13048.95 h | 14913.08 h | 16777.22 h |
| 1.5TB | 13981.01 h | 16777.22 h | 19573.42 h | 22369.62 h | 25165.82 h |
| 2TB | 18641.35 h | 22369.62 h | 26097.89 h | 29826.16 h | 33554.43 h |
| 3TB | 27962.03 h | 33554.43 h | 39146.84 h | 44739.24 h | 50331.65 h |
| 4TB | 37282.70 h | 44739.24 h | 52195.78 h | 59652.32 h | 67108.86 h |
Note: a one-second recording needs 16KB space. So a one-minute recording need 16KB/s*60s=960KB space.
Voglio utilizzare la musica di attesa in dotazione. Ho bisogno di una licenza?
I file musicali di attesa in dotazione sono distribuiti sotto la licenza Creative Commons Attribution-ShareAlike 3.0 tramite il permesso esplicito dei loro autori.
La licenza è disponibile qui.
Se non hai trovato la risposta nelle nostre domande frequenti, visita il nostro portale di supporto.