VoIP.ms SIP Trunk Configuration Guide
How to configure VoIP.ms SIP trunk with Yeastar S-Series PBX
Configure a SIP Trunk
1. Create an Account with VoIP.ms
To start with, you need to have an account from VoIP.ms. Please visit their website to get a SIP account: https://voip.ms/
2. Add a SIP Trunk in S-Series VoIP PBX
After you get the SIP trunk account, you need to add a SIP trunk in Yeastar S-Series VoIP PBX.
Go to Settings > PBX > Trunks, click Add.

3. Configure the VoIP.ms trunk
In the new window, select Canada/United States from the “Select Country” drop-down list and select VoIP.ms from the “ITSP”.
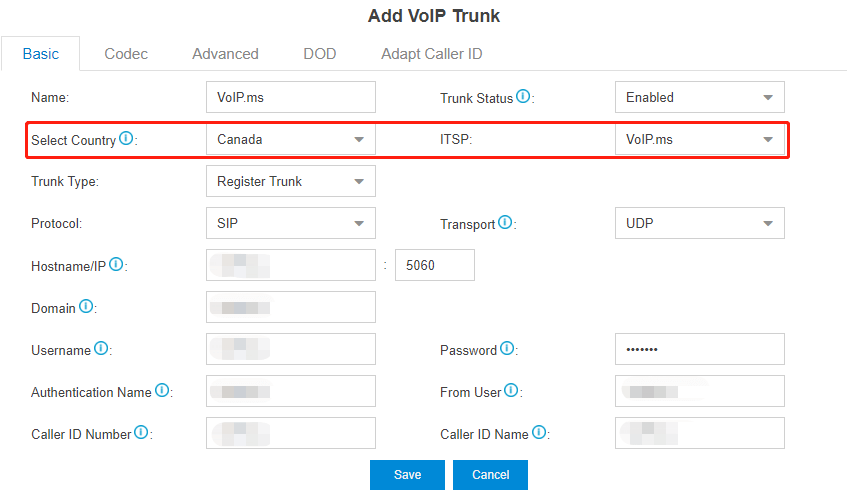
- Name: give this SIP trunk a name to help you identify it.
- Protocol: SIP.
- Trunk Type: Register Trunk.
- Transport: UDP.
- Username: your VoIP.ms Account username.
- Authentication Name: the same as the username.
- From User: the same as the user name.
- Password: your VoIP.ms Account password.
- Caller ID Number: your VoIP.ms Account DID number.
4. Check the Trunk Status
Click Save and Apply. Go to PBX Monitor to check if the SIP trunk is connected successfully as the screenshot below shows.

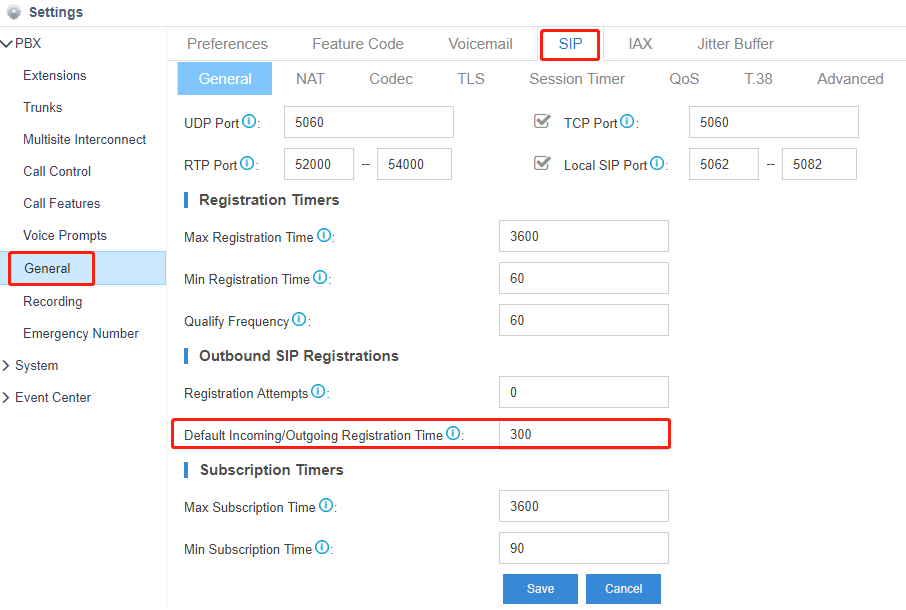
5. Set the Registration Time
Go to Settings > PBX > General > SIP > General, adjust the Default Incoming/Outgoing Registration Time into 300.
Configure the Outbound Route with VoIP.ms Trunk
To make outbound calls via the newly created SIP trunk, you need to configure an outbound route for the trunk.
1. Create an Outbound Route
Go to Settings > PBX > Call Control > Outbound Routes, click Add.

2. Configure the Outbound Route
The system compares the number with the pattern that you have defined in your route 1. If it matches, it will initiate the call using the selected trunks. If it does not, it will compare the number with the pattern you have defined in route 2 and so on. The outbound route which is in a higher position will be matched firstly.
You can adjust the outbound route sequence by clicking these buttons![]()
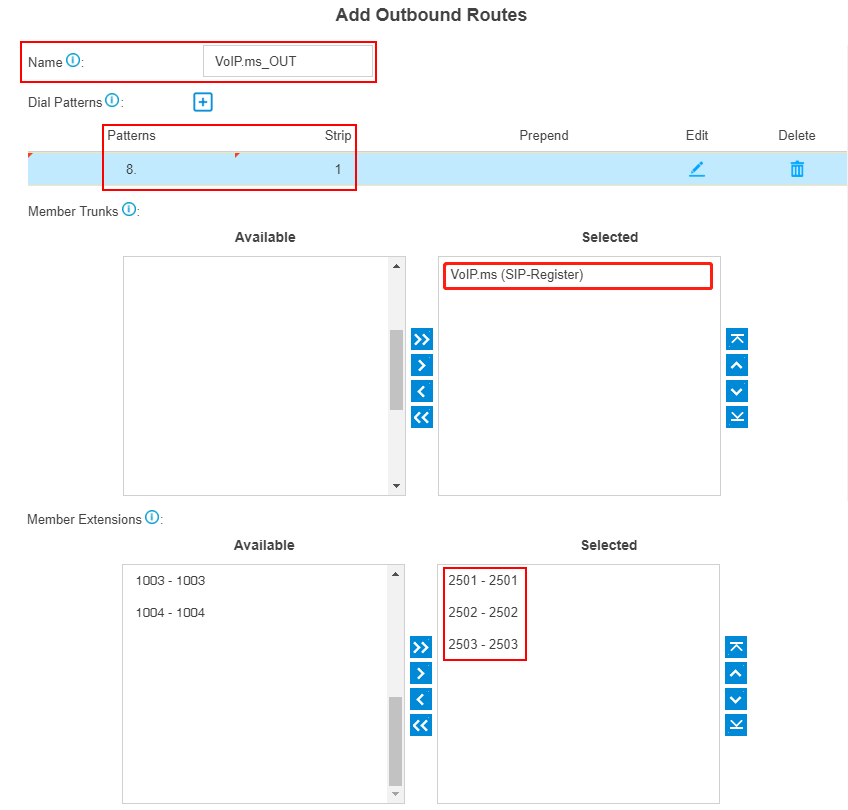
- Route Name: give this outbound route a name to help you identify it.
- Dial Patterns: set the dial patterns. As the settings below, to make calls via the SIP trunk, you need to precede the number to be dialed with the prefix 8.
- Dial Pattern: 8.
- Strip: 1
- Member Extensions: select the extensions that are allowed to make calls through the outbound route.
- Member Trunks: select the VoIP.ms trunk.
3. Click Save and Apply
Now you can make outbound calls through the VoIP.ms trunk. As the dial patterns configured above, you need to dial “8” before the destination number.
For example, to call the number “101234567”, you need to dial “8101234567” on your phone.
Configure the Inbound Route with VoIP.ms Trunk
To specify how calls from the VoIP.ms trunk should be routed, you need to configure an inbound route for the SIP trunk.
1. Create an Inbound Route
Go to Settings > PBX > Call Control > Inbound Routes, click Add.

2. Configure the Inbound Route
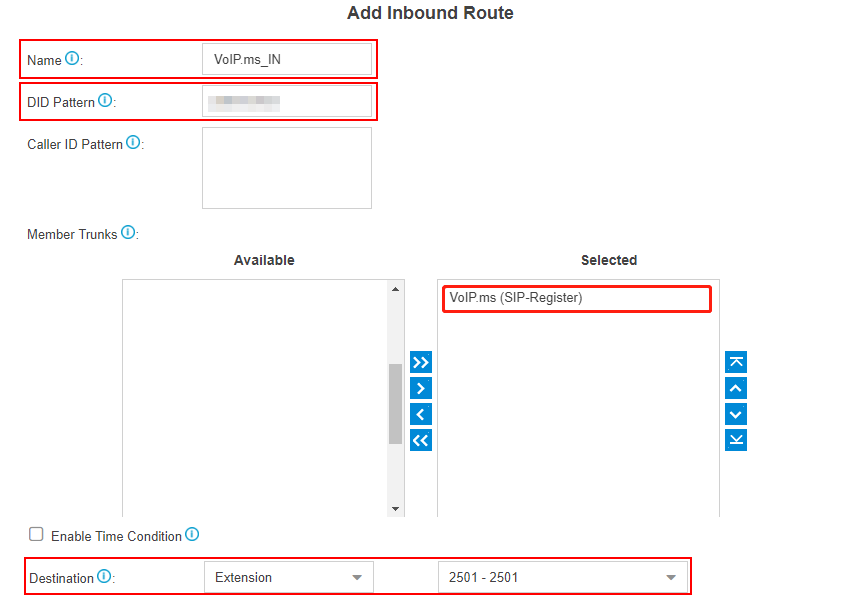
- Name: give this inbound route a name to help you identify it.
- Member Trunks: choose the VoIP.ms trunk.
- Destination: select the destination where the incoming calls will be routed.
3. Click Save and Apply
When you call in the SIP trunk, the call will be routed to the destination configured on the inbound route.