MyPBX FAQ
Is it possible for MyPBX to support unified communications and remote working?
Sorry but MyPBX Series is discontinued and it lacks unified communications support. You can look at P-Series PBX System, a “PBX-Plus-More” system, for full UC features, remote working adaptability, advanced call center features, and more.
How to secure MyPBX from attacks and fraudulent calls?
A. Please refer to MyPBX Security Configuration Guides for details.
How to change the default IP address of MyPBX?
The default IP address of MyPBX is 192.168.5.150, the network segment of which might be different from your network. So in order to make initial configuration, please change the default IP address first. Next we will show you how to change the default IP address in different cases.
The IP address of users PC and that of MyPBX are in different network segment.
A. For example:
In company A, the IP address of the gateway is 192.168.1.1.
The IP address of the user”s PC (PC A) is 192.168.1.10, subnet mask: 255.255.255.0, gateway: 192.168.1.1.
And the default IP address of MyPBX server is 192.168.5.150.
The user would like to change the IP address of MyPBX to 192.168.1.200, which is in the same segment with the company network.
Please follow the steps to change the IP address:
Step 1: Connect the LAN port of MyPBX to the Internet service via a cable and then power on MyPBX.
Step 2: Change the IP address of PC A to 192.168.5.0 segment.
a. Start-> Control Panel->Network and Internet Connection->Network Connection->Local Area Connection, and double click it. (See Figure1-1).
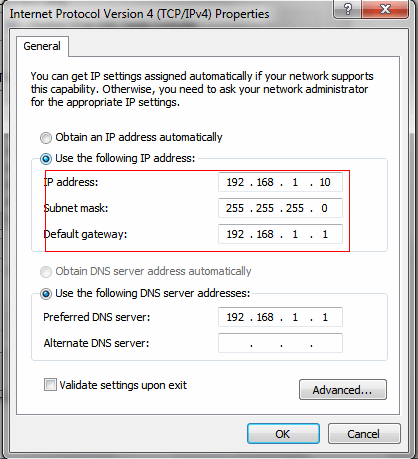
Figure 1-1
b. Click “Advanced”, and then click “IP settings” -> “IP address”-> “Add” (See Figure 1-2). In the popup window, enter an IP address with a same segment with MyPBX server (e.g.192.168.5.61, but please note that this IP address shall not conflict with the IP address on the existing network), see Figure 1-3.
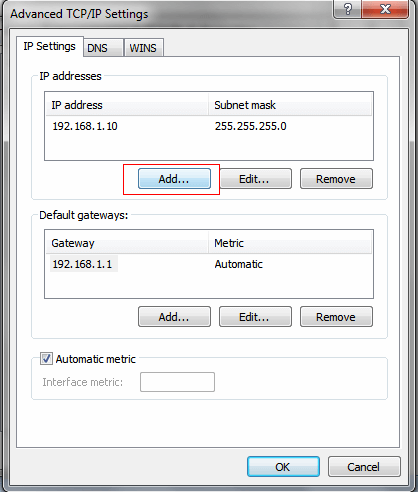
Figure 1-2
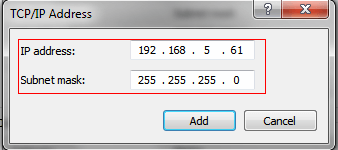
Figure 1-3
Step 3: Start the IE browser on PC A. In the address bar, enter the default IP address of MyPBX: http://192.168.5.150.
Step 4: Enter the user name and password when the login page appears.
Default user name: admin
Default password: password
Note: if you fail to reach MyPBX login page with http://192.168.5.150, please check if the indicator light is green. If not, please check the connection between the cable and the LAN port.
Step 5: After login, please select the “Systems” -> “LAN Settings”. The LAN Settings page appears (see Figure 1-4).

Figure 1-4
Step 6: Change the IP address on the “LAN Settings” page as below:
IP address: 192.168.1.200
Subnet Mask: 255.255.225.0
Gateway: 192.168.1.1
Primary DNS: 192.168.1.1
Then click “Save” to save the change (see Figure 1-5).

Figure 1-5
Step 7: After clicking “save”, the “Reboot Now” button will appear. Please click this button to reboot the server in order to apply the changes.
Step 8: After successful rebooting, the User could enter http://192.168.1.200 in the IE address bar to login the MyPBX configuration panel.
Step 9: The change of default IP address is completed.
The IP address of users PC and that of MyPBX are in the same network segment.
For example, the user would like to change the IP address of MyPBX to 192.168.5.11, the configuration steps are as follows:
Step 1: connect the LAN port of MyPBX to the Internet service via a cable and then power on MyPBX.
Step 2: start the IE browser on PC A. In the address bar, enter the default IP address of MyPBX: http://192.168.5.150.
Step 3: enter the user name and password when the login page appears.
Default user name: admin
Default password: password
Note: if you fail to reach MyPBX login page with http://192.168.5.150, please check if the indicator light is green. If not, please check the connection between the cable and the LAN port.
Step 4: after login, please select the “System” -> “LAN Settings”. The LAN Settings page appears (see Figure 1-6).
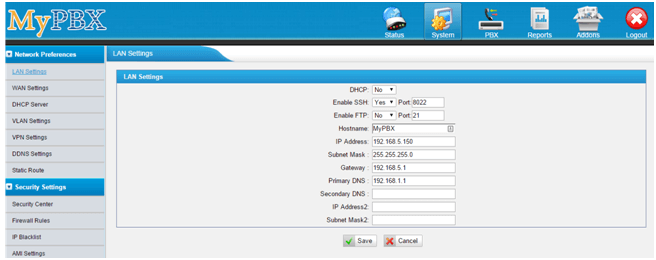
Figure 1-6
Step 5: change the IP address to 192.168.5.11 on the LAN Settings page and click “Save” to save the changes (see Figure 1-7).
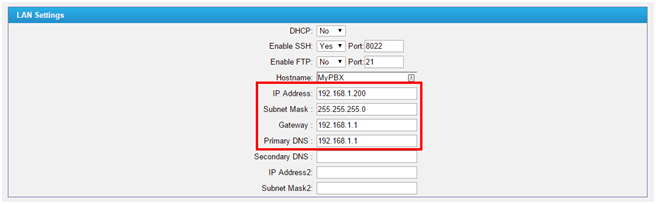
Figure 1-7
Step 6: after clicking “Save”, the “Reboot Now” button will appear. Please click this button to reboot the server in order to apply the changes.
Step 7: after successful rebooting, the User could enter http://192.168.5.11 in the IE address bar to login the MyPBX configuration panel.
Step 8: the change of default IP address is completed.
What’s the default IP address of MyPBX?
The default IP address is 192.168.5.150.
What’s the default username and password of MyPBX?
The default user name and password of MyPBX are: User name: admin Password: password
How can the extension user log in MyPBX and manage the relative settings of extension?
The login information of MyPBX User Web Interface is as below: IP address: same as MyPBX server User name: Extension number (e.g. 501) Password: voicemail access PIN # of this extension (e.g. 501) Note: the User is able to log in the User Web Interface only if the “User Web Interface” function is enabled by the admin in the Extension editing page.
What to do if the Web Configuration Interface of MyPBX shows “undefined”?
Retry after refreshing the IE web page; if the problem has not been solved, please delete the cookie and cache of the browser.
How to change the default User Extensions range of MyPBX?
On the Menu bar of MyPBX, click “PBX” -> “Basic Settings” -> “General Preferences”. In the “Extension Preferences” section, you can define the User Extensions range as you like.
How to change the extension number of FXS extension?
To change the extension number of FXS extension, please follow the steps below:
Step 1: select the FXS extension to be changed and click “Delete”.
Step 2: click “Edit”, and change the Extension number in the General section on the “Edit Extension” page.
How to add FXS extensions?
The number of FXS extensions (analog extensions) is determined by the number of S2 modules (one S2 module contains two FXS ports, i.e. 2 FXS extensions) and SO modules (one SO module contains one FXS port, i.e. 1 FXS extension) installed in MyPBX. So if you need to add FXS extensions, please make sure that there are empty module slots for S2 or SO module first.
Step 1: power off or unplug MyPBX.
Step 2: unscrew MyPBX, and open the upper case.
Step 3: insert the S2 or SO module into the corresponding slot and place back the upper case and tighten the 4 screws. Then power on MyPBX and new FXS extensions will be added successfully after rebooting.
How to register VoIP extensions on IP phone and softphone?
MyPBX have done successful compatibility testing with the mainstream IP phone brands, such as Yealink, Grandstream, Cisco, Polycom, snom, Panasonic, Digium, Aastra, etc. For detailed configuration manuals, please refer to the this link.
What to do if the registration fails even though the IP Phone is configured with the correct extension number, password and IP address in the LAN?
Please check if the value of IP phone UDP port is the same as that of MyPBX server (which could be checked by selecting “PBX”->”Advanced Settings”->”SIP Settings”). Please note that the default UDP port of MyPBX is 5060.
How to register remote VoIP extension?
Step 1: map the corresponding communication port of MyPBX on the router. The default value of communication port is as below:
UDP: 5060
UDP: 10000-12000
Step 2: on the “SIP Settings” page, enable “NAT” mode, and enter public IP address of the router in the blank of “External IP Address”.
Step 3: add a VoIP extension on MyPBX and enable “NAT” and “Register Remotely” on the “FXS/VoIP Extensions” page.
Step 4: in the external network, the IP phone could register to MyPBX server with the extension number set up on step 3.
For detailed configuration instructions, please refer to this guide.
What is Mobility Extension and how to configure it?
Mobility Extension is a mobile number that enjoys all the authority of internal extensions, like direct calling other extensions, calling through trunks and voicemail checking when the number calls into MyPBX.
How to configure Mobility Extension?
Step 1: click “PBX”->”FXS/VoIP Extensions”. Then select the extension to be configured with Mobility Extension and click “Edit”.
Step 2: in the “Other Settings” tab, enable Mobility Extension and enter the corresponding cell phone number. Then the configuration of Mobility Extension is completed.
For example: if the cell phone number entered is 15960111111, then when the user calls in MyPBX with this number, he will hear the ringback tone first, and then the dialing tone after getting through. At that time, the cell phone can operate all the functions of Mobility Extension.
Note: Because MyPBX recognizes the caller as Mobility Extension via the match of “Caller ID”, please note the following two points if you would like to use this function.
a. The trunk should be able to show Caller ID.
b. If Call back function is enabled, the Mobility Extension function will be invalid automatically.
How to add analog trunks?
The number of Analog trunks (i.e. FXO ports) is determined by the number of O2 modules (one O2 module contains two FXO ports, i.e. 2 analog trunks) and SO modules (one SO module contains one FXO port, i.e. 1 analog trunk) installed in MyPBX. So if you need to add analog trunks, please make sure that there are emtpy module slots for O2 or SO module first.
The steps to add analog trunks are as below:
Step 1: power off or unplug MyPBX.
Step 2: unscrew MyPBX, and open the upper case.
Step 3: insert the O2 or SO module into the corresponding slot and place back the upper case and tighten the 4 screws. Then power on MyPBX and new analog trunks will be added successfully after rebooting.
How to register a VoIP trunk?
In the configuration page of “VoIP Trunk”, click “Add VoIP Trunk”, and enter the following information in the popup window. (Take the IMS trunk provided by Chinamobile as an example.)
Provider Name: Chinamobile
Hostname/IP: the IP address provided by Chinamobile for registration (e.g.111.111.111.111)
Port: 5060
Domain: the domain provided by Chinamobile (e.g.ims.fj.chinamobile.com)
User Name: the user name provided by Chinamobile (e.g. 865921111111@ims.fj.chinamobile.com)
Password: the password provided by Chinamobile
From User: +8Call 6592111111
Maximum Channels: the number of the channels of each line you applied for (e.g.2)
Caller ID: +8Call 6592111111
Why does the registration sometimes fail, sometimes succeed when the device registers one or several VoIP trunks to the same provider?
To solve this problem, please select “PBX”-> Advanced Settings”-> ”SIP Settings”-> “Advanced Settings”, uncheck “Quality”, and then have a test. If the problem still exists, please check the firewall settings. If the firewall has been enabled, please add a rule in “Common Rules” to enable the pass of the UDP port: 5060 and UDP port: 10000-12000 for the registration IP address provided by the VoIP provider.
How to connect and configure BRI trunk?
Every BRI module purchased will be supplied with a RJ45-RJ11 cable. (The RJ45 connector is to connect the port offered by BRI provider while the RJ11 part is for the BRI port of MyPBX. See Figure 4-1.)
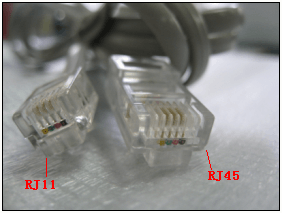
Figure 4-1
Step 1: connect BRI trunk as the above instructions and log in the web interface (“Status” ->”Trunk Status”) to check if the connection is successful. If the connection is successful, then the status will show “OK”. If not, please select the right type of signaling that the service provider requires in the “Edit BRI trunk” page. Note: the change of settings takes effect only after rebooting.
Step 2: configure inbound routes. One BRI trunk has two channels, i.e. two numbers. So if different destinations for them are preferred, two inbound routes should be defined for this BRI trunk and its two channels can be distinguished by DID numbers, that is, the two numbers of this trunk.
For example: The two numbers of the BRI trunk are 686867 and 686868. Then you can define two inbound routes (see Figure 4-2) to distinguish them.
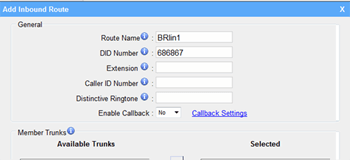
Figure 4-2
After the configuration, the incoming calls from BriTrunk9 would reach MyPBX via two routes: BRIin1 (call the number 686867) or BRIin2 (call the number 686868).
How to configure outbound routes?
Outbound routes are used to determine the authority or dial pattern for the extensions to make outbound calls to cell phones and landline phones, or make domestic long-distance calls and IDD calls.
Step 1: check if the selected trunks can be used in the “Trunk Status” page.
Step 2: select “PBX”->”Outbound Routes” and click “Add Outbound Route”.
For example, if the user would like to allow extensions 500-507 to make any outbound calls (i.e. any number starts with digit 0-9) via “PSTN4” trunk, please see Figure 5-1 for the detailed configuration. For more instructions, please refer to MyPBX User Manual.

Figure 5-1
How to configure inbound routes?
Inbound Routes are used to determine the destinations of incoming calls of different time (i.e. office hour, non-office hour, and holiday). The steps of configuration are as below:
Step 1: click “PBX”->”Inbound Routes” and “Add Inbound Route”.
Step 2: in the “Add Inbound Route” page, select the trunks that you prefer for this route and then select different destinations for incoming calls of different time (see Figure 5-2). For more instructions, please refer to MyPBX User Manual.
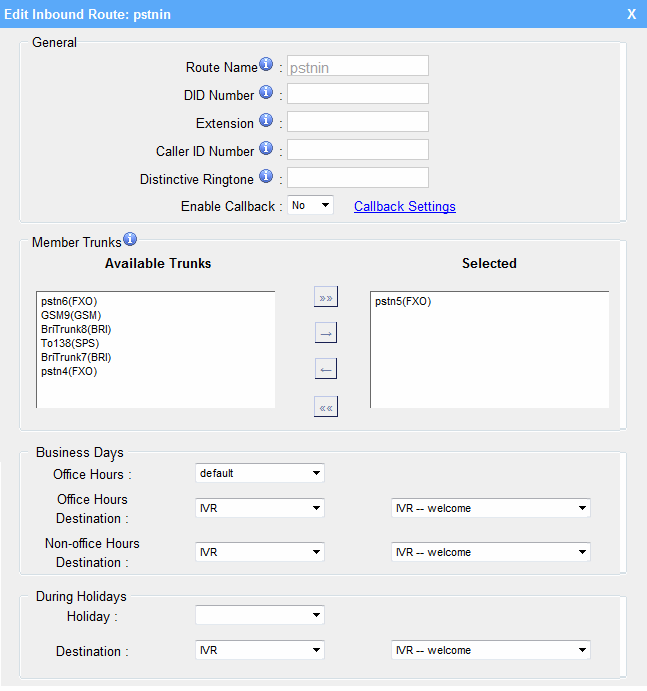
Figure 5-2
Why can’t the extension make outbound calls (to landline or cell phones)?
a. If the problem just happens to one specific extension, please check if this extension has been selected in the outbound route.
b. If the problem happens to all extensions, i.e. all extension cannot make outbound calls, please follow the below steps.
Step 1: please make sure that the connection of MyPBX and the telecom lines is ok, and check if the lines are available (log in MyPBX Web Configuration Panel and select “Status”->”Trunk status”).
Step 2: if the trunk is available to use, please check the configuration of outbound routes (click “PBX”->”Outbound Routes”).
1) Check if the configuration of “Dial Pattern” is correct.
2) Check if the expected trunk has been selected.
Why does the user hear the “toot toot” sound first when taking the phone off the hook before hearing the normal dialing tone?
That’s because the extension has new voicemails. Please dial the feature code “*2” to check the new voicemails. After all the voicemails have been checked, the “toot toot” sound would disappear.
Why does the user always hear the prompt that “The number you dialed cannot be reached now, please leave the message after the tone” when calling a specific extension?
The problem might result from one of the following configurations:
1. The extension has set up “Always transfer to voicemail”. The user can log in “User Web Interface” and uncheck the “Always transfer to voicemail” option.
2. The extension or the phone has enabled “DND” function.
1) If it is the extension that has enabled “DND”, then it can be canceled by entering the feature code (the default value is” *075”) on the phone. Also the user could log in “User Web Interface”, select “Settings” and uncheck the DND option.
2) If it is the phone that has enabled “DND” function, and you can see the “DND” on the phone screen, please cancel the “DND” function according to User Manual of the phone.
Why does the callback function fail when press the “RD” button on the phone directly (the screen displays “unfound”)?
It’s because that the callee replaces its caller ID with English letters. When the “RD” button is pressed to call back, the phone will call the callee’s “Caller ID” directly. But MyPBX system recognizes the callee only by “Extension number” rather than “Caller ID”. So the phone screen would displays “unfound”. Solution: Make the callee’s “Caller ID” equal to “Extension Number”.
Why do the inbound calls of a certain trunk would be hung up during a specific time period?
It is because that the system has enabled “Business Hours” and the destination of “Non-office hour” has been configured to “End calls” in the inbound routes. Please follow the steps to change the settings:
Step 1: figure out which is the trunk that has the problem and check all the inbound routes that use this trunk.
Step 2: solve the problem by changing the destination of “Non-office hours” in the “Edit Inbound route” page.
The extensions fail to make outbound calls or receive inbound calls. The admin logs in the Web Configuration Panel to check the problem, but the screen shows “502 Bad gateway”. After rebooting, everything goes OK, but the above problem repeats again a while later. What’s wrong?
It’s because that MyPBX has mapped the port to WAN without configuring firewall settings (i.e. no definition of corresponding common rules) and has been attacked. Please configure the firewall settings according to MyPBX User Manual.
Why the phone screen displays “unknown” instead of Caller ID when the caller calls through the analog trunk?
It might result from:
1) The trunk doesn’t have Caller ID service. In order to confirm it, please connect the PSTN line directly to the analog phone and call it via cell phone to check if there is Call ID on the phone. If there is no Caller ID, please contact the service provider.
2) Wrong settings of “Caller ID Start” and “Caller ID Signaling”.
In this case, please change their settings. (Select “Trunk”->”Analog trunk”, and select the right type for “Call ID Start “and “Caller ID Signaling” in the editing page)
Note: In China, you can try only “Bell-USA” and “DTMF” for “Caller ID Signaling”.
Why is the analog trunk always in busy status even when there is no call?
It results from the incorrect configuration of “Busy Detection”. Please log in the Web Configuration Panel and check if the value of “Busy Detection” is “yes” in the Analog Trunk editing page (the default value is “yes”).
1) If the value is “No”, please change it to “yes” and test if it’s OK then.
2) If the value is “Yes”, please set up other parameters of Busy Detection. In the case that you can get the parameters from your service provider, please configure them directly.
Why I can make outbound calls but cannot receive inbound calls through my analog trunk?
In this case, please check if the analog trunk has been selected in Inbound Routes.
1) If this trunk hasn’t been selected, please move it to the “Selected” box directly or add a new inbound route for it.
2) If this trunk has been selected in the right inbound route, the problem might be caused by the mismatch of signaling. Please select “Trunk”->”Analog trunk” and change the settings of “Caller ID Start” and “Caller ID Signaling”
Why I can make outbound calls but cannot receive inbound calls through my SIP trunk?
1) Please add a new inbound route for this SIP trunk alone and define “DID number” to enable it match all DID numbers (i.e. define the DID number as “.” which will match any remaining digits).
2) If this SIP trunk has several DID numbers and different DID numbers called are supposed to be led to different destinations, please add different inbound routes for each of them. If the problem still exists after the configuration, please click “PBX”->“Advanced Settings” ->”SIP Settings”->”Advanced Settings” and change the value of “To Field” to “To”.
Why does the user always hear the ring back tone when call in through analog trunk but the Internet extension has no response?
It is because of the mismatch of signaling. Please select “Trunk”->”Analog Trunk”, and change the value of “Caller ID Start” and “Caller ID Signaling” in the editing page.
Note: in most cases, the problem could be solved by changing the value of “Caller ID Start” from “Ring” to “Polarity”. But if not, please change it to other option.
What’s the application of MyPBX Callback feature and how to configure it?
When the callback feature is enabled, the user could dial an inbound route number and hang up after hearing the ring back tone or wait to be hung up by the system automatically. Then MyPBX will call the user via the trunk. After the call is getting through, the user could dial the number he wants to call. If you would like enable the Callback feature, please configure as below:
1) Click “PBX”->“Advanced Settings”->“Callback Settings”, and “Add Callback Rule”, enter the number that is allowed to be called back, i.e. Callback Number. (e.g. 15960111111).
2) Click “PBX”-> “Inbound Routes”, and select “Yes” for “Enable Callback” in the Inbound Route editing page. See Figure 6-1:
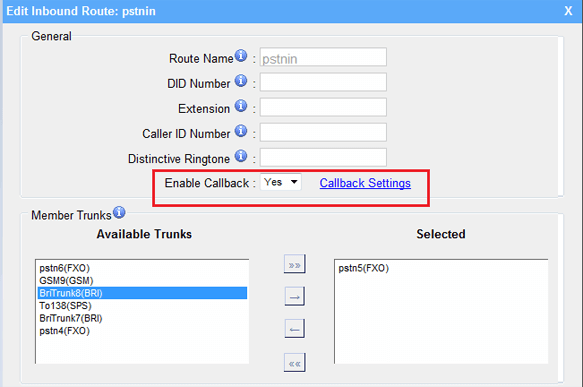
Figure 6-1
For example, in the above configuration, the trunk number is 5503301, and the user calls the number 5503301 via cell phone whose caller ID is Call 15960111111. After hearing the ring back tone, the user hang up the phone and MyPBX would call 15960111111 back via the trunk (5503301). Then the user could pick up the cellphone and dial the number he wants to call after hearing the prompt.
How to distinguish internal incoming calls from external via ringtone?
It can be distinguished by configuring the “Distinctive Ringtone” in MyPBX Inbound Route settings. For detailed instructions, please refer to MyPBX user manual.
Note: this feature must interoperate with the IP phones. The brands that have been tested are Yealink and snom.
How to make the incoming calls from different trunks have different ringtones?
It can be realized by configuring the “Distinctive Ringtone” in MyPBX Inbound Route settings. For detailed instructions, please refer to MyPBX user manual.
Note: this feature must interoperate with the IP phones. The brands that have been tested are Yealink and Snom.
How to configure if the user would like some extensions to enter the password before making outbound calls?
Solution No.1: click “PBX”->”Outbound Routes”, and set up password for the outbound route. In this way, all the selected extensions of this route must enter the password before making outbound calls.
Solution No.2: it can be realized by configuring PIN User. Click “PBX”->“Advanced Settings”->”PIN User Settings”, and add new PIN User. In the “Add PIN User” page, select the expected outbound routes and set up the PIN codes (not exclusive to one). In this way, the extension could make outbound calls only followed by entering the PIN code. In the settings of Figure 6-2, the extension 500 could first dial “*89” (default PIN User feature code), and enter “123” or “456” after hearing the prompt saying “please enter the PIN code”. When hearing the dialing tone, the user could make outbound calls.
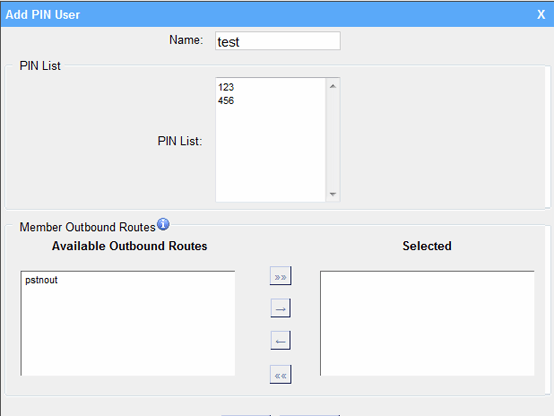
Figure 6-2
Why don’t the new settings take effect after the change?
After saving the change of settings, please don’t forget to click “Apply the changes” on the right corner of the page. Then 1-2 seconds later, the new settings could take effect.
How to change the system prompt?
Log in the Web Configuration Panel, and select “System Settings”->“System prompts” to change.
Note 1: if you select “Auto Detection” or “HTTP Download” as the Download Mode, please make sure that your device can access Internet first.
Note 2: if you select “TFTP” mode, please download the preferred system prompt first and then update it via TFTP server. Download link of system prompt is as below:
If the time in call logs is wrong, how to adjust it?
It’s because of the wrong “Date & Time” setting of the system. Please log in the Web Configuration Panel as the Admin, and click “System”->“System Preferences”->“Date and Time”. Adjust the time in the editing page.
Why is the time displayed of the server wrong even after the change of time zone?
It’s because that the device hasn’t been rebooted after the changes. Please reboot MyPBX after changing the time zone to make the new time take effect.
Why is the IP address in LAN/WAN settings different from that of System Info?
It’s because that MyPBX hasn’t been rebooted after changing the IP address. Please reboot the system and the problem would be solved.
Why does it fail when using MyPBX External Storage feature to auto back up the files?
Step 1: choose a Windows OS based PC as the Net-Disk server (note: only Windows OS is allowed).
Step 2: create a folder on this PC (e.g. folder name: share).
Step 3: create a text file named “status.txt” in the folder.
Step 4: share the folder and enable “permission of everyone to read and execute”.
Note: if your PC is Windows 7 OS based, please enable “permission of everyone to read and execute” and do not back up in C-disk.
How to configure the VPN settings?
The steps of configuring VPN settings are as below:
Step 1: in the Web Configuration Panel, select “System”->”VPN Settings”, and decide which VPN type you want to enable.
Step 2: click “Scan”, select the correct VPN configuration packet and click “Import”.
Step 3: reboot MyPBX.
Step 4: after rebooting, please select “Reports”->”System Info” to check if the VPN has been successfully connected. Once successfully enabled, the screen would show the status as “connected” with other information such as IP address.
Note: the VPN configuration packet should be in “*.tar” format.
1) The packet should include all the keys and certificates of the VPN server and client, and the configuration files of the clients. All the information is supposed to be offered by VPN service provider. (The name of the *.tar file can only be composed of number, letter, “-”and “.”.)
2) Because MyPBX is based upon UC Linux, all the VPN client configuration files should be in “*.conf” format (The Windows OS is using “*.ovpn” format.)
3) Please do not enable “user” and “group” in the client configuration files, or VPN could not be enabled successfully on MyPBX. Please configure as Figure 7-1 shows:
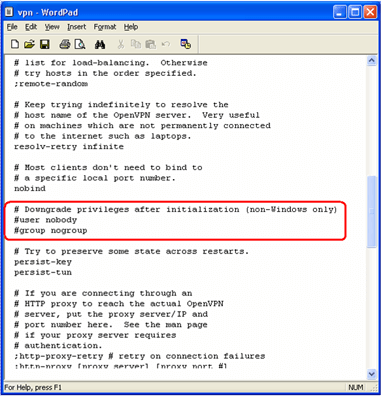
Figure 7-1
4) If your VPN cannot work well on MyPBX, please make sure it can work normally on your windows (Win2000/XP/Vista/7) or MAC OS. (Please note that if the VPN is running under Window 7 OS, it is required to use the mode that is compatible with Window XP OS and run as the administrator.)
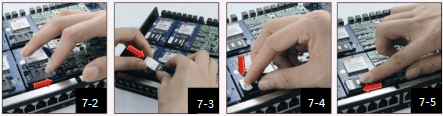
If MyPBX is installed with GSM/CDMA/UMTS modules, how can I insert the SIM cards in the device?
Step 1: power off or unplug MyPBX.
Step 2: unscrew MyPBX and open the upper case.
Step 3: move the card slot towards the direction of the sign slightly (as Figure 7-2)
Step 4: insert the SIM card into the card slot (as Figure 7-3) and pull it down (as Figure 7-4). Step 5: move the card slot back and lock the card (as Figure 7-5).
Which modules are supported by MyPBX models respectively?
|
Models | Modules
|
S2
|
O2
|
SO
|
B2
|
GSM
|
CDMA
|
UMTS
|
|
MyPBX SOHO
|
√
|
√
|
√
|
√
|
×
|
×
|
×
|
|
MyPBX Standard
|
√
|
√
|
√
|
√
|
√
|
√
|
√
|
|
MyPBX U100
|
√
|
√
|
√
|
√
|
√
|
√
|
√
|
|
MyPBX U200
|
√
|
√
|
√
|
√
|
√
|
√
|
√
|
|
MyPBX U300
|
×
|
×
|
×
|
×
|
×
|
×
|
×
|
|
MyPBX U5 Series
|
√
|
√
|
√
|
√
|
√
|
√
|
√
|
If you didn’t find your answer in our FAQs, please visit our support portal.