N824 FAQ
Why choose Yeastar N824 smart PBX?
Yeastar N824 smart PBX is a hybrid IP-PBX, which is mainly deployed with analog endpoints and a few SIP endpoints. It suits for SMB with existing CO lines and analog endpoints and only needs a few SIP trunks.
Compared with MyPBX, N824 has some useful features that MyPBX doesn’t have. Like Camp-on Busy, Automatic Update, Auto CLIP and so on.
How many FXS ports and FXO ports does N824 have? Should I install extra modules and extend the ports by modules?
N824 is embedded with 24 fixed FXS ports and 8 fixed FXO ports, so you don’t need to install extra modules.
How many SIP extensions and trunks could I create in N824?
At present it allows you to create 8 SIP extensions and 8 VoIP trunks. It may be extended in the future version.
Does N824 support recording?
Yes, it does. You can use the call recording feature free without extra license.
What is the maximum storage size of SD card that N824 supports?
N824 can support up to 64GB SD card.
How many concurrent calls do N824 support?
N824 supports up to 16 concurrent calls.
How to change the default IP address of N824?
The default IP address of N824 is 192.168.5.150, the network segment of which might be different from your network. So in order to make initial configuration, please change the default IP address first. Next we will show you how to change the default IP address in different cases.
How could I change the IP of N824?
The default IP of N824 is 192.168.5.150.
1) If you are in the same IP segment with N824, you can access its Web interface directly. And change the IP as required in LAN settings. The new IP address will take effect after reboot.
2) If you are not in the same IP segment with N824, you need to add an IP of segment 192.168.5.0 for your PC. After that you access N824 web interface by entering the default IP address. Then you can change the IP as required in LAN settings. The new IP address will take effect after reboot.
How to make and receive calls in N824?
1) Making calls
Go to the menu (PBX>Outbound Call Control>Outgoing Rules) on N824 Web interface. Click the “Add Outbound Route” or edit the existing outbound route. Then follow the steps:
Step 1. Fill the Route Name, and select the Password, T.38 support, Rrmemory Hunt, Office Hours as required.
Step 2. Configure the Dial Patterns, the 3 fields Dial Pattern, Strip, Prepend combine as a matching rule. For example, if we set the Dial Pattern: “9.”, Strip “1”, Prepend: blank. And you dial 95503301. N824 will dial 5503301 out from one selected line.
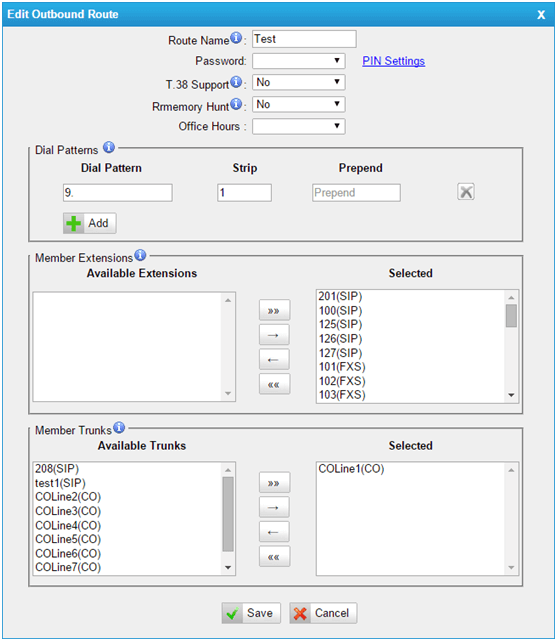
For more details about the 3 fields, you can move the mouse pointer to the icon , then it will show the feature description.
Step 3. Select the Member Extension, move the required extensions to the “Selected” box so that they can dial out from this route.
Step 4. Select the Member Trunks, move the required trunks to the “Selected” box.
Step 5. Save the changes, and click “Apply Changes” to take effect.
2) Receiving calls
Go to the menu (PBX>Inbound Call Control>Incoming Rules) on N824 Web interface. Click the “Add Inbound Route” or edit the existing inbound route. Then follow the steps:
Step 1. Fill in the Route Name, DID number (it is not needed if you use CO line), Caller ID Number (this is caller ID number restriction, generally you don’t need to configure) as required.
Step 2. Select the Member Trunks, move the required trunks to the “Selected” box.
Step 3. Select Office Hours, in this box, you can choose the business hours you configured in the Business Hours menu (PBX>Basic Settings>Business Hours). Then incoming call will be routed to the right destination by the time define in the business hours. If it is not selected in this box, the incoming call will be all routed to the Office Hours Destination.
Step 4. Select Destination, in these boxes, you can select a destination like to a specific extension.
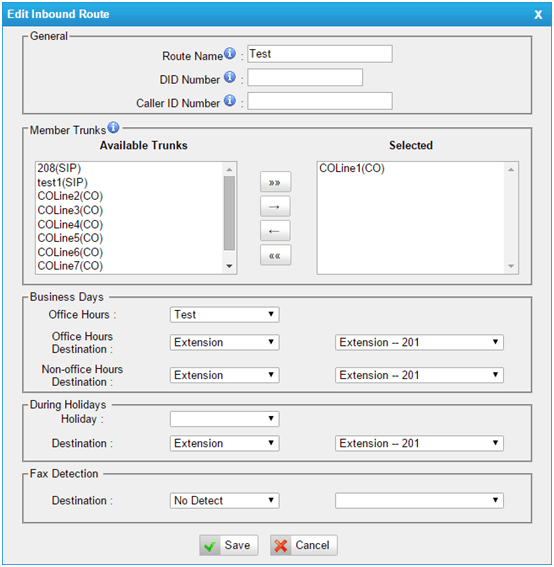
Step 5. Save the changes, and click “Apply Changes” to take effect.
How to check voicemail in N824?
1) Checking voicemail by phones
To check the voicemail of a specific extension, the default feature code is *2. Dial *2 on this phone, and enter the voicemail PIN code to access your voicemail. The default voicemail PIN number is the same as the extension number. The password can be changed on the extension edit page.
You can also check voicemail of other extensions on your own handset by using feature code *02. Dial *02 on your phone to enter the voicemail main menu. Entering the desired extension number and followed by the extension voicemail PIN, you will be able to check the voicemail.
2) Checking voicemail on web
Before logging in N824 web interface by using the extension User account, go to the extension edit page (Account tab) to enable “User Web Interface” option and configure the Password for the extension. Then login with the user name (extension number) and the right password you configured.
How to upgrade the firmware for N824?
There are 3 ways to do that: Automatic Update, Upgrade through HTTP, Upgrade through TFTP. For more details, you can refer to the N824 user manual.
How to configure the recording in N824?
1) Go the menu (System>Auto Recording Settings>Recording Settings>General Preferences) on N824 web interface. Check the “Enable Call Recording” with “Yes”.
2) Select storage location and set up the storage
3) Select the recording type among the 3 options “Allow to Record Inbound”, “Allow to Record Outbound”, “Allow to Record Internal”. Check the recording type option as required.
4) Unfold the “Apply To” section to define what extension, trunk, conference you need to record.
For the detailed instructions, please refer to the N824 user manual.
How to configure and strengthen the security settings for N824?
As N824 supports SIP and HTTP web access, user and external endpoints will access the N824. So it’s necessary to configure the security settings in N824. There are several aspects you can configure:
1) Password and port Enhancement
2) Firewall configuration
3) Service security
4) Calling rules restriction
For the detailed instructions, please refer to MyPBX Security Configuration Guide (the security configuration of N824 is similar with MyPBX).
Why I can’t login the web interface after upgrade or the web interface shows in disorder?
Retry after refreshing the browser web page; if problem persists, please delete the cookie and cache of the browser.
Why I can’t receive the voicemail email from N824?
1) Make sure the email address, password, port are correct. If you are using TLS, please check the corresponding option.
2) Make sure the “Enable Voicemail” and “Enable Send Voicemail” options are both checked on the extension edit page.
3) Make sure the SMTP test is successful (Go to the PBX>Basic Settings>Voicemail Settings).
4) Make sure the DNS in the LAN settings is able to parse the SMTP server you filled in the Voicemail settings. You can try to fill with a universal DNS like 8.8.8.8 or 8.8.4.4. Note that the new DNS will take effect only until you reboot your system.
5) If the issue persists, please seek help from our support.
Why there is no caller ID from the PSTN line?
This might result from:
1) The trunk doesn’t have caller ID service. In order to confirm it, please connect the CO line directly to the analog phone and call it via cell phone to check if there is caller ID on the phone. If there is no caller ID, please contact the service provider.
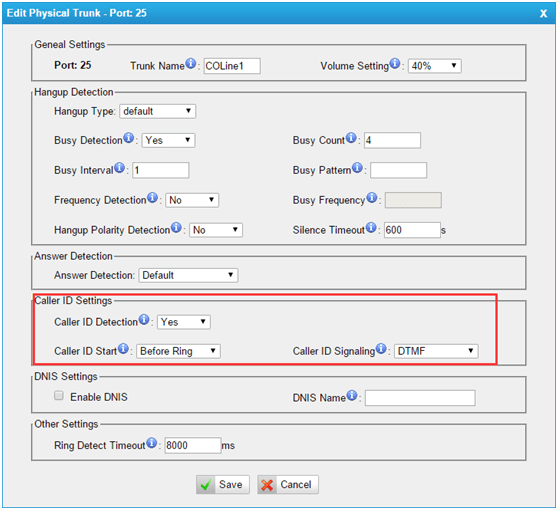
2) Wrong settings of “Caller ID Start” and “Caller ID Signaling”.
In this case, please change their settings. Go to the menu (PBX>Extensions and Trunks>Trunks), then select the right trunk and select the right type for “Call ID Start” and “Caller ID Signaling” in the edit page. As well as check the “Enable Caller ID Detection” with “YES”.
3) If you can’t get the right Caller ID signaling information. You could help make a signal trace for us by following the guide. Then seek help from our support with the trace.
Note: the guide is for MyPBX, however, the operation is similar in N824. And the port number in N824 starts from 25. So if you want to trace the port 25, you can adjust the command like: dahdi_monitor 25 -r rx.raw.
Why N824 can’t detect hang-up from the PSTN line?
It might be that the current hangup detection is not suitable for the busy signal from the CO line. You can follow the guide to configure the hangup detection settings on the trunk edit page (PBX>Extensions and Trunks>Trunks). If it is not easy, you can seek help from our support with the trace.
Note: the guide is for MyPBX, however, the operation is similar in N824. And the port number in N824 starts from 25. So if you want to trace the port 25, you can adjust the command like: dahdi_monitor 25 -r rx.raw.
How could I troubleshoot in N824? What logs could I get?
N824 provides the System Logs and Packet Tool for users to troubleshoot.
In the System Logs menu, you can get hardware log, web log and debug log. The 3 logs own different information. You can refer the following instruction.
Hardware log: it will print the every event during the booting process in the log.
Web log: it will record the operations on the web interface. Like login user, login IP, changing password, modifying the extensions and so on.
Debug log: it will include the Asterisk CLI logs. When you enable this option, it’s recommended to check the “Debug” option. For “Enable SIP Debug” and “RTP SIP Debug” options, it is useful when you have problems with SIP extensions.
Note: usually you may not understand the meaning of the logs, so it’s recommended to send us the right logs depending on your problems for help.
If you didn’t find your answer in our FAQs, please visit our support portal.
 Unified Communications

 Yeastar announced the Disaster Recovery solution for the P-Series Phone System, empowering enterprises with cross-region redundancy for uninterrupted communications in the face of disasters.